This document is designed to allow developers to quickly understand the development process and steps of TPU-KERNEL, as well as related test steps; it does not involve specific code descriptions, development skills and API usage references. If you need to know more about it, you can refer to “TPU-KERNEL Technical Reference Manual.pdf”.
TPU-KERNEL Overview
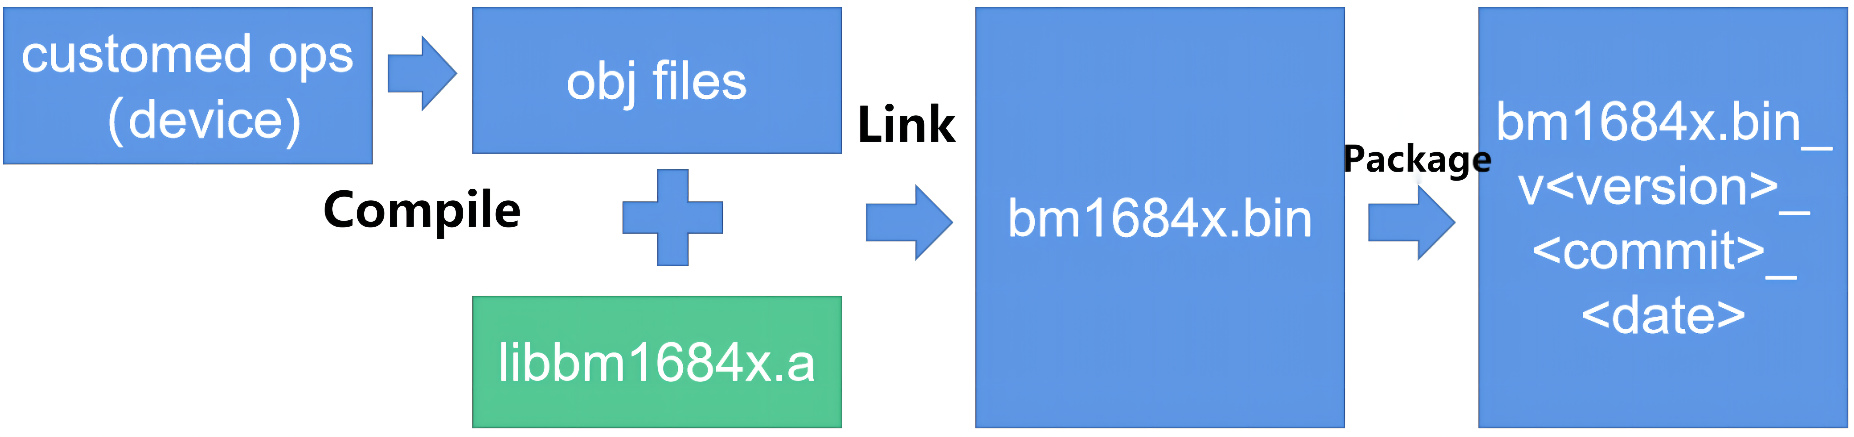
TPU-KERNEL provides users with a development environment for programming directly on TPU devices. Developers can write custom operators on the device (TPU), link with the firmware library provided by TPU-KERNEL, and package them into firmware that can run on the TPU. After downloading to the device, call it in the application of the host to achieve the purpose of using the TPU to accelerate the calculation.
The TPU contains a single-core A53 ARM processor (A53Lite), through which the actual computing units of the TPU are configured and run. Therefore, the compilation of the firmware needs to use the aarch64-none version of the cross-compilation tool.
The following is the basic process of compiling firmware. Developers use TPU-KERNEL to call the device’s API to implement their own operators. After completing the coding, use the cross-compilation tool to compile it into an obj file, and then link it with the base library libbm1684x.a provided by TPU-KERNEL to form a complete firmware program. Then use the packaging tool to add the device id, version number and other information in the firmware to form a file named bm1684x_v<VERSION>-<COMMIT>-<DATE>.
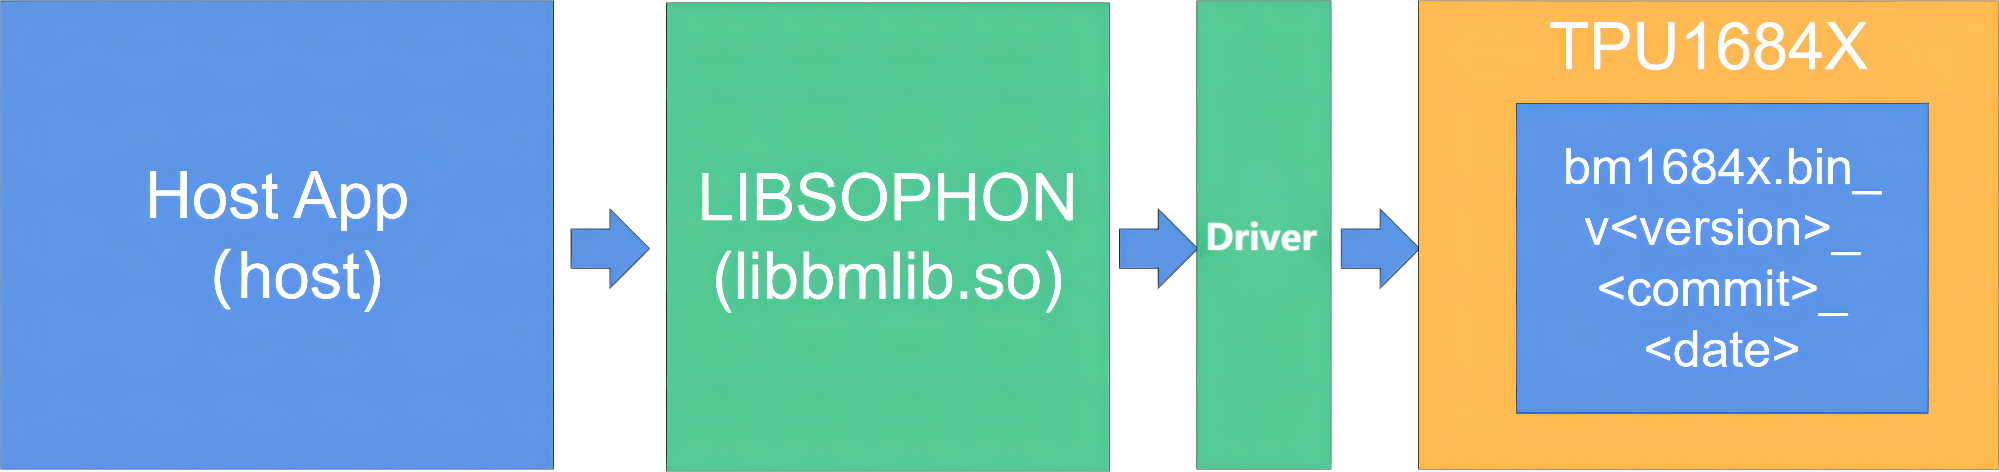
The usage process is as follows. First of all, load the firmware into the TPU using the tools provided. The TPU-KERNEL communication function in LIBSOPHON (libbmlib.so) will be called in the host program, and the operator parameters and input and output addresses will be sent to the firmware through the driver to finally achieve the purpose of operation.
The following is the directory structure of the TPU-KERNEL development package
├── README.md # Environment initialization documentation
├── doc/
│   ├── TPU-KERNEL Quick Start.pdf
│   └── TPU-KERNEL Technical Reference Manual.pdf
├── scripts/
│   ├── envsetup.sh # Environment initialization script, setting cross toolchain
                    #   and environment variables
│   ├── build_firmware.sh # Compile the firmware script
│   ├── firmware_pack.py  # Firmware packaging script, which will be
                          #   called in build_firmware.sh
│   ├── load_firmware.py  # Load firmware script
│   └── firmware_info.py  # View the internal information of the firmware
├── include/
│   ├── tpu_defs.h # Common definitions related to TPU, such as types,
                   #   enumerations, macros, etc.
│   │              # Can be used in device and host programs
│   ├── tpu_fp16.h # Definitions of FP16
│   ├── common.h   # Some common definitions, such as data types, etc.
│   ├── device/tpu_kernel.h  # The tpu-kernel instruction calls the interface,
                             #   which can only be called in the device code
│   └── ...
├── lib/
│   ├── libbm1684x.a # Base library for device code linking
│   └── ...
├── samples/         # Some examples are used to demonstrate project structure
                     #   and test performance
│   ├── README.md    # Instructions for use of samples
│   ├── host/        # Code running on the host
│   ├── device/      # Code running on device, custom operators
│   ├── include/     # The data structure of the communication protocol between
                     #   host and device
│   ├── CMakeList.sh # Build script
│   └── ...
└── firmware/
    └── bm1684x.bin_v<VERSION>-<COMMIT>-<DATA> # Original firmware
TPU-KERNEL Environment Initialization
Dependency Introduction
The development of TPU-KERNEL needs to use the following cross-compilation chain, you can directly click the link to download, or use our script to automatically initialize, which will be introduced in detail below
In addition, the host program development of TPU-KERNEL needs to rely on LIBSOPHON and the driver environment. You can download the SDK from the official website , which includes:
sophon-libsophon_*.deb
sophon-libsophon-dev_*.deb
sophon-driver_*.deb
Initialization Steps
Install the LIBSOPHON environment, if you have already installed it, skip this step.
# Put the relevant packages of LIBSOPHON in the current directory
sudo dpkg -i sophon-driver*.deb
sudo dpkg -i sophon-libsophon*.deb
Initialize the compilation environment.
# The downloaded tpu-kernel_v<VERSION>_<COMMIT>_<DATE>.tar.gz is placed
#   in the current directory
# Unzip and enter the extracted directory

# If you have downloaded the above cross-compilation tool, you can put
#   it in the same directory, such as /home/`whoami`/compilers
# Then export CROSS_TOOLCHAINS=home/`whoami`/compilers

# Execute environment initialization script
source scripts/envsetup.sh

# If the CROSS_TOOLCHAINS environment variable is not set,
#    it will set CROSS_TOOLCHAINS=../toolchains_dir
# If there is no required cross-compilation tool in the directory set by CROSS_TOOLCHAINS,
#    The corresponding cross-compilation tool will be automatically downloaded from
#      the Internet and decompressed into this directory
# Set TPUKERNEL_TOP=`pwd`
PCIE Mode
PCIE mode development is suitable for development on machines with PCIE boards. After the relevant programs include the host computer application and firmware, the firmware can be directly loaded and run.
After initializing the environment, it is in this mode by default.
# The command line prompt has a `(pcie)` prompt on the far left.
(pcie)my/current/work/path $
Switch to this mode with use_pcie.
CMODEL Mode
CMODEL mode development is suitable for situations where there is no TPU device, or when you use gdb directly on the machine to debug the code. CMODEL uses x86 machines to simulate TPU devices, which runs relatively slowly, but can directly use gdb to debug device code, which is also a commonly used mode in the development process. When the debugging in CMODEL is completed, you can switch to PCIE or SOC mode and run the program on the actual device.
Switch to this mode with use_cmodel.
# The command line prompt has a `(cmodel)` prompt on the far left.
(cmodel)my/current/work/path $
SOC Mode
SOC mode develops TPU devices suitable for SOC. The basic workflow is to cross-compile the application and corresponding firmware on an x86 machine, then copy it to the SOC device, load the firmware first, and then run the application.
In this mode, you need to initialize the environment according to “SOC MODE” in the “Development with libsophon” chapter of “LIBSOPHON User Manual”, and set the directory path of soc_sdk to the SOC_SDK environment variable , to specify the sdk location of the soc.
# /path_to_sdk/soc_sdk is just an example and needs to be modified
#   according to the actual settings.
export SOC_SDK=/path_to_sdk/soc_sdk
Switch to this mode with use_soc.
# The command line prompt has the `(soc)` prompt on the far left.
(soc)my/current/work/path $
Samples’s Instructions
The samples in TPU-KERNEL provide a series of examples of operator development and use, and also provide batch test scripts, which can test the performance of TPU under different parameters.
Project Layout and Compilation
The current project layout is the recommended development method for actual operator development. It contains automatic build scripts, which can package and load firmware and compile host programs. The main directory or file description is as follows:
├── CMakeLists.txt # Host program and firmware automatic build script
├── device/        # The custom operators running on the device will generate
                   #   firmware together with libbm1684x.a
├── host/          # Application on the host
├── include/       # Contains definitions of data types or structures that can be used or
                   #   shared by both the host and the device
└── test/          # Batch test script
PCIE Mode Compilation
cd samples
# Currently in the tpu-kernel/samples directory

mkdir build && cd build

# Compile the Release version of the host program
cmake ../

# If you want to compile the Debug version of the host program, you can execute
# cmake ../ -DCMAKE_BUILD_TYPE=Debug

# Compile the custom operator in the device directory and link it with libbm1684x.a
# Generate firmware/bm1684x.bin_v<VERSION>-<COMMIT>-<DATE>
make firmware

# Since the host program uses the BM1684X device with device_id=0,
# So only the compiled firmware can be loaded to the device with device_id=0 and BM1684X
make load

# After the loading is successful, you can use the dmesg command, and the
#   following output will be displayed

# ...
# [   14.505087] bmdrv: bmsophon0 firmware init done!, status = 0x6125438
# [   14.505168] bmdrv: firmware load success!
# ...

# Compile the host's application
make -j
CMODEL Mode Compilation
cd samples
# Currently in the tpu-kernel/samples directory

mkdir build_cmodel && cd build_cmodel

# For the convenience of debugging, the Debug version of the program is compiled by default
cmake ../

# Compile the custom operator in the device directory and link it with libbm1684x_cmodel.so
# Generate libfirmware_cmodel.so in the current directory
make firmware

# Specify the firmware of the generated cmodel version,
# set_cmodel_firmware is a command provided by envsetup.sh
set_cmodel_firmware libfirmware_cmodel.so

# Compile the host's application
make -j
SOC Mode Compilation
cd samples
# Currently in the tpu-kernel/samples directory

mkdir build_soc && cd build_soc

# By default, the Release version of the program is compiled
cmake ../

# Compile the custom operator in the device directory and link it with libbm1684x.a
# Finally generate firmware/bm1684x.bin_v<VERSION>-<COMMIT>-<DATE>
make firmware

# Compile the host's application
make -j

# Collect related files used on soc
# The install folder will be generated in the current directory
make install
The running method is different from PCIE and CMODEL. The running method is as follows.
Copy all the install folders generated in the current directory to the SOC device.
# Suppose:
# 1. Logged in to the soc device and copied the install folder
# 2. There is a complete libsophon environment that matches the version
#      and the SDK used for compilation
# 3. The current directory is the install directory

# Load firmware
python3 scripts/load_firmware.py --firmware firmware/bm1684x.bin*

cd bin
# Run the test program, take tpu_crop as an example
# Single run
./tpu_crop
# Batch test
python3 ../test/batch_test_crop.py
Operators Description
After the compilation in the previous step, the following applications will be generated in the current build directory, corresponding to the operators to be explained below, and there will be batch test scripts related to batch_test_xxx.py in ../test for performance testing.
tpu_gemm
tpu_database_topk
tpu_database_group_topk
tpu_multi_crop_resize
tpu_rgb2yuv
tpu_yuv2rgb_formula
tpu_yuv2rgb_lookup_table
tpu_warp_affine
tpu_warp_affine_bilinear
tpu_crop
tpu_rpn
tpu_hanming_distance
tpu_image_resize
tpu_pad
tpu_crop_and_resize
tpu_resize_using_lut
tpu_yuv_deinterlace
tpu_test_instrutions
Note: The above program can only run on the BM1684X device with device_id=0
tpu_gemm
GEMM (General Matrix Multiplication) is a typical operation of TPU, this example will calculate two matrix multiplications of shape M*K and K*N.
Relevant documents include
include/tpu_api_protocol.h
host/tpu_gemm.cpp
device/tpu_device_gemm.c
test/batch_test_gemm.py
The following are related usage instructions for the tpu_gemm command:
# Print Instructions for Use
./tpu_gemm -h
# The output is as follows
# --L_ROW(-m) xxx   : Left matrix row, there is no limit on the maximum if cpu side can malloc enough memory, default 10
# --L_COL(-k) xxx   : Left matrix columns, there is no limit on the maximum if cpu side can malloc enough memory, default 10
# --R_COL(-n) xxx   : Right matrix columns, there is no limit on the maximum if cpu side can malloc enough memory, default 20
# --idtype(-i) xxx   : input data_type, 5:FP32, 3:FP16, 1:INT8, 0:UINT8, 7:INT16,
#                       6:UINT16, 9:INT32, 8:UINT32, 11:BFP16 default: FP32
# --odtype(-o) xxx   : output data_type, default: FP32
# --seed(-s) xxx   : set test seed
# --compare(-c) xxx   : need compare result, default=1
# Note: about the combination(idtype/odtype) of idtype & odtype, support the below list:
#  FP32/FP32, FP16/FP16, FP16/FP32, BFP16/FP32, BFP16/BFP16, INT8/FP32, INT8/INT32,
#  INT8/INT16, INT8/INT8, UINT8/FP32, UINT8/UINT32, UINT8/UINT16, UINT8/UINT8,
#  UINT16/UINT32, UINT16/INT32, INT16/UINT32, INT16/INT32

# Run with default parameters
./tpu_gemm
# The output is as follows
# L_row=10, L_col=10, R_col=20, L=F32, R=F32, Y=F32, time=13(us) --> success

# Batch test, since local matrix calculation is required to compare the results,
# the running time is relatively long, and the GEMM.csv file will eventually be generated

# Running batch test on PCIE platform
# test without compare
python3 ../test/batch_test_gemm.py 0
# test and compare (not recommended for cmodel, SOC platform or performance-only test)
python3 ../test/batch_test_gemm.py 1

# Running batch test on SOC platform
# limit device mem resource and disable compare
MAX_MEM=2*1024*1024*1024 python3 ../test/batch_test_gemm.py 0
tpu_database_topk
The whole database TopK is an operation based on the pedestrian database scenario simulation. The data structure and parameters are as follows:
It is assumed that each pedestrian data has four attributes: database ID, gender, whether to wear a hat, and confidence.
There are a total of db_num databases
All total_people_num data are randomly distributed in these db_num databases according to the database ID
The operation process of the operator is as follows:
Select the data of db_sel_num databases from db_num databases, and set data filtering options according to gender, whether to wear a hat, and confidence, and use TPU to perform data filtering
At this time, the filtered data are mixed together, and the top K maximum values and the corresponding original index are selected according to the confidence attribute of these data.
Related files:
include/tpu_api_protocol.h
host/tpu_database_topk.cpp
device/tpu_device_attr_filter.c
device/tpu_device_topk.c
test/batch_test_topk.py
tpu_database_topk use:
# For the meaning of the parameters, see the data structure and parameter description
#   section above.
./tpu_database_topk [total_people_num] [db_num] [db_sel_num] [k]
# total_people_num : No limit is set on the maximum
# db_num : Number of databases, not exceed the total amount of data, not recommended to exceed 512
# db_sel_num : Number of selected databases, no more than db_num
# k : Top K maximum values, no more than the total amount of selected data

# Default settings:
# total number of people is 1000000,
# total number of databases is 64,
# select 64 databases,
# get the top 10 item
./tpu_database_topk

# Custom settings:
# total number of people is 1000000,
# total number of databases is 64,
# select 5 databases,
# get the top 1 item
./tpu_database_topk 1000000 64 5 1

# The output is as follows
# TopK total_people_num=1000000, db_num=64, db_sel_num=5, k=1, avg_time=0.8205(ms)
#   --> Topk value: [ 99.9954]
#   --> Topk index: [ 999954]


# Batch test (not recommened for cmodel)
# topk.csv will be generated
python3 ../test/batch_test_topk.py
tpu_database_group_topk
The Grouped Database TopK is an operation based on the pedestrian database scenario simulation. The data structure and parameters are as follows:
It is assumed that each pedestrian data has four attributes: database ID, gender, whether to wear a hat, and confidence.
There are a total of db_num databases
All total_people_num data are randomly distributed in these db_num databases according to the database ID
The operation process of the operator is as follows:
Select the data of db_sel_num databases from db_num databases, set data filtering options according to gender, whether to wear a hat, and confidence, and use TPU to perform data filtering
Use TPU to divide the mixed data into db_sel_num groups according to the library ID
Select the top K maximum values according to the confidence of the data in each group, and finally output the db_sel_num group value and index results
The difference from the TopK of the whole database is that the TopK of the whole database puts the filtered data together, and selects the top K data, while the sub-database separates the filtered data according to the database ID, and takes the top K from the db_sel_num databases respectively.
The relevant documents are as follows:
include/tpu_api_protocol.h
host/tpu_database_group_topk.cpp
device/tpu_device_attr_filter.c
device/tpu_device_db_seperate.c
device/tpu_device_topk.c
test/batch_test_group_topk.py
tpu_database_group_topk Instructions for use:
# For the meaning of the parameters, see the data structure and parameter
#   description section above.
./tpu_database_group_topk [total_people_num] [db_num] [db_sel_num] [k]
# total_people_num : No limit is set on the maximum
# db_num : Number of databases, not exceed the total amount of data, not recommended to exceed 512
# db_sel_num : Number of selected databases, no more than db_num
# k : Top K maximum values, no more than the total data after selection in each database

# Default settings:
# total number of people is 1000000,
# total number of databases is 64,
# select 64 databases,
# get the top 10 item
./tpu_database_group_topk

# Custom settings:
# total number of people is 1000000,
# total number of databases is 64,
# select 5 databases,
# get the top 1 item
./tpu_database_group_topk 1000000 64 5 1

# output as follows:
# Group TopK total_people_num=1000000, db_num=64, db_sel_num=5, k=1,
#   avg_time=1.2234(ms)
#   --> Group 0 Topk value: [ 99.9778 ]
#   --> Group 0 Topk index: [ 999778 ]
#   --> Group 1 Topk value: [ 99.9634 ]
#   --> Group 1 Topk index: [ 999634 ]
#   --> Group 2 Topk value: [ 99.989 ]
#   --> Group 2 Topk index: [ 999890 ]
#   --> Group 3 Topk value: [ 99.9954 ]
#   --> Group 3 Topk index: [ 999954 ]
#   --> Group 4 Topk value: [ 99.9942 ]
#   --> Group 4 Topk index: [ 999942 ]

# Batch test (not recommened for cmodel)
# group_topk.csv will be generated
python3 ../test/batch_test_group_topk.py
tpu_multi_crop_resize
tpu_multi_crop_reize shows how to crop images according to roi_num (between 1 and 10) boxes, and resize the cropped image to a given output size. The supported formats are YUV420, NV12, GRAY and RGB_PLANAR.
The relevant documents are as follows:
include/tpu_api_protocol.h
host/tpu_multi_crop_resize.cpp
device/tpu_device_multi_crop_resize.c
test/batch_test_multi_crop_resize.py
tpu_multi_crop_resize Instructions for use:
./tpu_multi_crop_resize roi_num src_format dst_format src_h src_w roi_h roi_w dst_h dst_w
# roi_num: the number of cropped images
# src format: the format of the input image, 0-YUV420P, 3-NV12, 8-RGB_PLANAR, 14-GRAY
# dst_format: the format of the output image, 0-YUV420P, 3-NV12, 8-RGB_PLANAR, 14-GRAY
# src_h: the height of the input image
# src_w: the width of the input image
# roi_h: the height of the cropped image
# roi_w: the width of the cropped image
# dst_h: the height of the output image
# dst_w: the width of the output image

# Example of use
# ./tpu_multi_crop_reisze 5 0 3 1280 720 1280 720 960 540
# [TPUKERNEL-MULTI_CROP_RESIZE] src_format: 0 dst_format: 3 roi_num: 5
#   src_h: 1280 src_w: 720 roi_h: 1280 roi_w: 720 dst_h: 960 dst_w: 540
# using time= 67165(us)

# Batch test (not recommened for cmodel)
# multi_crop_and_resize.csv will be generated
python3 ../test/batch_test_multi_crop_resize.py

Notes.
1. Only support even width and height.
2. The supported image size range is 2*2 ~ 4096*4096.
3. Input u8 supports output u8.
tpu_rgb2yuv
RGB to YUV realizes the conversion of RGB image to YUV format. Currently, the output YUV only supports I420. Only even width and height are supported.
Relevant documents include:
include/tpu_api_protocol.h
host/tpu_rgb2yuv.cpp
device/tpu_device_cv_rgb2yuv.c
test/batch_test_rgb2yuv.py
tpu_rgb2yuv instructions for use:
./tpu_rgb2yuv [input_height] [input_width]

# input image resolution: 32 * 32   | 64 * 64   | 96 * 96   |
#                         128 * 128 | 256 * 256 | 384 * 384 |
#                         512 * 512 | 960 * 540 | 1280 * 720
# output image resolution: Same size as input image.


# Example of use
./tpu_rgb2yuv 256 256

# The output is as follows
# ---------------parameter-------------
# width=256, height=256
#
# - rgb2yuv TPU using time= 86(us)
# rgb2yuv successful!

# Batch test (not recommened for cmodel)
# rgb2yuv.csv will be generated
python3 ../test/batch_test_rgb2yuv.py

Notes.
1. Only support even width and height.
2. The supported image size range is 2*2 ~ 4096*4096.
3. Input u8 supports output u8.
tpu_yuv2rgb_formula
tpu_yuv2rgb_formula is based on the formula method to realize the conversion of YUV format pictures to BGR Planner format, currently only supports I420, NV12, NV21. And only even width and height are supported.
Relevant documents include:
include/tpu_api_protocol.h
host/tpu_yuv2rgb_formula.cpp
device/tpu_device_cv_yuv2rgb_formula.c
test/batch_test_yuv2rgb_formula
tpu_yuv2rgb_formula Instructions for use
./tpu_yuv2rgb_formula [src_image_format] [output_data_format] [output_height] [output_width]

# output image resolution: 32 * 32   | 64 * 64   | 96 * 96   |
#                          128 * 128 | 256 * 256 | 384 * 384 |
#                          512 * 512 | 640 * 640 | 1280 * 720
# src_image_format : I420 (0) | NV12 (3) | NV21 (4)
# output_data_format : FP32 (0) | U8 (1) | FP16 (5)


# Example of use
./tpu_yuv2rgb_formula 0 0 128 128
# ---------------parameter-------------
# input_height: 128
# input_width: 128
# src_image_format: YUV420
# output_data_format: FP32
# -------------------------------------
# ----- using time: 101us -----
# ------[TEST YUV2RGB] ALL TEST PASSED!

# Batch test (not recommened for cmodel)
# yuv2rgb_formula.csv will be generated
python3 ../test/batch_test_yuv2rgb_formula.py

Notes.
1. Only support even width and height.
2. The supported image size range is 2*2 ~ 4096*4096.
3. Input u8 supports output u8 and fp32.
tpu_yuv2rgb_lookup_table
tpu_yuv2rgb_lookup_table is based on the look-up table method to realize the conversion of YUV format images to BGR Planner format, currently only supports I420, NV12, NV21. And only even width and height are supported.
Relevant documents include:
include/tpu_api_protocol.h
host/tpu_yuv2rgb_lookup_table.cpp
device/tpu_device_cv_yuv2rgb_lookup_table.c
test/batch_test_yuv2rgb_lookup_table
tpu_yuv2rgb_lookup_table Instructions for use
./tpu_yuv2rgb_lookup_table [src_image_format] [output_data_format] [output_height] [output_width]

# output image resolution: 32 * 32   | 64 * 64   | 96 * 96   |
#                          128 * 128 | 256 * 256 | 384 * 384 |
#                          512 * 512 | 640 * 640 | 1280 * 720
# src_image_format : I420 (0) | NV12 (3) | NV21 (4)
# output_data_format : FP32 (0) | U8 (1) | FP16 (5)


# Example of use
./tpu_yuv2rgb_lookup_table 0 0 128 128
# ---------------parameter-------------
# input_height: 128
# input_width: 128
# src_image_format: YUV420
# output_data_format: FP32
# -------------------------------------
# ----- using time: 97us -----
# ------[TEST YUV2RGB] ALL TEST PASSED!

# Batch test (not recommened for cmodel)
# yuv2rgb_lookup_table.csv will be generated
python3 ../test/batch_test_yuv2rgb_lookup_table.py

Notes.
1. Only support even width and height.
2. The supported image size range is 2*2 ~ 4096*4096.
3. Input u8 supports output u8 and fp32.
tpu_hanming_distance
tpu_hanming_distance indicates the number of different characters in the same position for two strings of the same length.
The related files include:
include/tpu_api_protocol.h
host/tpu_hanming_distance.cpp
device/tpu_device_hm_distance.c
test/batch_test_hm_distance.py
tpu_hanming_distance Instructions for use:
./tpu_hanming_distance vec_dims query_num database_num
# vec_dims: 8
# query_num : <= 32
# database_num : <= 20000000

# The output is as follows:
# ./tpu_hanming_distance 8 32 100000
# using time: 33701 us

# Batch test, the final output tpu_hanming_distance.csv file
python3 ../test/batch_test_hanming_distance.py
tpu_warp_affine
tpu_warp_affine implements the affine transformation of the image, and can realize the translation, scaling and rotation of the image. Currently, this interface supports the RGB-Planer format.
Relevant documents include:
include/tpu_api_protocol.h
host/tpu_warp_affine.cpp
device/tpu_device_warp_affine.c
test/batch_test_warp_affine.py
tpu_warp_affine instructions for use:
./tpu_warp_affine [input_height] [input_width] [output_height] [output_width]

# input image resolution: 68 * 68 | 128 * 128 | 384 * 336 | 410 * 720
# output image resolution: 64 * 64 | 112 * 112 | 224 * 224 | 384 * 384 | 400 * 400

./tpu_warp_affine 128 128 64 64

# The output is as follows:
# ---------------parameter-------------
# input_height: 128
# input_width: 128
# output_height: 64
# output_width: 64
# -------------------------------------
# -- warp_affine TPU using time: 105um --
# ------[WARP_AFFINE TEST PASSED!]------


# Batch test (not recommened for cmodel)
# warp_affine.csv will be generated
python3 ../test/batch_test_warp_affine.py

Notes.
1. The supported image size range is 2*2 ~ 4096*4096.
2. Input u8 supports output u8.
tpu_warp_affine_bilinear
tpu_warp_affine_bilinear realizes the affine transformation of the image, which can realize the translation, scaling and rotation of the image. Currently, the interface supports RGB-Planer and gray formats.
Relevant documents include:
include/tpu_api_protocol.h
host/tpu_warp_affine_bilinear.cpp
device/tpu_device_warp_affine_bilinear.c
test/batch_test_warp_affine_bilinear.py
tpu_warp_affine_bilinear instructions for use:
./tpu_warp_affine_bilinear [flag] [input_data_format] [output_data_format] [image_format] [input_height] [input_width] [output_height] [output_width]
# flag: 0 means test specific parameters;
#       1 means a random width and height image within the 1024;
#       2 means an image with a random width and height between 1024 and 2048;
#       3 means an image with a random width and height between 2048 and 4096.
# input_data_format:  0 --> fp32 ; 1  --> u8
# output_data_format:  0 --> fp32 ; 1  --> u8
# image_format: 9 --> bgr ; 14 --> gray
# input image resolution: larger than the width and height of the output image
# output image resolution: 2 * 2 -----> 4096 *4096

./tpu_warp_affine_bilinear 0 0 0 9 2000 2000 128 128

# output:
# ---------------parameter-------------
# input_height: 2000
# input_width: 2000
# image_height: 128
# image_width: 128
# image_format: FORMAT_MAPPING_BGR_PLANAR
# input_data_format: FP32
# output_data_format: FP32
# -------------------------------------
# -- warp affine bilinear TPU using time: 7282(us) --
# ------[WARP_AFFINE BILINEAR TEST PASSED!]------

# Batch test (not recommened for cmodel)
# warp_affine_bilinear.csv will be generated
python3 ../test/batch_test_warp_affine_bilinear.py

Notes.
1. The supported image size range is 2*2 ~ 4096*4096.
2. Input u8 supports output u8 and fp32; Input fp32 supports output fp32.
tpu_crop
tpu_crop realizes cropping the input image according to the specified size, and currently supports three formats: YUV420P, NV12, and NV21.
Relevant documents include:
include/tpu_api_protocol.h
host/tpu_crop.cpp
device/tpu_device_crop.c
test/batch_test_crop.py
tpu_crop instructions for use:
./tpu_crop format input_h input_w output_h output_w
# format: the format of the input and output images, 0-YUV420P, 3-NV12, 4-NV21
# input size: the input image size, input_h * input_w
# output size: the output image size, output_h * output_w

# The output is as follows:
# ./tpu_crop 4 1280 720 32 32
# format: 4
# input size: 1280 * 720
# output size: 32 * 32
# using time= 69(us)

# Batch test (not recommened for cmodel)
# crop.csv will be generated
python3 ../test/batch_test_crop.py

Notes.
1. The supported image size range is 2*2 ~ 4096*4096.
2. Input u8 supports output u8.
tpu_yuv_deinterlace
tpu_yuv_deinterlace achieves that NV12/NV21 format transforms to I420 format.
Relevant documents include:
include/tpu_api_protocol.h
host/tpu_yuv_deinterlace.cpp
device/tpu_device_yuv_deinterlace.c
test/batch_test_yuv_deinterlace.py
tpu_yuv_deinterlace instructions for use:
./tpu_yuv_deinterlace img_h img_w src_format
# img_size: the size of image, img_h * img_w
# format: the format of the input images, 3-NV12, 4-NV21

# output:
# ./tpu_yuv_deinterlace 1920 1080 3
# img_size : 1920 * 1080
# format: 3
# using time: 486us

# Batch test (not recommened for cmodel)
# yuv_deinterlace.csv will be generated
python3 ../test/batch_test_yuv_deinterlace.py

Notes.
1. The supported image size range is 2*2 ~ 4096*4096.
2. Input u8 supports output u8.
tpu_rpn
RPN(Region Proposal Networks), the new proposal generation network proposed by Faster RCNN.
Relevant documents include:
include/tpu_api_protocol.h
host/tpu_rpn.cpp
device/tpu_device_rpn.c
test/batch_test_rpn.py
tpu_rpn instructions for use:
# instructions for use
./tpu_rpn batch_num feature_height feature_width compare
# batch_num   : batch num, there is no limit on the maximum, default 1
# feature_height   : feature map's height, there is no limit on the maximum, default 14
# feature_width   : feature map's wdith, there is no limit on the maximum, default 14
# compare   : Whether to execute the cpu algorithm and compare it with
#               the result of the cpu algorithm, 1: compare 0: do not compare

# output:
# ./tpu_rpn 4 20 14 1
# batch_num: 4
# feat_stride: 16
# min_size: 16
# base_size: 16
# pre_nms_topN: 614
# post_nms_topN: 251
# nms_thresh: 0.41
# score_thresh: 0.81
# scales_num: 3
# ratios_num: 3
# map_height: 20
# map_width: 14
# score_out_flag: 0
# origin_w: 224
# origin_h: 320
# compare: 1
# Native detected box number: 130
# time=xx(us)
# result compare success

# Batch test (not recommened for cmodel)
# rpn.csv will be generated
python3 ../test/batch_test_rpn.py
tpu_image_resize
tpu_image_resize implements resize the input image to the given size.
The related files include:
include/tpu_api_protocol.h
host/tpu_image_resize.cpp
device/tpu_device_image_resize.c
test/batch_test_image_resize.py
tpu_image_resize instructions for use:
./tpu_image_resize format src_h src_w dst_h dst_w if_padding padding_r padding_g padding_b
# format: the format of src_image and dst_image, 0-YUV420P 3-NV12 4-NV21 9-BGR_PLANAR 14-GRAY
# src_image_size: the size of src image, src_h * src_w
# dst_image_size: the size of dst_image, dst_h * dst_w
# if_padding: 0-Scale proportionally and fill according to the set pixel value
#             1-Non-proportional scaling
# padding_r: the filled value of r channel
# padding_g: the filled value of g channel
# padding_b: the filled value of b channel

# output:
# ./tpu_image_resize 0 1024 2048 200 200 0 1 2 3
# src_format: 0
# dst_format: 0
# src_h: 1024
# src_w: 2048
# dst_h: 200
# dst_w: 200
# if_padding: 0
# time=xx(us)

# Batch test (not recommened for cmodel)
# image_resize.csv will be generated
python3 ../test/batch_test_image_resize.py

Notes.
1. Only support even width and height.
2. The supported image size range is 2*2 ~ 4096*4096.
3. Input u8 supports output u8 and fp32; Input fp32 supports output fp32.
tpu_pad
tpu_pad realizes fills the input image according to the specified size, and currently supports four formats: YUV420P, NV12, and NV21, BGR_PLANAR.
Relevant documents include:
include/tpu_api_protocol.h
host/tpu_pad.cpp
device/tpu_device_pad.c
test/batch_test_pad.py
tpu_pad usage:
./tpu_pad format: input_h input_w up down left right format data_dtype

# input_size: input_h input_wss
# pad_size: up down left right
# format: the format of the input and output images, 0-YUV420P, 3-NV12, 4-NV21,9-BGR_PLANAR
# data_type: 0-DT_UINT8, 5-DT_FP32;

# output:
# ./tpu_pad 100 100 64 64 512 512 0 0 0
# using time= 44(us)

# Batch test (not recommened for cmodel)
# pad.csv will be generated
python3 ../test/batch_test_pad.py
tpu_crop_and_resize
tpu_crop_and_resize implements crop multiple images (between 1 and 10) and then resize the cropped images to the given size.
The related files include:
include/tpu_api_protocol.h
host/tpu_crop_and_resize.cpp
device/tpu_device_crop_and_resize.c
test/batch_test_crop_and_resize.py
tpu_crop_and_resize instructions for use:
./tpu_crop_and_resize roi_num format src_h src_w roi_h roi_w dst_h dst_w padding_r padding_g padding_b
# roi_num: the num of cropped image
# format: the format of src_image and dst_image, 0-YUV420P 3-NV12 4-NV21 9-BGR_PLANAR 14-GRAY
# src_image_size: the size of src image, src_h * src_w
# roi_image_size: the size of cropped images, roi_h * roi_w
# dst_image_size: the size of dst_image, dst_h * dst_w
# padding_r: the filled value of r channel
# padding_g: the filled value of g channel
# padding_b: the filled value of b channel

# output:
# ./tpu_crop_and_resize 2 3 2048 1920 200 100 600 600 1 2 3
# roi_num: 2
# src_format: 3
# dst_format: 3
# src_h: 2048
# src_w: 1920
# roi_h: 200
# roi_w: 100
# dst_h: 600
# dst_w: 600
# time=xx(us)

# Batch test (not recommened for cmodel)
# crop_and_resize.csv will be generated
python3 ../test/batch_test_crop_and_resize.py
tpu_resize_using_lut
tpu_resize_using_lut implements bilinear interpolation resize an image using lookup table method
The related files include:
include/tpu_api_protocol.h
host/tpu_resize_using_lut.cpp
device/tpu_device_resize_using_lut.c
test/batch_test_resize_using_lut.py
tpu_resize_using_lut instructions for use:
./tpu_resize_using_lut [image_format] [input_height] [input_width] [output_height] [output_width] [input_dtype] [output_dtype]

# image_format : 0-YUV420P, 3-NV12, 4-NV21, 9-BGR_PLANAR, 14-GRAY
# input_height : between [1, 4096]
# input_width : between [1, 4096]
# output_height : between [1, 4096]
# output_width : between [1, 4096]
# The height and width of the input image can only be scaled at the same time. Can 't height enlarge with width reduction, or width enlarge with height reduction. If the input format is YUV420P, NV12, or NV21, the input height and width must be divided by 4.
# input_dtype : 0-FP32,3-UINT8
# output_dtype : 0-FP32,3-UINT8
# Only support: 1.FP32-input FP32-output  2.UINT8-input FP32-output  3.UINT8-input UINT8-output

# Example of use
./tpu_resize_using_lut 9 64 64 128 128 0 0

# The terminal output is as follows
[TPUKERNEL-IMAGE_RESIZE_USING_LOOKUP_TABLE] src_format: 9 dst_format: 9 src_h: 64 src_w: 64 dst_h: 128 dst_w: 128 src_dtype: 0 dst_dtype: 0
TPU using time= xxx(us)
tpu_kernel_api_lut_resize single_test succeeded

# Batch test(not recommened for cmodel)
# resize_using_lut.csv will be generated
python3 ../test/batch_test_resize_using_lut.py
tpu_test_instrutions
Test the computing power of TPU by calculating the specified TPU instruction. It is recommended to run in pcie mode or soc mode.
The related files include:
include/tpu_api_protocol.h
host/tpu_test_instrutions.cpp
device/tpu_test_instrutions.c
test/batch_test_instructions.py
tpu_test_instrutions for use:
./tpu_test_instrutions [instrution_type] [data_type]
# instrution_type: the type of instrution, INS_CONV | INS_MAT_MUL2
# data_type: the type of input data, INS_CONV supports DT_INT8, DT_FP16 and DT_FP32, INS_MAT_MUL2 supports DT_INT8 and DT_FP16.

# output:
# ./tpu_test_instrutions INS_MAT_MUL2 DT_INT8
# ================= start test MAT MUL 2 =================
# data type: DT_INT8  loop times: 1000
# --case 0
#   mm2 param: left matrix=(1024 2048), right matrix=(2048 1024)
#   TPU total time= 131580(us)  TPU avg time= 131.58(us)  TPU computing power= 32.64T
# --case 1
#   mm2 param: left matrix=(1024 2048), right matrix=(2048 1024)  l_matrix is transposed.  r_matrix is transposed.
#   TPU total time= 264195(us)  TPU avg time= 264.20(us)  TPU computing power= 32.51T
# --case 2
#   mm2 param: left matrix=(1024 2048), right matrix=(1024 2048)   r_matrix is transposed.
#   TPU total time= 135638(us)  TPU avg time= 135.64(us)  TPU computing power= 31.66T

# Batch test (not recommened for cmodel)
# tpu_test_instrutions.csv will be generated
# All supported instrution and data types will be executed in turn.
python3 ../test/batch_test_instructions.py
TPU-KERNEL Function Usage Guide
Dynamic loading provides a way to directly call tpu instructions on the host side by packaging some encapsulated tpu_kernel functions into a dynamic library file called “kernel module”, which can be called on the host side by function name. When calling tpu kernel functions, tpu performs corresponding calculations on the data in device memory and stores the output in device memory.
Device Memory Management. When using tpu kernel functions, device memory needs to be managed. Depending on the requirements, you may need to perform steps such as allocating data memory, obtaining physical addresses of data, copying memory between host and device, etc. Device memory management can refer to the usage method of host-side code under the samples directory.
A general usage flow is as follows, where tpu_kernel_load_module_file() loads the library file, tpu_kernel_get_function() obtains the function ID, and tpu_kernel_launch() starts the function. Kernel modules can also be packaged as program data and included in the executable file. Packaging methods can refer to the compilation configuration under the samples directory.
The following header file needs to be included in the code:
#include "bmlib_runtime.h"
Declare the variables required for tpu kernel:
tpu_kernel_module_t tpu_module;
tpu_kernel_function_t func_id;
First, load the kernel module. Note: the library file only needs to be loaded once in the context to avoid multiple loading, and the start function can be executed multiple times.
tpu_module = tpu_kernel_load_module_file(handle, "./libbm1684x_kernel_module.so");
Then define a structure as the input interface required by the tpu kernel api, and fill in the parameters, for example:
#define INPUT_NUM 3
#define OUTPUT_NUM 2
typedef struct {
    u64 input_addr[INPUT_NUM];
    u64 output_addr[OUTPUT_NUM];
    int arg_1;
    float arg_2;
    ...
}__attribute__((packed)) api_name_t;
bm_device_mem_t input_addr;
bm_device_mem_t output_addr;
// set input parameters of tpu_kernel operator
api_name_t *api;

api->input_addr[i] = bm_mem_get_device_addr(input_addr);
api->output_addr[i] = bm_mem_get_device_addr(output_addr);
api->arg_1 = arg_1;
api->arg_2 = arg_2;
Get the function ID by function name, start the tpu_kernel function, and execute the function.
func_id = tpu_kernel_get_function(handle, tpu_module, "function_name");
ret = tpu_kernel_launch(handle, func_id, &api, full_size);
// synchronize tpu kernel api in thread and wait for tpu kernel function to complete execution
bm_thread_sync(handle);
Before and after function execution, the input and results are saved in the corresponding device memory. Host-device communication and data transmission may need to be performed as required.
Operator Description
tpu_kernel_api_yolov5_detect_out
tpu_kernel_api_yolov5_detect_out is a TPU implementation of post-processing for the ultralytics released yolov5 series models, which includes box decode and NMS processing. The input of this function is the direct output of the last convolution layer of the yolov5 model, generally in the shape of three four-dimensional tensors [n, (class + 5) * anchor_num, h_0, w_0], [n, (class + 5) * anchor_num, h_1, w_1], [n, (class + 5) * anchor_num, h_2, w_2].
The output is the final bounding box data and number after NMS processing. The shape of the output bounding box data is dynamic and corresponds to the output count.
Define an input parameter structure:
#define MAX_YOLO_INPUT_NUM 3
#define MAX_YOLO_ANCHOR_NUM 3
typedef struct {
    u64 bottom_addr[MAX_YOLO_INPUT_NUM];
    u64 top_addr;
    u64 detected_num_addr;
    int input_num;
    int batch_num;
    int hw_shape[MAX_YOLO_INPUT_NUM][2];
    int num_classes;
    int num_boxes;
    int keep_top_k;
    float nms_threshold;
    float confidence_threshold;
    float bias[MAX_YOLO_INPUT_NUM * MAX_YOLO_ANCHOR_NUM * 2];
    float anchor_scale[MAX_YOLO_INPUT_NUM];
    int clip_box;
}__attribute__((packed)) tpu_kernel_api_yolov5NMS_t;
Function Parameters
Name |
Type |
Description |
bottom_addr |
u64* |
The input data address, has a shape typically of [n, (class + 5) * anchor_num, w, h]. |
top_addr |
u64 |
Address of output data, shape is [1,1,n,7], where n is the number of detections, and 7 represents [img_id/cls_id/prob/x/y/w/h]. “img_id” represents the corresponding image number, “cls_id” is the class number starting from 0, “x” and “y” are the absolute coordinates of the center of the box relative to the input size, and “w” and “h” are the absolute coordinates of width and height relative to the input size. |
detected_num_addr |
u64 |
Address of detection box number |
input_num |
int |
Number of input tensors |
batch_num |
int |
Batch size |
hw_shape |
int |
Input data shape |
num_classes |
int |
Number of target categories |
num_boxes |
int |
Number of anchors on each scale |
keep_top_k |
int |
Number of detection results to be retained |
nms_threshold |
float |
Non-maximum suppression threshold |
confidence_threshold |
float |
Confidence threshold |
bias |
float* |
Scale of each prior anchor |
anchor_scale |
float* |
Input and feature map size ratio for each scale, also known as down-sampling rate |
clip_box |
int |
Clip the boundary of the box so that it does not exceed the input size |
agnostic_nms |
int |
Class-agnostic NMS, utilizing class aware NMS if ‘agnostic_nms’ was set to 0, otherwise do NMS over classes |
Determine the size of the detection results according to the number of output detection boxes, and pass them to the host:
int dt_num_data = 0;
bm_memcpy_d2s_partial_offset(handle,
                            (void *)dt_num_data,
                            detect_num_mem,
                            batch_num * sizeof(int32_t),
                            0);
output_tensor.shape[2] = *dt_num_data;
bm_memcpy_d2s_partial_offset(handle,
                            (void *)output_data,
                            out_dev_mem,
                            output_tensor.shape[2] * output_tensor.shape[3] * sizeof(float),
                            0);
Export model: Modify the “forward()” method in the Detect class defined in yolov5/models/yolo.py as follows: 1.Add comments to the “permute” and subsequent code. 2.Return ‘x’ and then run “python3 export.py”. The final exported model output shape is [n, (class + 5) * anchor_num, w, h] * x, where n represents batch size, class represents the number of predicted object classes, anchor_num represents the number of anchors predicted for each grid cell, w and h represent the width and height of the feature map, and x represents the number of feature maps. Therefore, the model output shape is a list of four-dimensional tensors with a length of x.
Note When the confidence_threshold is too low or the input size is too large, it may result in too many intermediate results, which can cause TPU memory overflow. It is recommended to set a relatively high confidence threshold.
tpu_kernel_api_yolov5_out_without_decode
tpu_kernel_api_yolov5_out_without_decode is a TPU implementation of post-processing for the YOLOv5 series models, specifically for the models released by Ultralytics. It includes candidate box filtering and NMS (non-maximum suppression). The input to this function is the final output of the YOLOv5 model, which is generally a 3D tensor (concatenation of 3 branches) after box decoding, with a shape of [n, box_num, class_num + 5]. The output is the final bounding box data and number after NMS processing, with a dynamic shape that corresponds to the output number.
typedef struct {
    u64 bottom_addr;
    u64 top_addr;
    u64 detected_num_addr;
    int input_shape[3];
    int keep_top_k;
    float nms_threshold;
    float confidence_threshold;
    int agnostic_nms;
    int max_hw;
}__attribute__((packed)) tpu_kernel_api_yolov5NMS_v2_t;
Function Parameters
Name |
Type |
Description |
bottom_addr |
u64 |
The address of the input data, with a shape of [n, box_num, class_num + 5], where “class_num + 5” indicates the absolute coordinates of the center point of xy, the absolute width and height of wh, the confidence of conf, and the probability of each class. |
top_addr |
u64 |
The address of the output data, with a shape of [1,1,n,7], where n is the number of detections, and 7 represents [img_id/cls_id/prob/x/y/w/h]. img_id represents the corresponding image number, cls_id is the class number starting from 0, x and y are the absolute coordinates of the center of the box relative to the input size, and w and h are the absolute width and height relative to the input size. |
detected_num_addr |
u64 |
The address of the number of detection box data |
input_shape |
int* |
The shape of the input tensor |
keep_top_k |
int |
The number of detection results to keep |
nms_threshold |
float |
The threshold for non-maximum suppression |
confidence_threshold |
float |
The threshold for confidence |
agnostic_nms |
int |
Class-agnostic NMS, utilizing class aware NMS if ‘agnostic_nms’ was set to 0, otherwise do NMS over classes |
max_hw |
int |
The maximum size of the model input image width or height |
Based on the number of detected boxes output, the size of the detection result is determined and passed to the host.
int dt_num_data = 0;
bm_memcpy_d2s_partial_offset(handle,
                            (void *)dt_num_data,
                            detect_num_mem,
                            batch_num * sizeof(int32_t),
                            0);
output_tensor.shape[2] = *dt_num_data;
bm_memcpy_d2s_partial_offset(handle,
                            (void *)output_data,
                            out_dev_mem,
                            output_tensor.shape[2] * output_tensor.shape[3] * sizeof(float),
                            0);
Export model: To export the model in the YOLOv5 project, simply run “python3 export.py” directly. The final exported model output shape is [n, box_num, class + 5], where n represents batch size, box_num represents the total number of candidate boxes in the output feature map, and class represents the number of object classes. The final output i is a three-dimensional tensor.
Note when the confidence_threshold is too low or the input size is too large, there may be too many intermediate results, which may cause TPU memory overflow and result in inaccurate results. It is recommended to set a relatively high confidence threshold.
tpu_kernel_api_pointpillars_pillar_encoder
tpu_kernel_api_pointpillars_pillar_encoder is the tpu implementation of the middle encoder part of the point cloud pointpillars model released by mmdetection3d, including pillar_encoder, pfn, and scatter. The input of this function is the output of pointpillars pre-processing, including voxels[N x 4], coors[N x 3], num_points_per_voxels[N] three tensors. The output of this function is a [64 x 214272] tensor, which is to scatter the features of all pillars onto a 496*432 image, where each pillar has 64 features.
Define an input parameter structure:
typedef struct {
    u64 voxels_addr;
    u64 coors_addr;
    u64 num_points_addr;
    u64 batchmatmul_weight_addr;
    u64 BN_scale_addr;
    u64 BN_bias_addr;
    u64 pillar_encoder_output_addr;
    u64 pfn_output_addr;
    u64 scatter_indices_addr;
    u64 scatter_buffer_addr;
    u64 output_addr;
    float voxel_size[3];
    float voxel_zyx[3];
    int grid_size_x;
    int max_points_per_voxel;
    int voxel_num;
    int dtype; // 0-FP16 1-FP32
} __attribute__((packed)) tpu_kernel_api_pillar_encoder_t;
Function Parameters
名称 |
类型 |
描述 |
voxels_addr |
u64 |
The input data address of voxels, the shape is usually [N, 4], N is the number of voxels, and 4 are the features x, y, z, i of the lidar point |
coors_addr |
u64 |
The input data address of coors, the shape is [N,3], which saves the coordinates of each voxel |
num_points_addr |
u64 |
The input data address of num_points, the shape is [N], which saves the number of effective points in each voxel |
batchmatmul_weight_addr |
u64 |
The data address of the weight used by BatchMatmul in the pfn layer, the shape is [1,64,10] |
BN_scale_addr |
u64 |
The data address of the scale used by the pfn layer BatchNorm, the shape is [1,64,1] |
BN_bias_addr |
u64 |
The data address of the bias used by the pfn layer BatchNorm, the shape is [1,64,1] |
pillar_encoder_output_addr |
u64 |
The output address of the first part pillar_encoder, the shape is [N,32,10] |
pfn_output_addr |
u64 |
The output address of the second part pfn, the shape is [N,64] |
output_addr |
u64 |
The output address of the third part scatter, the shape is [64,214272] |
scatter_buffer_addr |
u64 |
The buffer address required for scatter calculation, the shape is [64,214272] |
voxel_size[3] |
float |
The length of each voxel in the z, y, and x directions |
voxel_zyx[3] |
float |
Calculate the parameters in the three dimensions of z, y, and x required for the center features of voxel |
grid_size_x |
int |
The grid size in x direction |
max_points_per_voxel |
int |
The maximum number of points each voxel can contain |
voxel_num |
int |
The number of voxels obtained by pre-processing |
dtype |
int |
Can choose fp32 or fp16 mode calculation, 0-FP16 1-FP32 |
Pass the output address output_addr to the backbone for subsequent reasoning
Appendix 1: General Usage Methods for Batch Testing
In the samples/test directory, there will be test scripts named batch_test_xxx.py. The environment variables CASE_START, CASE_COUNT can be used to control the start and running number of test cases. When the script is completed, the xxx.csv file will be generated, which will record the CASE parameters and running time. The following is an example of batch_test_topk.py:
Assuming that you are currently in the sample/build directory, and the application has been compiled.
# Run CASE {5, 6}. Note that the index starts at 0
CASE_START=5 CASE_COUNT=2 python3 ../test/batch_test_topk.py

# Run all CASES
python3 ../test/batch_test_topk.py
```
batch_test.py is the basic library of all test scripts. The usage of general_batch_test in it is as follows. You can write the corresponding scripts by yourself.
def general_batch_test(
            command_params, exclude_func=None,
            is_format=False, param_names=None, title=None):
  """
  for 'command1 p0 p1 p2 p3 p4' test, let
      is_format=False
      command_params = [
          ("command1", [[p0_1, p0_2, p0_3], [(p1_0, p2_0), (p1_1, p2_1)], [(p3, p4)]]),
          ("command1", [[p0_4], [(p1_3, p2_3), (p1_4, p2_4)], [(p3, p4)]]),
      ]
  will generate following cases:
      command1 p0_1 p1_0 p2_0 p3 p4
      command1 p0_1 p1_1 p2_1 p3 p4
      command1 p0_2 p1_0 p2_0 p3 p4
      command1 p0_2 p1_1 p2_1 p3 p4
      command1 p0_3 p1_0 p2_0 p3 p4
      command1 p0_3 p1_1 p2_1 p3 p4
      command1 p0_4 p1_3 p2_3 p3 p4
      command1 p0_4 p1_4 p2_4 p3 p4
  for "command2 -m {} -n {] -k {}" test, let
      is_format=True
      command_params = [
          ("command2", [[p0_1, p0_2, p0_3], [(p1_0, p2_0), (p1_1, p2_1)]]),
      ]
  will generate following cases:
      command2 -m p0_1 -n p1_0 -k p2_0
      command2 -m p0_1 -n p1_1 -k p2_1
      command2 -m p0_2 -n p1_0 -k p2_0
      command2 -m p0_2 -n p1_1 -k p2_1
      command2 -m p0_3 -n p1_0 -k p2_0
      command2 -m p0_3 -n p1_1 -k p2_1

  exclude_func: func(param) filter invalid param combinations, the param is ignored
    when return True
  param_names: use for generated csv file as csv table titles, such as ['m', 'k', 'n'] for
    'command2' or ['p0', 'p1', 'p2', 'p3', '4' ] for 'command1'
  title: generate {title}.csv file if not None

  At last, the function will search time = *(*) or time: *(*) pattern in command outputs
    to collect time info, write into {title}.csv file
  """