7.2. 视频编解码性能
本节我们列举了BM1684芯片对于视频编码、解码、转码的性能数据,此外,我们附上了每一个性能测试的测试命令,您可以按照表格中的测试命令进行验证。
注解
sleep参数值是经验值,需要根据tpu型号和视频格式自行设置。
如发生”tail: write error: Broken pipe”的问题,是因为线程还没有完成编/解码,因此线程没有正常退出。解决办法是将sleep设置的时间长一点。
测试文件可从如下链接中获取: 测试脚本
7.2.1. 视频解码性能测试
测试命令
#!/bin/bash

video=jellyfish-3-mbps-hd-h264.mkv
tpu_id=0
thread_num=16
decode_type=h264_bm

rm -rf *.log
rm -rf fpssum.txt  fps.txt  framesum.txt  frame.txt  speed.txt  timeavg.txt  timesum.txt  time.txt
killall ffmpeg &> /dev/null

for ((thread=0; thread<$thread_num; thread++))
do
{
        nohup ffmpeg -benchmark -extra_frame_buffer_num 5 -output_format 0 -zero_copy 1 -sophon_idx ${tpu_id} -c:v ${decode_type} -i $video  -f null /dev/null >> ${video}_thread_${thread}_tpu_${tpu_id}.log 2>&1 &
} &
done

echo "Start Wait End..."

while true; do
    ffmpeg_num=$(ps aux | grep ffmpeg | grep -v "grep" | wc -l)
    echo "running ffmpeg num: ${ffmpeg_num}"
    if [[ "$ffmpeg_num" == "0" ]]; then
            break
    fi
    sleep 3
done

echo "Start Calc fps..."


for ((thread=0; thread<$thread_num; thread++))
do
    frame_index=0
    for((a=1; a<20; a++))
    do
        str=$(cat ${video}_thread_${thread}_tpu_${tpu_id}.log | tail -n ${a}|head -n 1)
        # echo $str
        keyword=$(echo $str |grep "frame=")
        # echo $keyword
        if [[ $keyword != "" ]];
        then
        frame_index=${a}
        break
        fi
    done
    time_index=0
    for((a=1; a<20; a++))
    do
            str=$(cat ${video}_thread_${thread}_tpu_${tpu_id}.log | tail -n ${a}|head -n 1)
            # echo $str
            keyword=$(echo $str |grep "rtime=")
            # echo $keyword
            if [[ $keyword != "" ]];
            then
                time_index=${a}
                break
            fi
    done

    cat ${video}_thread_${thread}_tpu_${tpu_id}.log | tail -n $frame_index|head -n 1| awk -F '=' '{print $3}'|tr -d 'a-z'|tr -d ' ' >> fps.txt    #fps
    cat ${video}_thread_${thread}_tpu_${tpu_id}.log | tail -n $frame_index|head -n 1| awk -F '=' '{print $2}'|tr -d 'a-z'|tr -d ' ' >> frame.txt    #frames
    cat ${video}_thread_${thread}_tpu_${tpu_id}.log | tail -n $time_index|head -n 1| awk -F '=' '{print $4}'|tr -d 'a-z'|tr -d ' ' >> time.txt    #frames
    cat fps.txt | awk '{sum+=$1} END {print sum}' > fpssum.txt
    cat frame.txt | awk '{sum+=$1} END {print sum}' > framesum.txt
    cat time.txt | awk '{sum+=$1} END {print sum}' > timesum.txt
done

echo "tpu_id: $tpu_id"
echo "total_frames: $(<framesum.txt)"
task_num=$(cat frame.txt | grep "." -c)
cat timesum.txt | awk '{print $1/'$task_num'}' > timeavg.txt
echo "avg_time: $(<timeavg.txt)"
f_sum=$(<framesum.txt)
time_avg=$(<timeavg.txt)
awk 'BEGIN{printf "%.2f\n",'$f_sum'/'$time_avg'}' > speed.txt
speed=$(<speed.txt)
echo "speed: ${speed}"
参数说明
tpu_id: 测试的tpu的编号,可以通过bm-smi查看。
thread_num: 解码线程数,一般可设置为16。
decode_type: 解码方式,如h264_bm,hevc_bm ,分别代表h264和h265。
典型测试结果
芯片 |
场景 |
测试结果 |
1684 |
decode |
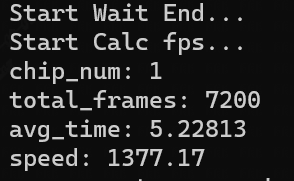
|
1684X |
decode |
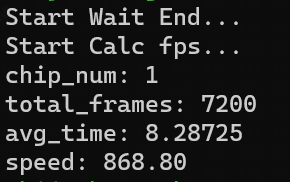
|
小技巧
测试脚本 中包含了多芯卡的测试程序’decode_multicard.sh’,通过修改里面的’tpu_ids’可实现对多芯卡的视频解码测试。
7.2.2. 视频编码性能测试
测试命令
video=jellyfish-3-mbps-hd-h264.mkv
tpu_id=0
thread_num=12
encode_type=h264_bm

rm -rf *.log
rm -rf fpssum.txt  fps.txt  framesum.txt  frame.txt  speed.txt  timeavg.txt  timesum.txt  time.txt
killall ffmpeg &> /dev/null

for ((thread=0; thread<$thread_num; thread++))
do
{
    nohup ffmpeg -benchmark -extra_frame_buffer_num 5 -output_format 0 -zero_copy 1 -sophon_idx ${tpu_id} -i $video -sophon_idx ${tpu_id} -c:v ${encode_type} -g 256 -is_dma_buffer 1 -b:v 3MB -enc-params "gop_preset=2:mb_rc=1:delta_qp=3:min_qp=35:max_qp=40" -f null /dev/null >> ${video}_thread_${thread}_tpu_${tpu_id}.log 2>&1 &
} &
done

echo "Start Wait End..."

while true; do
    ffmpeg_num=$(ps aux | grep ffmpeg | grep -v "grep" | wc -l)
    echo "running ffmpeg num: ${ffmpeg_num}"
    if [[ "$ffmpeg_num" == "0" ]]; then
            break
    fi
    sleep 3
done

echo "Start Calc fps..."

for ((thread=0; thread<$thread_num; thread++))
do
    frame_index=0
    for((a=1; a<20; a++))
    do
        str=$(cat ${video}_thread_${thread}_tpu_${tpu_id}.log | tail -n ${a}|head -n 1)
        # echo $str
        keyword=$(echo $str |grep "frame=")
        # echo $keyword
        if [[ $keyword != "" ]];
        then
        frame_index=${a}
        break
        fi
    done
    time_index=0
    for((a=1; a<20; a++))
    do
            str=$(cat ${video}_thread_${thread}_tpu_${tpu_id}.log | tail -n ${a}|head -n 1)
            # echo $str
            keyword=$(echo $str |grep "rtime=")
            # echo $keyword
            if [[ $keyword != "" ]];
            then
                time_index=${a}
                break
            fi
    done

    cat ${video}_thread_${thread}_tpu_${tpu_id}.log | tail -n $frame_index|head -n 1| awk -F '=' '{print $3}'|tr -d 'a-z'|tr -d ' ' >> fps.txt    #fps
    cat ${video}_thread_${thread}_tpu_${tpu_id}.log | tail -n $frame_index|head -n 1| awk -F '=' '{print $2}'|tr -d 'a-z'|tr -d ' ' >> frame.txt    #frames
    cat ${video}_thread_${thread}_tpu_${tpu_id}.log | tail -n $time_index|head -n 1| awk -F '=' '{print $4}'|tr -d 'a-z'|tr -d ' ' >> time.txt    #frames
    cat fps.txt | awk '{sum+=$1} END {print sum}' > fpssum.txt
    cat frame.txt | awk '{sum+=$1} END {print sum}' > framesum.txt
    cat time.txt | awk '{sum+=$1} END {print sum}' > timesum.txt
done

echo "tpu_id: $tpu_id"
echo "total_frames: $(<framesum.txt)"
task_num=$(cat frame.txt | grep "." -c)
cat timesum.txt | awk '{print $1/'$task_num'}' > timeavg.txt
echo "avg_time: $(<timeavg.txt)"
f_sum=$(<framesum.txt)
time_avg=$(<timeavg.txt)
awk 'BEGIN{printf "%.2f\n",'$f_sum'/'$time_avg'}' > speed.txt
speed=$(<speed.txt)
echo "speed: ${speed}"
参数说明
tpu_ids: 测试的tpu的编号,可以通过bm-smi查看。
thread_num: 编码线程数,典型的,一般在BM1684芯片上面设置为2,在BM1684X芯片上可设置为12。
encode_type: 编码方式,如h264_bm,h265_bm ,分别代表h264和h265。
典型测试结果
芯片 |
场景 |
测试结果 |
1684 |
encode |
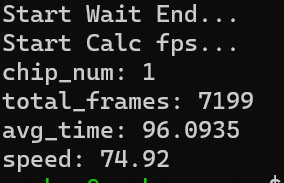
|
1684X |
encode |
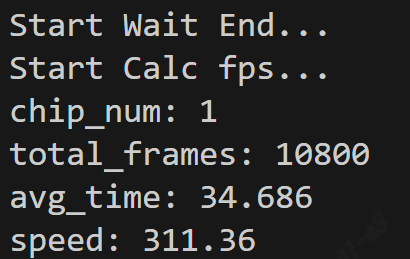
|
小技巧
测试脚本 中包含了多芯卡的测试程序’encode_multicard.sh’,通过修改里面的’tpu_ids’可实现对多芯卡的视频编码测试。
7.2.3. 视频转码性能测试
生成转码所需要的原始视频
ffmpeg -i jellyfish-3-mbps-hd-h264.mkv -c copy -bsf:v h264_mp4toannexb -f mpegts 1.264
ffmpeg -i "concat:1.264|1.264|1.264|1.264|1.264|1.264|1.264|1.264" -c copy -bsf:a aac_adtstoasc -movflags +faststart test.264
转32K低码流
ffmpeg -hwaccel bmcodec -hwaccel_device 0 -c:v h264_bm -output_format 101 -i test.264 -vf "scale_bm=352:288" -c:v h264_bm -g 256 -b:v 32K -y result.264
转1M高码流
ffmpeg -hwaccel bmcodec -hwaccel_device 0 -c:v h264_bm -output_format 101 -i test.264 -vf "scale_bm=352:288" -c:v h264_bm -g 256 -b:v 1M -y result.ts
参数说明
-hwaccel: 使用硬件API
-hwaccel_device: 指定设备,使用bm-smi查看
-c:v: 解码器
-output_format 输出数据的格式。设为0,则输出线性排列的未压缩数据;设为101,则输出压缩数据。缺省值为0。推荐设置为101,输出压缩数据。可以节省内存、节省带宽。输出的压缩数据,可以调用scale_bm filter解压缩成正常的YUV数据。
-i 输入
-vf ffmpeg过滤器,scale_bm将frame resize为目标宽高
-c:v 编码器
-g 关键帧间隔控制
-b:v 输出码流
-y 输出时覆盖原文件
result.ts 输出文件
典型测试结果 |
||
芯片 |
场景 |
测试结果 |
1684 |
转 32K 低码流 |

|
转 1M 高码流 |

|
|
1684X |
转 32K 低码流 |

|
转 1M 高码流 |

|
|