本文档旨在让开发者快速了解TPU-KERNEL的开发流程和步骤,及相关的测试步骤;不涉及具体的代码说明、开发技巧及API使用参考,如需要详细了解,可参考《TPU-KERNEL开发参考手册.pdf》。
TPU-KERNEL概述
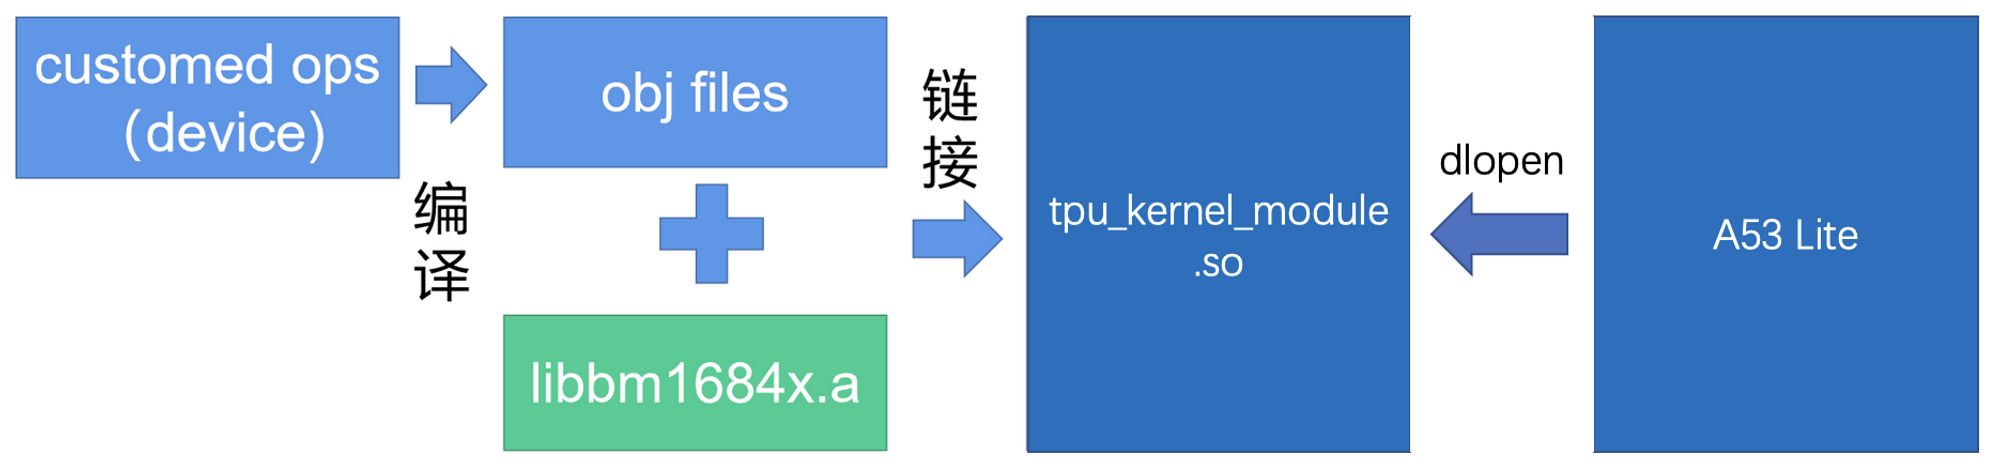
TPU-KERNEL为用户提供了一种直接在TPU设备编程的开发环境。开发者可以在设备(TPU)写自定义的算子,和TPU-KERNEL提供的firmware库进行链接,打包成在A53Lite可以加载的library。在主机的应用中调用,实现利用TPU加速计算的目的。
TPU上面包含一个单核A53 ARM处理器(A53Lite),TPU实际的计算单元都通过该处理器进行配置与运行。所以固件的编译需要利用aarch64-none版本的交叉编译工具。
下面是编译固件的基本流程,开发者利用TPU-KERNEL调用设备的API,实现自己的算子。完成编写后,利用交叉编译工具,编译成obj文件,然后与TPU-KERNEL提供的底库libbm1684x.a进行链接,形成完整的A53Lite可加载的原始动态库文件。
下面是使用的流程。

下面是TPU-KERNEL开发包的目录结构
├── README.md # 环境初始化说明文件
├── doc/
│   ├── TPU-KERNEL开发快速指南.pdf
│   └── TPU-KERNEL开发参考手册.pdf
├── scripts/
│   └──envsetup.sh # 环境初始化脚本,设定交叉工具链及环境变量
├── include/
│   ├── tpu_defs.h # 和TPU相关的通用定义,如类型、枚举、宏等
│   │              #     可以在device和host程序中使用
│   ├── tpu_fp16.h # fp16相关定义
│   ├── common.h   # 一些通用定义, 如数据类型等
│   ├── device/tpu_kernel.h  # tpu-kernel指令调用接口,只能在device代码中调用
│   └── ...
├── lib/
│   ├── libbm1684x.a # 供设备代码链接使用的底库
│   └── ...
├── samples/         # 一些示例用于演示工程结构与测试性能
│   ├── README.md    # samples使用说明
│   ├── host/        # host上运行的代码
│   ├── device/      # device上运行的代码,自定义算子
│   ├── include/     # host和device的通信协议的数据结构
│   ├── CMakeList.txt # 构建脚本
│   └── ...
└── tpu_kernel_module/
    └── tpu_kernel_module.so # A53Lite 加载的原始动态库文件
TPU-KERNEL环境初始化
依赖介绍
TPU-KERNEL开发需要用到如下交叉编译链,可以直接点击链接下载,或者用我们的的脚本自动初始化,下文会详细介绍
此外,TPU-KERNEL的host程序开发,需要依赖LIBSOPHON和驱动环境,可以从 官网 下载SDK,里面包含如下文件:
sophon-libsophon_*.deb
sophon-libsophon-dev_*.deb
sophon-driver_*.deb
初始化步骤
首先安装LIBSOPHON环境,如果已经安装过,可以略过这一步
# 将LIBSOPHON的相关软件包放到当前目录下
sudo dpkg -i sophon-driver*.deb
sudo dpkg -i sophon-libsophon*.deb
之后初始化编译环境
# 下载的tpu-kernel_v<VERSION>_<COMMIT>_<DATE>.tar.gz放到当前目录下
# 解压并进入解压出的目录

# 如果已经下载了上面的交叉编译工具,可以放到同一目录中,如/home/`whoami`/compilers
# 然后 export CROSS_TOOLCHAINS=/home/`whoami`/compilers

# 执行环境初始化脚本
source scripts/envsetup.sh

# 如果CROSS_TOOLCHAINS环境变量没有设置,
#    会设置CROSS_TOOLCHAINS=../toolchains_dir
# 如果CROSS_TOOLCHAINS设置的目录里没有所需要的交叉编译工具,
#    会自动从网上下载对应的交叉编译工具,并解压到该目录中
# 设置TPUKERNEL_TOP=`pwd`
PCIE模式
PCIE模式开发适用于在有PCIE板卡的机器上开发,相关程序包括上位机应用及对应的供A53Lite加载的原始动态库文件编译好后,可以直接加载动态库并运行。
环境初始化完成后,默认在此模式下。
# 命令行提示符最左边有 `(pcie)` 提示。
(pcie)my/current/work/path $
如果其他模式下,可以用 use_pcie 切换到此模式。
CMODEL模式
CMODEL模式开发适用于没有TPU设备,或者在机器上直接利用gdb来调试代码的情景。CMODEL是利用x86机器对TPU设备的模拟,运行比较慢,但能够直接利用gdb调试设备代码,也是开发过程中常用的模式。当在CMODEL下调试完成后,可以切换到PCIE或SOC模式下,到实际设备上运行程序。
可以用 use_cmodel 切换到此模式。
# 命令行提示符最左边有 `(cmodel)` 提示。
(cmodel)my/current/work/path $
SOC模式
SOC模式开发适用于SOC的TPU设备。基本工作流程是在x86的机器上交叉编译出应用和对应供a53 Linux加载的动态库,然后复制到SOC设备上,先加载动态库,再运行应用程序。
在此模式下,需要按照《LIBSOPHON使用手册》的 “ 使用libsophon开发 ” 一章中的 “ SOC MODE ” 进行环境初始化,并将soc_sdk的目录路径设置到SOC_SDK环境变量中,来指定soc的sdk位置
# /path_to_sdk/soc_sdk仅是示例,需要根据实际的设置进行修改
export SOC_SDK=/path_to_sdk/soc_sdk
可以用 use_soc 切换到此模式。
# 命令行提示符最左边有 `(soc)` 提示。
(soc)my/current/work/path $
Samples使用说明
TPU-KERNEL中的samples提供了一系列的算子开发和使用的示例,同时也提供了批量测试脚本,可以测试TPU在不同参数下的性能情况
下面示例仅以PCIE模式为主要说明,其他方式差异会进行备注
工程布局与编译
当前工程布局是实际算子开发时推荐的开发方式,里面包含了自动构建脚本,能够将firmware打包加载,并能够编译host程序。主要目录或文件说明如下:
├── CMakeLists.txt # host程序和动态库自动构建脚本
├── device/        # 设备上运行的自定义算子,会和libbm1684x.a一起生成供a53 Linux加载的动态库文件
├── host/          # 主机上的应用程序
├── include/       # 包含主机和设备均可使用或共用的数据类型或结构定义
└── test/          # 批量测试脚本
PCIE模式编译
cd samples
# 当前已处于tpu-kernel/samples目录下

mkdir build && cd build

# 编译Release版本的主机程序
cmake ../

# 如果要编译Debug版本的主机程序, 可以执行
# cmake ../ -DCMAKE_BUILD_TYPE=Debug

# 编译device目录中的自定义算子,并与libbm1684x.a进行链接
# 最终生成libbm1684x_kernel_module.so和host程序
make -j
CMODEL模式编译
cd samples
# 当前已处于tpu-kernel/samples目录下

mkdir build_cmodel && cd build_cmodel

# 为方便调试,默认编译的是Debug版本程序
cmake ../

# 指定生成的cmodel版的firmware,
# set_cmodel_firmware是envsetup.sh提供的命令
set_cmodel_firmware ./libcmodel.so

# 编译主机的应用程序
make -j
SOC模式编译
cd samples
# 当前已处于tpu-kernel/samples目录下

mkdir build_soc && cd build_soc

# 默认编译的是Release版本程序
cmake ../

# 编译device目录中的自定义算子,并与libbm1684x.a进行链接
# 最终生成libbm1684x_kernel_module.so和host程序
make -j

# 收集soc上用到的相关文件
# 会在当前目录下生成install文件夹
make install
运行方法与pcie及cmodel有所差异,运行方法如下
将当前目录生成的install文件夹全部复制到SOC设备上
# 假设:
# 1. 已经登录到soc设备上,复制了install完整文件夹
# 2. 有完整的且版本和编译所用的SDK匹配libsophon环境
# 3. 当前目录为install目录

cd bin
# 运行测试程序,这里以tpu_crop为例
# 单次运行
./tpu_crop
# 批量测试(不建议在cmodel模式下运行, 时间会比较长)
python3 ../test/batch_test_crop.py
算子功能说明
经过上一步的编译,会在当前build目录下生成以下应用,分别对应以下将要说明的算子,同时在../test中会有相关的batch_test_xxx.py的批量测试脚本,用于性能测试
tpu_gemm
tpu_database_topk
tpu_database_group_topk
tpu_multi_crop_resize
tpu_rgb2yuv
tpu_yuv2rgb_formula
tpu_yuv2rgb_lookup_table
tpu_warp_affine
tpu_warp_affine_bilinear
tpu_crop
tpu_rpn
tpu_hanming_distance
tpu_image_resize
tpu_pad
tpu_crop_and_resize
tpu_resize_using_lut
tpu_yuv_deinterlace
tpu_test_instructions
注意: 以上程序只能运行在device_id=0的BM1684X的设备上
tpu_gemm
GEMM(General Matrix Multiplication)通用矩阵乘法是TPU的典型运算,本示例会计算shape为MxK和KxN的两个矩阵乘法。
相关文件包括
include/tpu_api_protocol.h
host/tpu_gemm.cpp
device/tpu_device_gemm.c
test/batch_test_gemm.py
下面是`tpu_gemm`命令的相关使用说明:
# 打印使用说明
./tpu_gemm -h
# 输出如下
# --L_ROW(-m) xxx   : Left matrix row, there is no limit on the maximum if cpu side can malloc enough memory, default 10
# --L_COL(-k) xxx   : Left matrix columns, there is no limit on the maximum if cpu side can malloc enough memory, default 10
# --R_COL(-n) xxx   : Right matrix columns, there is no limit on the maximum if cpu side can malloc enough memory, default 20
# --idtype(-i) xxx   : input data_type, 5:FP32, 3:FP16, 1:INT8, 0:UINT8, 7:INT16, 6:UINT16, 9:INT32, 8:UINT32, 11:BFP16 default: FP32
# --odtype(-o) xxx   : output data_type, default: FP32
# --seed(-s) xxx   : set test seed
# --compare(-c) xxx   : need compare result, default=1
# 注意事项: 关于idtype和odtype的组合,支持如下组合(表达方式:idtype/odtype):
#  FP32/FP32, FP16/FP16, FP16/FP32, BFP16/FP32, BFP16/BFP16, INT8/FP32, INT8/INT32,
#  INT8/INT16, INT8/INT8, UINT8/FP32, UINT8/UINT32, UINT8/UINT16, UINT8/UINT8,
#  UINT16/UINT32, UINT16/INT32, INT16/UINT32, INT16/INT32
# 默认参数运行
./tpu_gemm
# 输出如下
# L_row=10, L_col=10, R_col=20, L=F32, R=F32, Y=F32, time=13(us) --> success

# 批量测试(不建议在cmodel模式下运行, 时间会比较长)
# 如果测试时开启比对,由于还要做本地矩阵计算,运行时间很长
# 最终会生成gemm.csv文件

# 以下针对pcie平台测试
# 关闭比对测试
python3 ../test/batch_test_gemm.py 0
# 开启比对测试(不建议在CMODEL、SOC下或仅关心性能情况下运行)
python3 ../test/batch_test_gemm.py 1

# 以下针对SOC平台下测试
# 由于SOC上资源受限,仅测试所需设备内存在2G以下的cases,并关闭比对
MAX_MEM=2*1024*1024*1024 python3 ../test/batch_test_gemm.py 0
tpu_database_topk
全库TopK是基于行人数据库场景模拟的操作,数据结构与参数如下:
假设每条行人数据有所在库ID、性别、是否戴帽、置信度四个属性
一共有db_num个数据库
所有total_people_num数据根据所在库ID随机分布在这db_num个数据库中
算子运行流程如下:
从db_num个数据库中选出db_sel_num个数据库的数据,并根据性别、是否戴帽、置信度设定数据过滤选项, 利用TPU执行数据过滤
此时过滤出的数据混在一起, 将这些数据按照置信度属性选择前K个最大值和对应的原始index
相关文件:
include/tpu_api_protocol.h
host/tpu_database_topk.cpp
device/tpu_device_attr_filter.c
device/tpu_device_topk.c
test/batch_test_topk.py
tpu_database_topk 使用:
# 参数含义见上面数据结构与参数说明部分
./tpu_database_topk [total_people_num] [db_num] [db_sel_num] [k]
# total_people_num : 不限制最大值
# db_num : 底库数量, 不超过数据总量, 不建议超过512
# db_sel_num : 挑选的底库数量, 不超过db_num
# k : 前k个最大值, 不超过挑选后数据总量

# Default settings:
# total number of people is 1000000,
# total number of databases is 64,
# select 64 databases,
# get the top 10 item
./tpu_database_topk

# Custom settings:
# total number of people is 1000000,
# total number of databases is 64,
# select 5 databases,
# get the top 1 item
./tpu_database_topk 1000000 64 5 1

# 输出如下
# TopK total_people_num=1000000, db_num=64, db_sel_num=5, k=1, avg_time=0.8205(ms)
#   --> Topk value: [ 99.9954 ]
#   --> Topk index: [ 999954 ]


# 批量测试(不建议在cmodel模式下运行, 时间会比较长)
# 最终会输出topk.csv
python3 ../test/batch_test_topk.py
tpu_database_group_topk
分库TopK是基于行人数据库场景模拟的操作,数据结构与参数如下:
假设每条行人数据有所在库ID、性别、是否戴帽、置信度四个属性
一共有db_num个数据库
所有total_people_num数据根据所在库ID随机分布在这db_num个数据库中
算子运行流程如下:
从db_num个数据库中选出db_sel_num个数据库的数据,并根据性别、是否戴帽、置信度设定数据过滤选项,利用TPU执行数据过滤
利用TPU将混在一起的数据按照所在库ID将分成db_sel_num组
分别将每组中数据按照置信度选择前K个最大值,最终会输出db_sel_num组value和index结果
和全库TopK区别在于全库TopK是把过滤出的数据放到一起,选其中的前K条数据,而分库是把过滤出的数据按照数据库ID分开,分别在db_sel_num个数据库中取前K条数据
相关文件如下:
include/tpu_api_protocol.h
host/tpu_database_group_topk.cpp
device/tpu_device_attr_filter.c
device/tpu_device_db_seperate.c
device/tpu_device_topk.c
test/batch_test_group_topk.py
tpu_database_group_topk 使用说明:
# 参数含义见上面数据结构与参数说明部分
./tpu_database_group_topk [total_people_num] [db_num] [db_sel_num] [k]
# total_people_num : 不限制最大值
# db_num : 底库数量, 不超过数据总量, 不建议超过512
# db_sel_num : 挑选的底库数量, 不超过db_num
# k : 前k个最大值, 不超过各数据库中挑选后数据总量

# Default settings:
# total number of people is 1000000,
# total number of databases is 64,
# select 64 databases,
# get the top 10 item
./tpu_database_group_topk

# Custom settings:
# total number of people is 1000000,
# total number of databases is 64,
# select 5 databases,
# get the top 1 item
./tpu_database_group_topk 1000000 64 5 1

# output as follows:
# Group TopK total_people_num=1000000, db_num=64, db_sel_num=5, k=1, avg_time=1.2234(ms)
#   --> Group 0 Topk value: [ 99.9778 ]
#   --> Group 0 Topk index: [ 999778 ]
#   --> Group 1 Topk value: [ 99.9634 ]
#   --> Group 1 Topk index: [ 999634 ]
#   --> Group 2 Topk value: [ 99.989 ]
#   --> Group 2 Topk index: [ 999890 ]
#   --> Group 3 Topk value: [ 99.9954 ]
#   --> Group 3 Topk index: [ 999954 ]
#   --> Group 4 Topk value: [ 99.9942 ]
#   --> Group 4 Topk index: [ 999942 ]

# 批量测试(不建议在cmodel模式下运行, 时间会比较长)
# 最终会输出group_topk.csv
python3 ../test/batch_test_group_topk.py
tpu_multi_crop_resize
tpu_multi_crop_resize 展示了如何对一张图像按照roi_num(1到10之间)个框进行crop,并将crop出来的roi图像resize成给定的输出大小。支持的格式有YUV420,NV12,GRAY和RGB_PLANAR。
相关文件如下:
include/tpu_api_protocol.h
host/tpu_multi_crop_resize.cpp
device/tpu_device_multi_crop_resize.c
test/batch_test_multi_crop_resize.py
tpu_multi_crop_resize 使用说明:
./tpu_multi_crop_resize roi_num src_format dst_format src_h src_w roi_h roi_w dst_h dst_w
# roi_num: the number of cropped images
# src format: the format of the input image, 0-YUV420P, 3-NV12, 8-RGB_PLANAR, 14-GRAY
# dst_format: the format of the output image, 0-YUV420P, 3-NV12, 8-RGB_PLANAR, 14-GRAY
# src_h: the height of the input image
# src_w: the width of the input image
# roi_h: the height of the cropped image
# roi_w: the width of the cropped image
# dst_h: the height of the output image
# dst_w: the width of the output image

# 使用示例
# ./tpu_multi_crop_resize 5 0 3 1280 720 1280 720 960 540
# [TPUKERNEL-MULTI_CROP_RESIZE] src_format: 0 dst_format: 3 roi_num: 5 src_h: 1280 src_w: 720 roi_h: 1280 roi_w: 720 dst_h: 960 dst_w: 540
# using time= 162366(us)
# tpu_kernel_api_multi_crop_resize comparing for output idx 0
# tpu_kernel_api_multi_crop_resize comparing for output idx 1
# tpu_kernel_api_multi_crop_resize comparing for output idx 2
# tpu_kernel_api_multi_crop_resize comparing for output idx 3
# tpu_kernel_api_multi_crop_resize comparing for output idx 4
# tpu_kernel_api_multi_crop_resize single_test succeeded
# -----[TEST MULTI_CROP_RESIZE WITH TPUKERNEL] ALL TEST PASSED!


# 批量测试(不建议在cmodel模式下运行, 时间会比较长)
# 最终会生成multi_crop_resize.csv
python3 ../test/batch_test_multi_crop_resize.py

备注:
1. 且只支持偶数宽度和高度。
2. 支持的图像尺寸范围是2*2 ~ 4096*4096。
3. 输入u8支持输出u8。
tpu_rgb2yuv
tpu_rgb2yuv 实现了RGB图像到YUV格式的转换,目前输出的YUV只支持I420。只支持偶数宽度和高度。
相关文件包括:
include/tpu_api_protocol.h
host/tpu_rgb2yuv.cpp
device/tpu_device_cv_rgb2yuv.c
test/batch_test_rgb2yuv.py
tpu_rgb2yuv 使用说明
./tpu_rgb2yuv [input_height] [input_width]

# input image resolution: 32 * 32   | 64 * 64   | 96 * 96   |
                          128 * 128 | 256 * 256 | 384 * 384 |
                          512 * 512 | 960 * 540 | 1280 * 720
# output image resolution: Same size as input image.


# 使用示例
./tpu_rgb2yuv 256 256

# 输出如下
# ---------------parameter-------------
# width=256, height=256
#
# - rgb2yuv TPU using time= 86(us)
# rgb2yuv successful!

# 批量测试(不建议在cmodel模式下运行, 时间会比较长)
# 最终会输出rgb2yuv.csv文件
python3 ../test/batch_test_rgb2yuv.py

备注:
1. 且只支持偶数宽度和高度。
2. 支持的图像尺寸范围是2*2 ~ 4096*4096。
3. 输入u8支持输出u8。
tpu_yuv2rgb_formula
tpu_yuv2rgb_formula 基于公式法实现了YUV格式图像转换为BGR Planner格式,目前只支持I420、NV12、NV21,且只支持偶数宽度和高度。
相关文件包括:
include/tpu_api_protocol.h
host/tpu_yuv2rgb_formula.cpp
device/tpu_device_cv_yuv2rgb_formula.c
test/batch_test_yuv2rgb_formula
tpu_yuv2rgb_formula 使用说明
./tpu_yuv2rgb_formula [src_image_format] [output_data_format] [output_height] [output_width]

# output image resolution: 32 * 32   | 64 * 64   | 96 * 96   |
#                          128 * 128 | 256 * 256 | 384 * 384 |
#                          512 * 512 | 640 * 640 | 1280 * 720
# src_image_format : I420 (0) | NV12 (3) | NV21 (4)
# output_data_format : FP32 (0) | U8 (1) | FP16 (5)

# 使用示例
./tpu_yuv2rgb_formula 0 0 128 128

---------------parameter-------------
input_height: 128
input_width: 128
src_image_format: YUV420
output_data_format: FP32
-------------------------------------
----- using time: 101us -----
------[TEST YUV2RGB] ALL TEST PASSED!

# 批量测试(不建议在cmodel模式下运行, 时间会比较长)
# 最终会输出yuv2rgb_formula.csv文件
python3 ../test/batch_test_yuv2rgb_formula.py

备注:
1. 且只支持偶数宽度和高度。
2. 支持的图像尺寸范围是2*2 ~ 4096*4096。
3. 输入u8支持输出u8和fp32。
tpu_yuv2rgb_lookup_table
tpu_yuv2rgb_lookup_table 基于查表法实现了YUV格式图像转换为BGR Planner格式,目前只支持I420、NV12、NV21,且只支持偶数宽度和高度。
相关文件包括:
include/tpu_api_protocol.h
host/tpu_yuv2rgb_lookup_table.cpp
device/tpu_device_cv_yuv2rgb_lookup_table.c
test/batch_test_yuv2rgb_lookup_table
tpu_yuv2rgb_lookup_table 使用说明
./tpu_yuv2rgb_lookup_table [src_image_format] [output_data_format] [output_height] [output_width]

# output image resolution: 32 * 32   | 64 * 64   | 96 * 96   |
#                          128 * 128 | 256 * 256 | 384 * 384 |
#                          512 * 512 | 640 * 640 | 1280 * 720
# src_image_format : I420 (0) | NV12 (3) | NV21 (4)
# output_data_format : FP32 (0) | U8 (1) | FP16 (5)

# 使用示例
./tpu_yuv2rgb_lookup_table 0 0 128 128

[TEST YUV2RGB] test starts... LOOP times will be 1
------[TEST YUV2RGB] LOOP 0------
random seed 828228
---------------parameter-------------
input_height: 128
input_width: 128
src_image_format: YUV420
output_data_format: FP32
-------------------------------------
----- using time: 31139(us) --
------[TEST YUV2RGB] ALL TEST PASSED!

# 批量测试(不建议在cmodel模式下运行, 时间会比较长)
# 最终会输出yuv2rgb_lookup_table.csv文件
python3 ../test/batch_test_yuv2rgb_lookup_table.py

备注:
1. 且只支持偶数宽度和高度。
2. 支持的图像尺寸范围是2*2 ~ 4096*4096。
3. 输入u8支持输出u8和fp32。
tpu_warp_affine
tpu_warp_affine 实现了图像的仿射变换,可以实现对图像的平移、缩放、旋转操作,目前该接口支持RGB Planer格式。
相关文件包括:
include/tpu_api_protocol.h
host/tpu_warp_affine.cpp
device/tpu_device_warp_affine.c
test/batch_test_warp_affine.py
tpu_warp_affine 使用说明:
./tpu_warp_affine [input_height] [input_width] [output_height] [output_width]

# input image resolution: 68 * 68 | 128 * 128 | 384 * 336 | 410 * 720
# output image resolution: 64 * 64 | 112 * 112 | 224 * 224 | 384 * 384 | 400 * 400

./tpu_warp_affine 128 128 64 64

# 输出如下:
# ---------------parameter-------------
# input_height: 128
# input_width: 128
# output_height: 64
# output_width: 64
# -------------------------------------
# -- warp_affine TPU using time: 207us --
# ------[WARP_AFFINE TEST PASSED!]------


# 批量测试(不建议在cmodel模式下运行, 时间会比较长)
# 最终会输出warp_affine.csv文件
python3 ../test/batch_test_warp_affine.py

备注:
1. 支持的图像尺寸范围是2*2 ~ 4096*4096。
2. 输入u8支持输出u8。
tpu_warp_affine_bilinear
tpu_warp_affine_bilinear 实现了图像的仿射变换,可以实现对图像的平移、缩放、旋转操作,目前该接口支持RGB Planer和Gray格式。
相关文件包括:
include/tpu_api_protocol.h
host/tpu_warp_affine_bilinear.cpp
device/tpu_device_warp_affine_bilinear.c
test/batch_test_warp_affine_bilinear.py
tpu_warp_affine_bilinear 使用说明:
./tpu_warp_affine_bilinear [flag] [input_data_format] [output_data_format] [image_format] [input_height] [input_width] [output_height] [output_width]
# flag: 0 表示测试特定的参数;1 表示测试 1024 以内的随机宽高图像;2 表示测试1024到2048之间随机宽高的图像;3 表示测试2048到4096之间随机宽高的图像
# input_data_format:  0 --> fp32 ; 1  --> u8
# output_data_format:  0 --> fp32 ; 1  --> u8
# image_format: 9 --> bgr ; 14 --> gray
# input image resolution: larger than the width and height of the output image
# output image resolution: 2 * 2 -----> 4096 *4096

./tpu_warp_affine_bilinear 0 0 0 9 2000 2000 128 128

# 输出如下:
# ---------------parameter-------------
# input_height: 2000
# input_width: 2000
# image_height: 128
# image_width: 128
# image_format: FORMAT_MAPPING_BGR_PLANAR
# input_data_format: FP32
# output_data_format: FP32
# -------------------------------------
# -- warp affine bilinear TPU using time: 7282(us) --
# ------[WARP_AFFINE BILINEAR TEST PASSED!]------

# 批量测试(不建议在cmodel模式下运行, 时间会比较长)
# 最终输出 warp_affine_bilinear.csv文件
python3 ../test/batch_test_warp_affine_bilinear.py

备注:
1. 支持的图像尺寸范围是2*2 ~ 4096*4096。
2. 输入u8支持输出u8和fp32;输入fp32支持输出fp32。
tpu_crop
tpu_crop 实现了将输入图像按照指定大小进行裁剪,目前支持YUV420P、NV12、NV21三种格式。
相关的文件包括:
include/tpu_api_protocol.h
host/tpu_crop.cpp
device/tpu_device_crop.c
test/batch_test_crop.py
tpu_crop 使用说明:
./tpu_crop format input_h input_w output_h output_w
# format: the format of the input and output images, 0-YUV420P, 3-NV12, 4-NV21
# input size: the input image size, input_h * input_w
# output size: the output image size, output_h * output_w

# 输出如下:
# ./tpu_crop 4 1280 720 32 32
# format: 4
# input size: 1280 * 720
# output size: 32 * 32
# using time= 69(us)

# 批量测试(不建议在cmodel模式下运行, 时间会比较长)
# 最终输出crop.csv文件
python3 ../test/batch_test_crop.py

备注:
1. 支持的图像尺寸范围是2*2 ~ 4096*4096。
2. 输入u8支持输出u8。
tpu_yuv_deinterlace
tpu_yuv_deinterlace 实现了NV12/NV21格式到I420格式的转换
相关的文件包括:
include/tpu_api_protocol.h
host/tpu_yuv_deinterlace.cpp
device/tpu_device_yuv_deinterlace.c
test/batch_test_yuv_deinterlace.py
tpu_yuv_deinterlace 使用说明:
./tpu_yuv_deinterlace img_h img_w src_format
# img_size: the size of image, img_h * img_w
# format: the format of the input images, 3-NV12, 4-NV21

# 输出如下:
# ./tpu_yuv_deinterlace 1920 1080 3
---------------parameter-------------
img_num : 1
img_height: 1080
img_width: 1920
src_image_format: FORMAT_NV12
dst_image_format: FORMAT_YUV420P
-------------------------------------
-- tpu_kernel_yuv_deinterlace TPU using time: 31298(us) --
------[YUV_DEINTERLACE TEST PASSED!]------


# 批量测试(不建议在cmodel模式下运行, 时间会比较长)
# 最终输出yuv_deinterlace.csv文件
python3 ../test/batch_test_yuv_deinterlace.py

备注:
1. 输入u8支持输出u8。
2. 支持的图像尺寸范围是2*2 ~ 4096*4096。
tpu_hanming_distance
汉明距离表示两个相同长度的字符串在相同位置上不同字符的个数.
相关的文件包括:
include/tpu_api_protocol.h
host/tpu_hanming_distance.cpp
device/tpu_device_hm_distance.c
test/batch_test_hm_distance.py
tpu_hanming_distance 使用说明:
./tpu_hanming_distance vec_dims query_num database_num
# vec_dims: 8
# query_num : <= 32
# database_num : <= 20000000

# 输出如下:
# ./tpu_hanming_distance 8 32 100000
random seed = 1676513312
--using time = 75963(us)--
------[HAMMING_DISTANCE TEST ALL PASSED!]------

# 批量测试,最终输出 hanming_distance.csv文件
python3 ../test/batch_test_hanming_distance.py
tpu_rpn
RPN(Region Proposal Networks)是Faster RCNN出新提出来的proposal生成网络。
相关文件包括
include/tpu_api_protocol.h
host/tpu_rpn.cpp
device/tpu_device_rpn.c
test/batch_test_rpn.py
下面是 tpu_rpn 命令的相关使用说明:
# 使用说明
./tpu_rpn batch_num feature_height feature_width compare
# batch_num   : batch num, 最大值没有限制,默认为1
# feature_height   : feature map's height, 最大值没有限制, 默认14
# feature_width   : feature map's wdith, 最大值没有限制, 默认14
# compare   : 是否执行cpu算法,并与cpu算法的结果进行比较, 1:比较 0:不比较

# 输出如下
# ./tpu_rpn 4 20 14 1
random seed 3052735
batch_num: 4
feat_stride: 16
min_size: 16
base_size: 16
pre_nms_topN: 1519
post_nms_topN: 673
nms_thresh: 0.91
score_thresh: 0.71
scales_num: 3
ratios_num: 3
map_height: 20
map_width: 14
score_out_flag: 0
origin_w: 224
origin_h: 320
compare: 1
Native detected box number: 1254
time=xx(us)
result compare success


# 批量测试(不建议在cmodel模式下运行)
# 最终会生成rpn.csv文件
python3 ../test/batch_test_rpn.py
tpu_image_resize
tpu_image_resize 实现将输入图像缩放至指定宽高。
相关文件包括:
include/tpu_api_protocol.h
host/tpu_image_resize.cpp
device/tpu_device_image_resize.c
test/batch_test_image_resize.py
tpu_image_resize 使用说明:
./tpu_image_resize format src_h src_w dst_h dst_w if_padding padding_r padding_g padding_b
# format: the format of src_image and dst_image, 0-YUV420P 3-NV12 4-NV21 9-BGR_PLANAR 14-GRAY
# src_image_size: the size of src image, src_h * src_w
# dst_image_size: the size of dst_image, dst_h * dst_w
# if_padding: 0-Scale proportionally and fill according to the set pixel value
#             1-Non-proportional scaling
# padding_r: the filled value of r channel
# padding_g: the filled value of g channel
# padding_b: the filled value of b channel

# 输出如下:
# ./tpu_image_resize 0 1024 2048 200 200 0 1 2 3
---------------parameter-------------
src_format: 0
dst_format: 0
src_data_type: u8
dst_data_type: FP32
src_h: 1024
src_w: 2048
dst_h: 200
dst_w: 200
if_padding: 0
-------------------------------------
--using time = 47509(us)--
------[IMAGE_RESIZE TEST PASSED!]------


# 批量测试(不建议在cmodel模式下运行)
# 最终会生成image_resize.csv文件
python3 ../test/batch_test_image_resize.py

备注:
1. 且只支持偶数宽度和高度。
2. 支持的图像尺寸范围是2*2 ~ 4096*4096。
3. 输入u8支持输出u8和fp32;输入fp32支持输出fp32。
tpu_pad
tpu_pad 实现将输入图像按照指定大小进行填充,目前支持YUV420P、NV12、NV21、BGR_PLANAR四种格式
相关的文件包括:
include/tpu_api_protocol.h
host/tpu_pad.cpp
device/tpu_device_pad.c
test/batch_test_pad.py
tpu_pad 使用说明:
./tpu_pad format: input_h input_w up down left right format data_dtype

# input_size: input_h input_w
# pad_size: up down left right
# format: the format of the input and output images, 0-YUV420P, 3-NV12, 4-NV21,9-BGR_PLANAR
# data_type: 0-DT_UINT8, 5-DT_FP32;

# 输入如下:
# ./tpu_pad 100 100 64 64 512 512 0 0 0
# using time= 44(us)
------[The two results are consistent]!

# 批量测试(不建议在cmodel模式下运行, 时间会比较长)
# 最终输出pad.csv文件
python3 ../test/batch_test_pad.py
tpu_crop_and_resize
tpu_crop_and_resize 实现对一张图像按照roi_num(1到10之间)个框进行crop,并将crop出来的roi图像缩放成给定的输出大小
相关文件包括:
include/tpu_api_protocol.h
host/tpu_crop_and_resize.cpp
device/tpu_device_crop_and_resize.c
test/batch_test_crop_and_resize.py
tpu_crop_and_resize 使用说明:
./tpu_crop_and_resize roi_num format src_h src_w roi_h roi_w dst_h dst_w padding_r padding_g padding_b
# roi_num: the num of cropped image
# format: the format of src_image and dst_image, 0-YUV420P 3-NV12 4-NV21 9-BGR_PLANAR 14-GRAY
# src_image_size: the size of src image, src_h * src_w
# roi_image_size: the size of cropped images, roi_h * roi_w
# dst_image_size: the size of dst_image, dst_h * dst_w
# padding_r: the filled value of r channel
# padding_g: the filled value of g channel
# padding_b: the filled value of b channel

# 输出如下:
# ./tpu_crop_and_resize 2 3 2048 1920 200 100 600 600 1 2 3
------[TEST FP32 TO FP32!]------
---------------parameter-------------
roi_num : 2
src_format: 3
dst_format: 3
src_data_type: FP32
dst_data_type: FP32
src_h: 2048
src_w: 1920
roi_h: 200
roi_w: 100
dst_h: 600
dst_w: 600
-------------------------------------
--using time = 41544(us)--
------[IMAGE_CROP_RESIZE TEST PASSED!]------

# 批量测试(不建议在cmodel模式下运行)
# 最终会生成crop_and_resize.csv文件
python3 ../test/batch_test_crop_and_resize.py
tpu_resize_using_lut
tpu_resize_using_lut 使用查表法对一张图像进行双线性插值
相关文件包括:
include/tpu_api_protocol.h
host/tpu_resize_using_lut.cpp
device/tpu_device_resize_using_lut.c
test/batch_test_resize_using_lut.py
tpu_resize_using_lut 使用说明
./tpu_resize_using_lut [image_format] [input_height] [input_width] [output_height] [output_width] [input_dtype] [output_dtype]

# image_format : 0-YUV420P,3-NV12,4-NV21,9-BGR_PLANAR,14-GRAY
# input_height : 大于0且小于4096
# input_width : 大于0且小于4096
# output_height : 大于0且小于4096
# output_width : 大于0且小于4096
# 输入图像的height和width只能同时缩放
# 不能出现height放大width缩小,或者height缩小width放大的情况
# 如果输入格式是YUV420P、NV12或NV21的话,必须满足input_height和input_width被4整除
# input_dtype : 0-FP32,3-UINT8
# output_dtype : 0-FP32,3-UINT8
# 只支持1.FP32-in FP32-out,2.UINT8-in FP32-out,3.UINT8-in UINT8-out三种情况

# 使用示例
./tpu_resize_using_lut 9 64 64 128 128 0 0

# 终端输出如下
[TPUKERNEL-IMAGE_RESIZE_USING_LOOKUP_TABLE] src_format: 9 dst_format: 9 src_h: 64 src_w: 64 dst_h: 128 dst_w: 128 src_dtype: 0 dst_dtype: 0
TPU using time= xxx(us)
tpu_kernel_api_lut_resize single_test succeeded

# 批量测试(不建议在cmodel模式下运行, 时间会比较长)
# 最终会输出resize_using_lut.csv文件
python3 ../test/batch_test_resize_using_lut.py
tpu_test_instructions
tpu_test_instructions 通过运算指定的TPU指令,以测试TPU的算力,建议在pcie模式或soc模式下运行。
相关文件包括:
include/tpu_api_protocol.h
host/tpu_test_instructions.cpp
device/tpu_test_instructions.c
test/batch_test_instructions.py
tpu_test_instructions 使用说明:
./tpu_test_instructions [instruction_type] [data_type]
# instruction_type: the type of instruction, INS_CONV | INS_MAT_MUL2
# data_type: the type of input data, INS_CONV supports DT_INT8, DT_FP16 and DT_FP32, INS_MAT_MUL2 supports DT_INT8 and DT_FP16.

# 输出如下:
# ./tpu_test_instructions INS_MAT_MUL2 DT_INT8
# ================= start test MAT MUL 2 =================
# data type: DT_INT8  loop times: 1000
# --case 0
#   mm2 param: left matrix=(1024 2048), right matrix=(2048 1024)
#   TPU total time= 131580(us)  TPU avg time= 131.58(us)  TPU computing power= 32.64T
# --case 1
#   mm2 param: left matrix=(1024 2048), right matrix=(2048 1024)  l_matrix is transposed.  r_matrix is transposed.
#   TPU total time= 264195(us)  TPU avg time= 264.20(us)  TPU computing power= 32.51T
# --case 2
#   mm2 param: left matrix=(1024 2048), right matrix=(1024 2048)   r_matrix is transposed.
#   TPU total time= 135638(us)  TPU avg time= 135.64(us)  TPU computing power= 31.66T

# 批量测试(不建议在cmodel模式下运行)
# 最终会生成instructions.csv文件
# 会依次在命令行中执行所有支持的命令类型
python3 ../test/batch_test_instructions.py
TPU-KERNEL函数使用说明
动态加载提供了一种可以在主机(host)端直接调用tpu指令的方式,一些封装好的tpu_kernel函数打包到了动态库文件 kernel module 中,可以在主机端通过函数名来调用。 调用时tpu kernel函数时,tpu会对设备内存中的数据进行相应的计算,并将输出存储在设备内存中
设备内存管理。使用tpu kernel函数时需要管理设备内存,根据需要,您可能会涉及到的步骤有分配数据内存、 获取数据物理地址、主机和设备之间的内存拷贝等。设备内存的管理可以参考samples目录下host端代码的使用方式。
一个通用的使用流程如下,其中tpu_kernel_load_module_file() 加载库文件,tpu_kernel_get_function()获得函数id,tpu_kernel_launch()启动函数。 也可以将 kernel module 作为程序数据打包到可执行文件中,打包的方法请参考 samples 下的编译配置
需要在代码中包含头文件
#include "bmlib_runtime.h"
声明tpu kernel所需的变量
tpu_kernel_module_t tpu_module;
tpu_kernel_function_t func_id;
首先,加载 kernel module。注:库文件只需要在上下文中加载一次以避免多次加载,启动函数可多次执行。
tpu_module = tpu_kernel_load_module_file(handle, "./libbm1684x_kernel_module.so");
然后定义一个结构体,作为 tpu kernel api 需要的输入接口,将参数填入,例如:
#define INPUT_NUM 3
#define OUTPUT_NUM 2
typedef struct {
    u64 input_addr[INPUT_NUM];
    u64 output_addr[OUTPUT_NUM];
    int arg_1;
    float arg_2;
    ...
}__attribute__((packed)) api_name_t;
bm_device_mem_t input_addr;
bm_device_mem_t output_addr;
// 设置tpu_kernel算子输入参数
api_name_t *api;

api->input_addr[i] = bm_mem_get_device_addr(input_addr);
api->output_addr[i] = bm_mem_get_device_addr(output_addr);
api->arg_1 = arg_1;
api->arg_2 = arg_2;
通过函数名称来获取函数ID,启动tpu_kernel函数,执行函数功能。
func_id = tpu_kernel_get_function(handle, tpu_module, "function_name");
ret = tpu_kernel_launch(handle, func_id, &api, full_size);
// 同步线程中的tpu kernel api,等待 tpu kernel 函数执行完成
bm_thread_sync(handle);
函数执行前后,输入和结果都保存在相应的设备内存中,根据需要执行主机和设备之间的通信和数据传输。
算子功能说明
函数tpu_kernel_get_function()通过下列api的名字获取id,函数名与下文列举的标题一致。
tpu_kernel_api_yolov5_detect_out
tpu_kernel_api_yolov5_detect_out是针对ultralytics发布的yolov5系列模型封装的后处理tpu实现,其中包含box decode和NMS的处理,该函数的输入为yolov5模型的最后卷积层的直接输出,形状一般 为[n, (class + 5) * anchor_num, h_0, w_0], [n, (class + 5) * anchor_num, h_1, w_1], [n, (class + 5) * anchor_num, h_2, w_2]的三个四维张量。 输出为最终NMS处理后的bounding box数据和数目,其中输出的bounding box数据的形状是动态的,对应输出数目。
定义一个输入参数结构体
#define MAX_YOLO_INPUT_NUM 3
#define MAX_YOLO_ANCHOR_NUM 3
typedef struct {
    u64 bottom_addr[MAX_YOLO_INPUT_NUM];
    u64 top_addr;
    u64 detected_num_addr;
    int input_num;
    int batch_num;
    int hw_shape[MAX_YOLO_INPUT_NUM][2];
    int num_classes;
    int num_boxes;
    int keep_top_k;
    float nms_threshold;
    float confidence_threshold;
    float bias[MAX_YOLO_INPUT_NUM * MAX_YOLO_ANCHOR_NUM * 2];
    float anchor_scale[MAX_YOLO_INPUT_NUM];
    int clip_box;
}__attribute__((packed)) tpu_kernel_api_yolov5NMS_t;
该函数的参数
名称 |
类型 |
描述 |
bottom_addr |
u64* |
输入的数据地址,形状通常为[n, (class + 5) * anchor_num, w, h] |
top_addr |
u64 |
输出的数据地址,形状为[1,1,n,7],n为检测数量,7表示[img_id/cls_id/prob/x/y/w/h],其中img_id表示对应的图像序号,cls_id为从0开始的类别序号,x和y为框中心相对于输入尺寸的绝对坐标,w和h为宽高相对于输入尺寸的绝对坐标。 |
detected_num_addr |
u64 |
检测框数目数据地址 |
input_num |
int |
输入张量数量 |
batch_num |
int |
批次大小 |
hw_shape |
int |
输入数据形状 |
num_classes |
int |
目标类别数 |
num_boxes |
int |
每个尺度上的anchor数目 |
keep_top_k |
int |
保留的检测结果数目 |
nms_threshold |
float |
非极大值抑制的阈值 |
confidence_threshold |
float |
置信度的阈值 |
bias |
float* |
每个prior anchor的尺度 |
anchor_scale |
float* |
输入与各个尺度的特征图大小比例,也是下采样率 |
clip_box |
int |
裁剪框的边界以至于不超过输入尺寸 |
agnostic_nms |
int |
控制类内或类间NMS的参数,为0时表示NMS时区分类别,为1时表示NMS时不区分类别 |
根据输出的检测框数量,确定检测结果的大小,传递到主机中
int dt_num_data = 0;
bm_memcpy_d2s_partial_offset(handle,
                            (void *)dt_num_data,
                            detect_num_mem,
                            batch_num * sizeof(int32_t),
                            0);
output_tensor.shape[2] = *dt_num_data;
bm_memcpy_d2s_partial_offset(handle,
                            (void *)output_data,
                            out_dev_mem,
                            output_tensor.shape[2] * output_tensor.shape[3] * sizeof(float),
                            0);
模型导出方法: 对yolov5/models/yolo.py中定义的Detect类方法”forward()”进行修改:1、对permute以及之后的代码注释; 2、返回‘x’,然后运行”python3 export.py”。最后导出的模型输出形状为[n, (class + 5) * anchor_num, w, h] * x。 其中 n 表示 batch size,class 表示预测的目标类别数,anchor_num 表示每个 grid cell 预测的 anchor 数量, w 和 h 表示 feature map 的宽度和高度,x 表示 feature map 的数量。因此,模型输出的形状是一个四维张量的列表,其中列表的长度为 x。
def forward(self, x):
  z = []  # inference output
  for i in range(self.nl):
      x[i] = self.m[i](x[i])  # conv
  #     bs, _, ny, nx = x[i].shape  # x(bs,255,20,20) to x(bs,3,20,20,85)
  #     x[i] = x[i].view(bs, self.na, self.no, ny, nx).permute(0, 1, 3, 4, 2).contiguous()
  #
  #     if not self.training:  # inference
  #         if self.dynamic or self.grid[i].shape[2:4] != x[i].shape[2:4]:
  #             self.grid[i], self.anchor_grid[i] = self._make_grid(nx, ny, i)
  #
  #         if isinstance(self, Segment):  # (boxes + masks)
  #             xy, wh, conf, mask = x[i].split((2, 2, self.nc + 1, self.no - self.nc - 5), 4)
  #             xy = (xy.sigmoid() * 2 + self.grid[i]) * self.stride[i]  # xy
  #             wh = (wh.sigmoid() * 2) ** 2 * self.anchor_grid[i]  # wh
  #             y = torch.cat((xy, wh, conf.sigmoid(), mask), 4)
  #         else:  # Detect (boxes only)
  #             xy, wh, conf = x[i].sigmoid().split((2, 2, self.nc + 1), 4)
  #             xy = (xy * 2 + self.grid[i]) * self.stride[i]  # xy
  #             wh = (wh * 2) ** 2 * self.anchor_grid[i]  # wh
  #             y = torch.cat((xy, wh, conf), 4)
  #         z.append(y.view(bs, self.na * nx * ny, self.no))
  #
  # return x if self.training else (torch.cat(z, 1),) if self.export else (torch.cat(z, 1), x)
  return x
注意: 当confidence_threshold太低,或者输入尺寸过大时,可能会导致中间结果过多,从而导致tpu内存溢出,结果可能不准确。建议设置一个比较高的置信度阈值。
tpu_kernel_api_yolov5_out_without_decode
tpu_kernel_api_yolov5_out_without_decode是针对ultralytics发布的YOLOv5系列模型封装的后处理tpu实现,其中包含候选框过滤和NMS,该函数的输入 为yolov5模型最终输出(一般为3个分支concat到一起、经过box decode,形状一般为[n, box_num, class_num + 5]的三维张量), 输出为最终NMS处理后的bounding box数据和数目,其中输出的bounding box数据的形状是动态的,对应输出数目。
定义一个输入参数结构体
typedef struct {
    u64 bottom_addr;
    u64 top_addr;
    u64 detected_num_addr;
    int input_shape[3];
    int keep_top_k;
    float nms_threshold;
    float confidence_threshold;
    int agnostic_nms;
    int max_hw;
}__attribute__((packed)) tpu_kernel_api_yolov5NMS_v2_t;
该函数的参数
名称 |
类型 |
描述 |
bottom_addr |
u64 |
输入的数据地址,形状通常为[n, box_num, class_num + 5],其中”class_num + 5”表示为:xy-中心点绝对坐标、wh-绝对宽高、conf-置信度、classes-各个类别之概率 |
top_addr |
u64 |
输出的数据地址,形状为[1,1,n,7],n为检测数量,7表示[img_id/cls_id/prob/x/y/w/h],其中img_id表示对应的图像序号,cls_id为从0开始的类别序号,x和y为框中心相对于输入尺寸的绝对坐标,w和h为宽高相对于输入尺寸的绝对坐标。 |
detected_num_addr |
u64 |
检测框数目数据地址 |
input_shape |
int* |
输入张量形状 |
keep_top_k |
int |
保留的检测结果数目 |
nms_threshold |
float |
非极大值抑制的阈值 |
confidence_threshold |
float |
置信度的阈值 |
agnostic_nms |
int |
控制类内或类间NMS的参数,为0时表示NMS时区分类别,为1时表示NMS时不区分类别 |
max_hw |
int |
模型输入图像宽高的最大尺寸 |
根据输出的检测框数量,确定检测结果的大小,传递到主机中
int dt_num_data = 0;
bm_memcpy_d2s_partial_offset(handle,
                            (void *)dt_num_data,
                            detect_num_mem,
                            batch_num * sizeof(int32_t),
                            0);
output_tensor.shape[2] = *dt_num_data;
bm_memcpy_d2s_partial_offset(handle,
                            (void *)output_data,
                            out_dev_mem,
                            output_tensor.shape[2] * output_tensor.shape[3] * sizeof(float),
                            0);
模型导出方法: 在yolov5工程中直接运行”python3 export.py”。最后导出的模型输出形状为[n, box_num, class + 5]。其中n表示batch size, box_num表示输出的特征图总共有多少个候选框,class表示类别数量。最后的输出i是一个3维张量。
注意 当confidence_threshold太低,或者输入尺寸过大时,可能会导致中间结果过多,从而导致tpu内存溢出,结果可能不准确。建议设置一个比较高的置信度阈值。
tpu_kernel_api_pointpillars_pillar_encoder
tpu_kernel_api_pointpillars_pillar_encoder是针对mmdetection3d发布的点云pointpillars模型中middle encoder部分的tpu实现,包含了pillar_encoder、pfn、scatter三部分,该函数的输入是pointpillars前处理的输出,包括voxels[N x 4],coors[N x 3],num_points_per_voxels[N]三个张量。 该函数的输出是一个[64 x 214272]的张量,是将所有pillar的特征scatter到一张496*432的图上,其中每个pillar有64个特征。
定义一个输入参数结构体
typedef struct {
    u64 voxels_addr;
    u64 coors_addr;
    u64 num_points_addr;
    u64 batchmatmul_weight_addr;
    u64 BN_scale_addr;
    u64 BN_bias_addr;
    u64 pillar_encoder_output_addr;
    u64 pfn_output_addr;
    u64 scatter_indices_addr;
    u64 scatter_buffer_addr;
    u64 output_addr;
    float voxel_size[3];
    float voxel_zyx[3];
    int grid_size_x;
    int max_points_per_voxel;
    int voxel_num;
    int dtype; // 0-FP16 1-FP32
} __attribute__((packed)) tpu_kernel_api_pillar_encoder_t;
该函数的参数
名称 |
类型 |
描述 |
voxels_addr |
u64 |
输入voxels的数据地址,形状通常为[N, 4],N为voxels的数量,4分别为激光雷达点的特征x、y、z、i |
coors_addr |
u64 |
输入coors的数据地址,形状为[N,3],保存了每个voxel的坐标 |
num_points_addr |
u64 |
输入num_points的数据地址,形状为[N],保存了每个voxel中有效点的数量 |
batchmatmul_weight_addr |
u64 |
pfn层BatchMatmul所用权重的数据地址,形状为[1,64,10] |
BN_scale_addr |
u64 |
pfn层BatchNorm所用scale的数据地址,形状为[1,64,1] |
BN_bias_addr |
u64 |
pfn层BatchNorm所用bias的数据地址,形状为[1,64,1] |
pillar_encoder_output_addr |
u64 |
第一部分pillar_encoder的输出地址,形状为[N,32,10] |
pfn_output_addr |
u64 |
第二部分pfn的输出地址,形状为[N,64] |
output_addr |
u64 |
第三部分scatter的输出地址,形状为[64,214272] |
scatter_buffer_addr |
u64 |
scatter计算所需的buffer地址,形状为[64,214272] |
voxel_size[3] |
float |
每个voxel在z、y、x三个方向上的长度 |
voxel_zyx[3] |
float |
计算voxel的center features所需的z、y、x三个维度上的参数 |
grid_size_x |
int |
x方向上网格大小 |
max_points_per_voxel |
int |
每个voxel可包含点的最大数量 |
voxel_num |
int |
前处理得到的voxel数量 |
dtype |
int |
可选用fp32或fp16模式计算,0-FP16 1-FP32 |
将输出地址output_addr传递给backbone,进行后续的推理
附录1: 批量测试通用使用方法
在samples/test目录下会有命名如batch_test_xxx.py的测试脚本,可以通过环境变量 CASE_START, CASE_COUNT 来控制测试case的起始和运行个数。当脚本运行完成后,会生成xxx.csv文件,里面会记录CASE参数与运行时间。 下面以 batch_test_topk.py 为例进行说明:
假设当前在sample/build目录下,并且已经编译好应用程序。
# 运行CASE {5, 6}. 注意索引从0开始
CASE_START=5 CASE_COUNT=2 python3 ../test/batch_test_topk.py

# 运行所有CASES
python3 ../test/batch_test_topk.py
```
batch_test.py是所有测试脚本的基础库, 里面的general_batch_test用法如下,在测试时可以自行写对应脚本
def general_batch_test(
            command_params, exclude_func=None,
            is_format=False, param_names=None, title=None):
  """
  for 'command1 p0 p1 p2 p3 p4' test, let
      is_format=False
      command_params = [
          ("command1", [[p0_1, p0_2, p0_3], [(p1_0, p2_0), (p1_1, p2_1)], [(p3, p4)]]),
          ("command1", [[p0_4], [(p1_3, p2_3), (p1_4, p2_4)], [(p3, p4)]]),
      ]
  will generate following cases:
      command1 p0_1 p1_0 p2_0 p3 p4
      command1 p0_1 p1_1 p2_1 p3 p4
      command1 p0_2 p1_0 p2_0 p3 p4
      command1 p0_2 p1_1 p2_1 p3 p4
      command1 p0_3 p1_0 p2_0 p3 p4
      command1 p0_3 p1_1 p2_1 p3 p4
      command1 p0_4 p1_3 p2_3 p3 p4
      command1 p0_4 p1_4 p2_4 p3 p4
  for "command2 -m {} -n {] -k {}" test, let
      is_format=True
      command_params = [
          ("command2", [[p0_1, p0_2, p0_3], [(p1_0, p2_0), (p1_1, p2_1)]]),
      ]
  will generate following cases:
      command2 -m p0_1 -n p1_0 -k p2_0
      command2 -m p0_1 -n p1_1 -k p2_1
      command2 -m p0_2 -n p1_0 -k p2_0
      command2 -m p0_2 -n p1_1 -k p2_1
      command2 -m p0_3 -n p1_0 -k p2_0
      command2 -m p0_3 -n p1_1 -k p2_1

  exclude_func: func(param) filter invalid param combinations, the param is ignored when return True
  param_names: use for generated csv file as csv table titles, such as ['m', 'k', 'n'] for 'command2' or ['p0', 'p1', 'p2', 'p3', '4' ] for 'command1'
  title: generate {title}.csv file if not None

  At last, the function will search time = *(*) or time: *(*) pattern in command outputs to collect time info, write into {title}.csv file
  """