5. cviDownloadTool
5.1. CviDownloadTool Introduction
Cvi download tool is a visual burning tool.
The single board is burned through USB, and a single device can be selected for programming, and bare processor programming is supported.
You can also choose a USB burning tool that supports up to 8 devices burning at the same time.
Note
To burn the board through USB, the following conditions must be met:
The USB interface of the PC is connected to the USB2.0 port of the board
The board must satisfy a system reset, which can be power-on reset or system soft reset.
When the above conditions must be met at the same time, the board can enter the USB burning process.
5.2. Configure Tool Parameters
There is a config folder in the directory where the tool is located.
There is a board config.ini configuration file in the folder.
Before opening the tool, users must modify each configuration option of the configuration file according to their own needs.
Burn_Type: Burn mode configuration
Burn_Type: Burn type
Currently three methods are supported:
Default: Default mode, the homepage selection page will be showed by default. The user can manually choose to enter the Single_Burn page or enter the Multiple_Burn page.
Single:Single burn mode, the Single_Burn page will be showed directly.
Multiple:Multiple burn mode, the Multiple_Burn page will be showed directly
Burn_Page_Feature:Select page feature
Currently six methods are supported:
Full:Full feature will show in Single cvi Burn
Only_Burn:Only Burn will show in Single cvi Burn
Only_Burn_USB:Only Burn USB will show in Single cvi Burn
Only_Burn_Emmc:Only Burn Emmc will show in Single cvi Burn
Only_Burn_NAND:Only Burn NAND will show in Single cvi Burn
Only_TFTP:TFTP will show in Single cvi Burn
Processor: Single board configuration
processor_type: board type
Currently supported board types are as follows:
cv180x
cv181x
cv182x
cv183x
O/S: System configuration
OS_type: system type
Currently supported system types are as follows:
alios
linux
dual_os
Note
If Burn_Type does not type the correct mode name, the home page selection interface will be opened by default.
If Burn_Page_Feature does not type the correct feature name, the full feature interface will be opened by default.
5.3. How to Use CviDownloadTool
Start cviDownloadTool, Enter the visual selection interface, You can choose the one-to-one burning tool (Single Cvi Burn) Or multiple Cvi Burn tool.
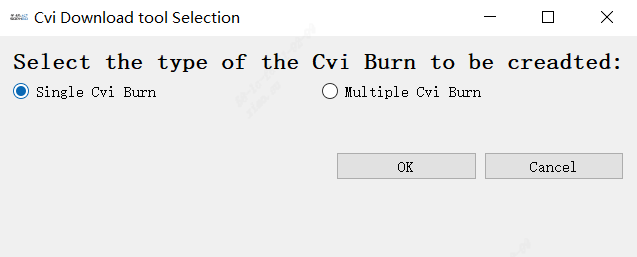
Fig. 5.1 Select interface
5.3.1. One-to-one Burning Tool (Single Cvi Download) Operation Process
Step1.1
After selecting the Single CviBurn burning tool type, click the OK button to jump to the corresponding page.
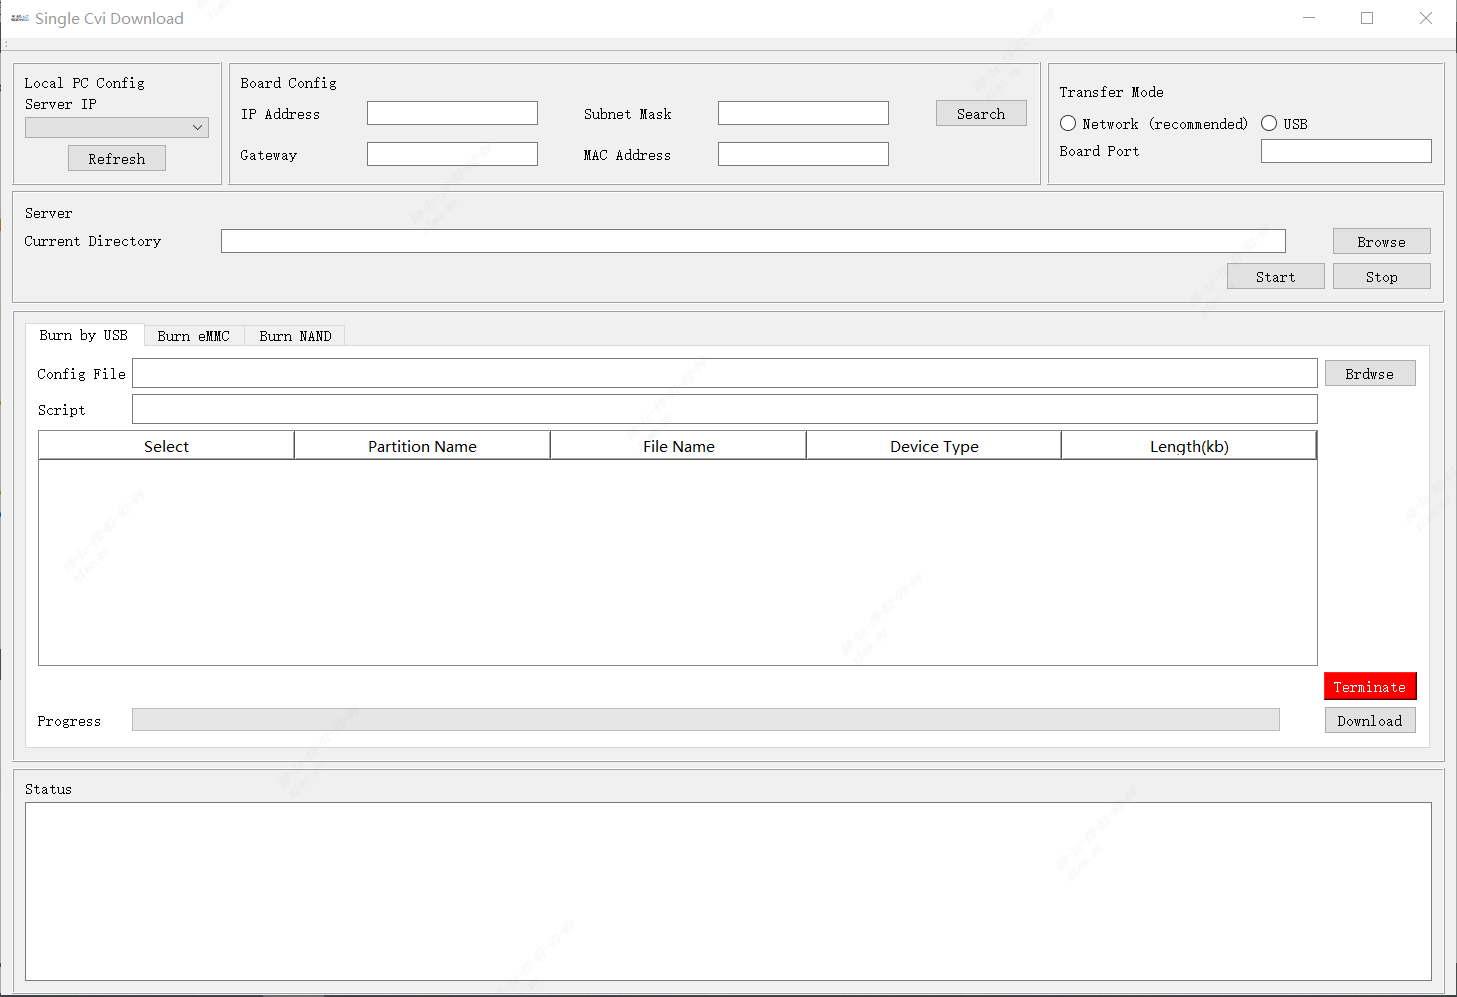
Fig. 5.2 Single CviBurn burning tool interface
Step1.2
Click the brdwse button and find the file system configuration xml file that needs to be burned.
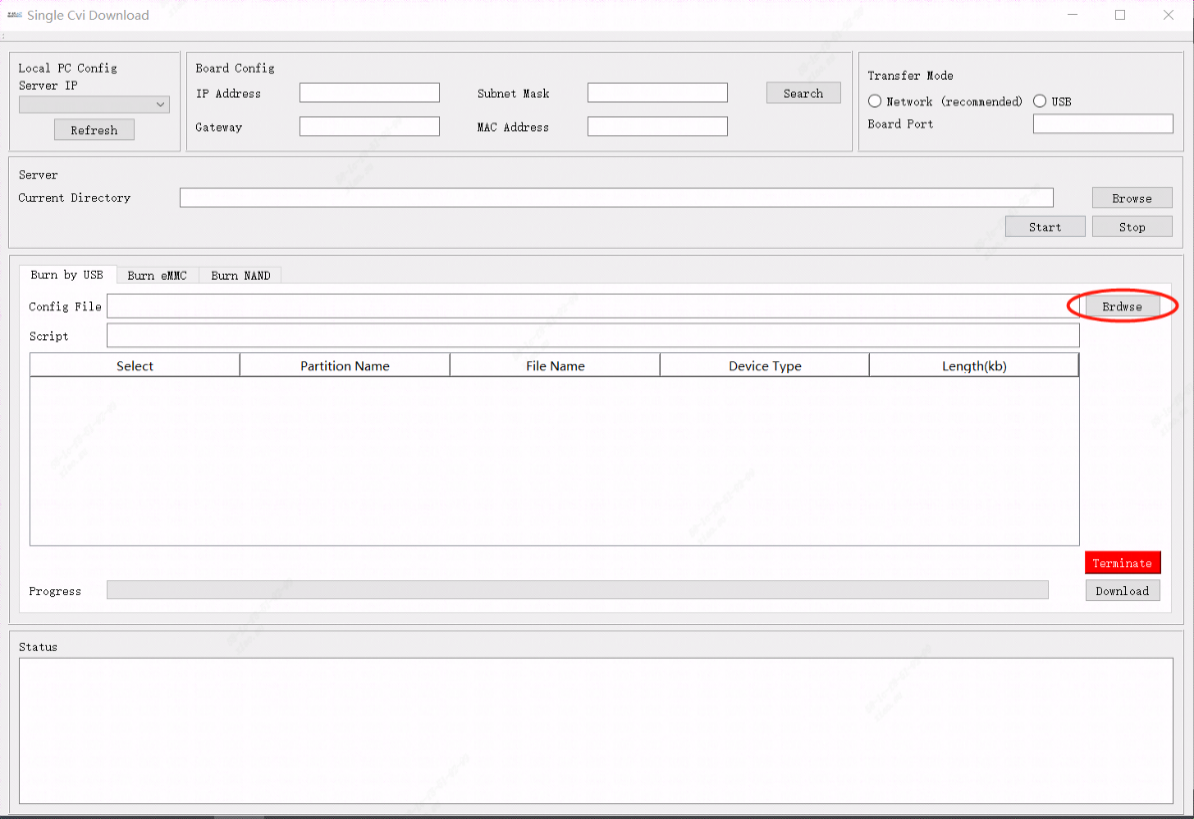
Fig. 5.3 Click on the Brdwse button
Step1.3
After selecting the file, click Confirm, and a message such as Fig. 5.4 will appear.
The table will list the files that need to be burned and their attributes.
Users can manually select which files can be burned.
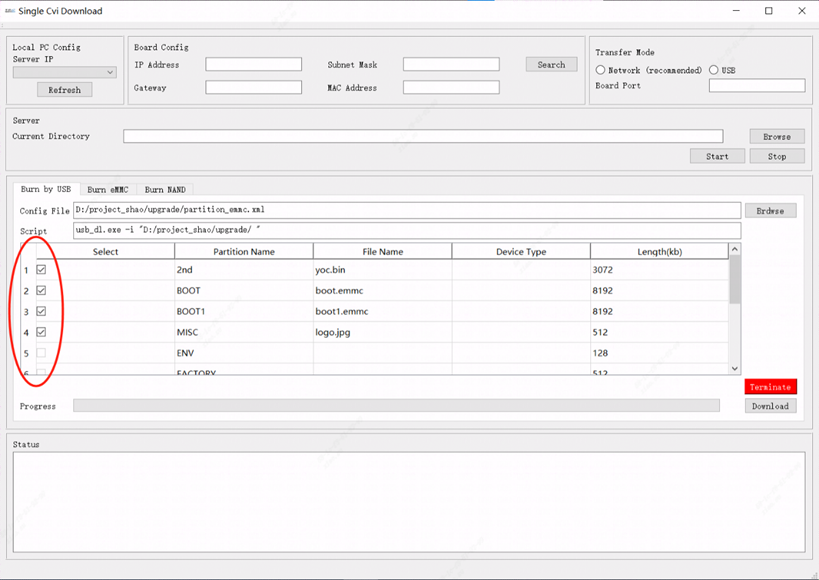
Fig. 5.4 Select the file to be downloaded
Step1.4
Click the download button, and a log message waiting to be downloaded will appear in the status bar.
The user needs to reset the system through power-on or soft reset the system.
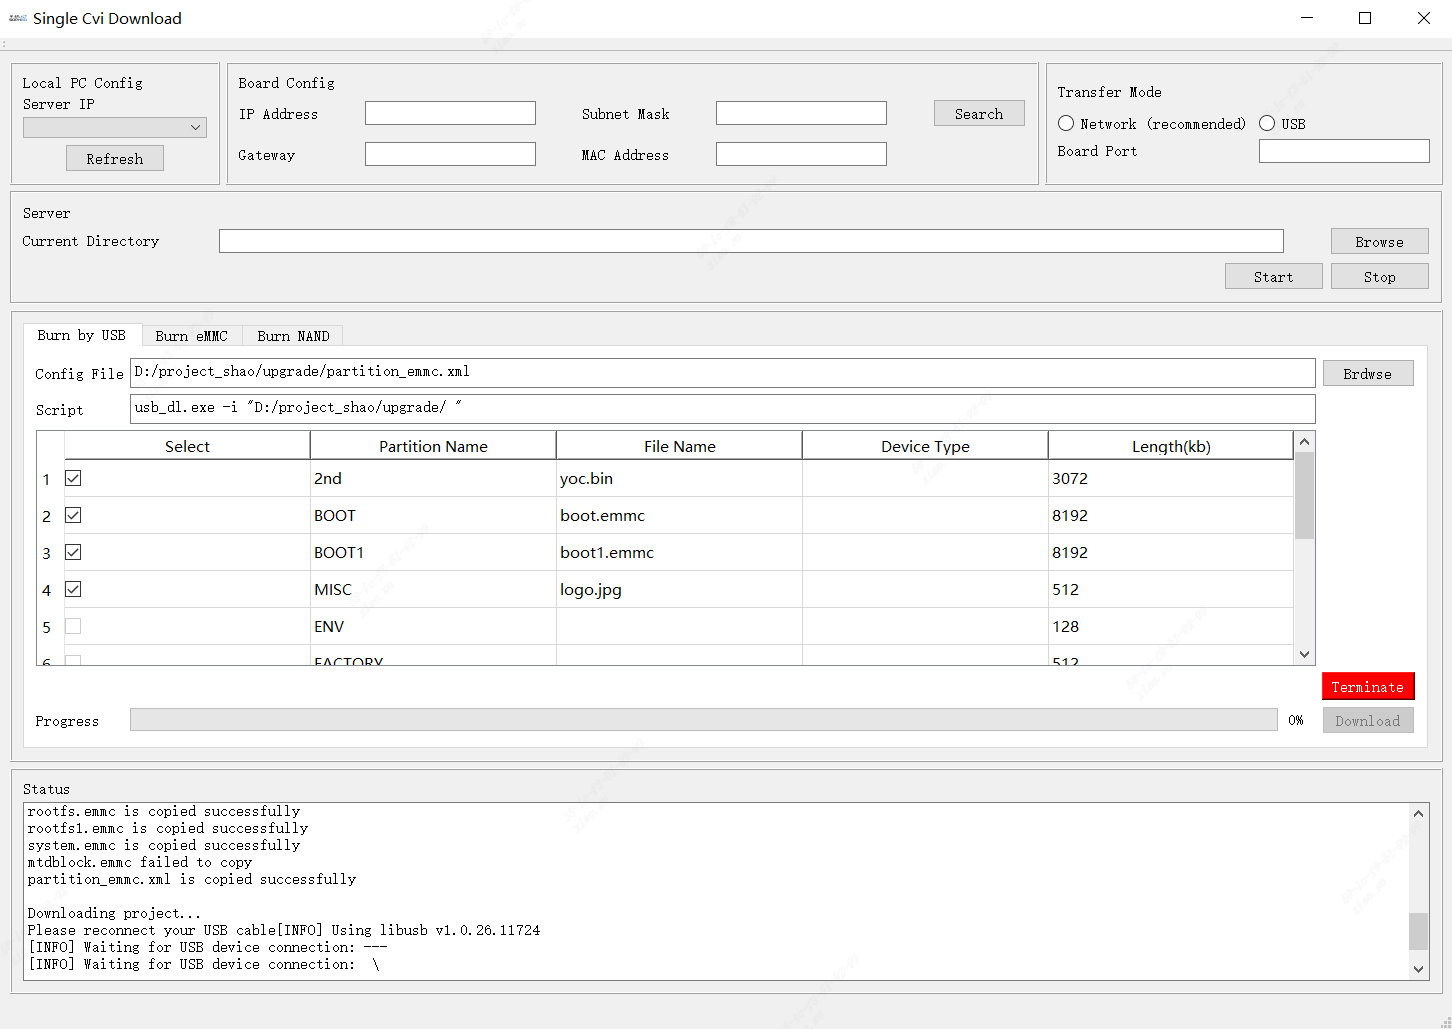
Fig. 5.5 After clicking Download, the system waits for reset
Step1.5
After the system is reset, the programming process will run automatically until the programming is completed.
The progress bar will record the programming progress, and the status bar will print the programming log status.
After the programming is completed, there will be a “Download completed!” prompt box.
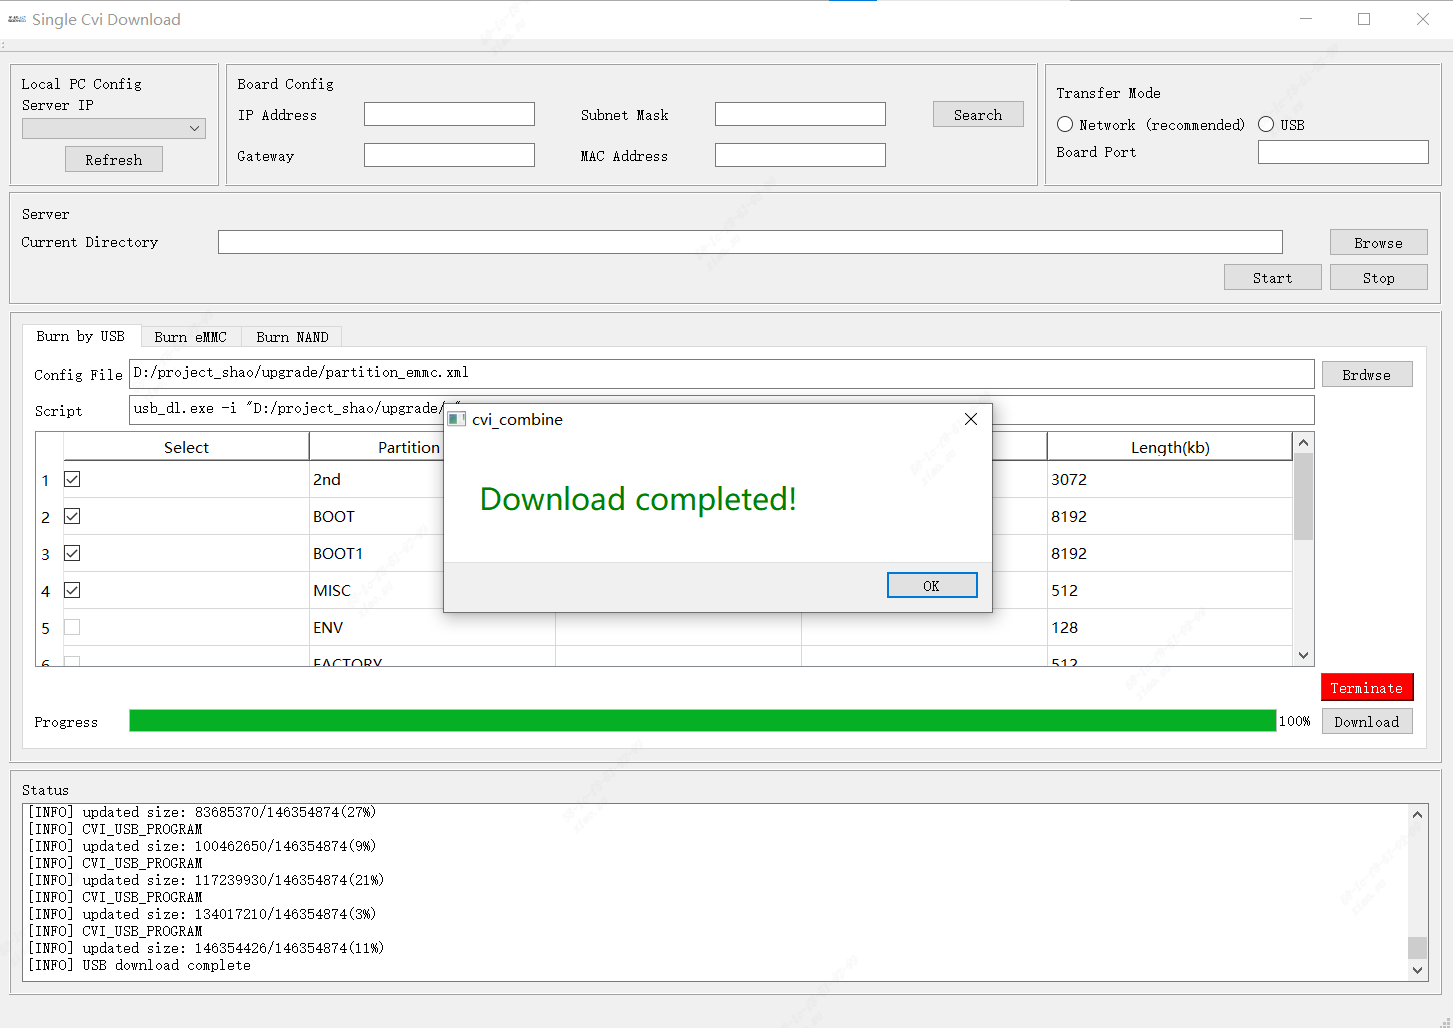
Fig. 5.6 Burning completed
Step1.6
If you need to terminate programming during the programming process, Then you can click the Terminate button and the burning process will be terminated directly.
And the “Process Terminate!!!” prompt box will appear.
The programming log will be retained in the status bar for users to read and check.
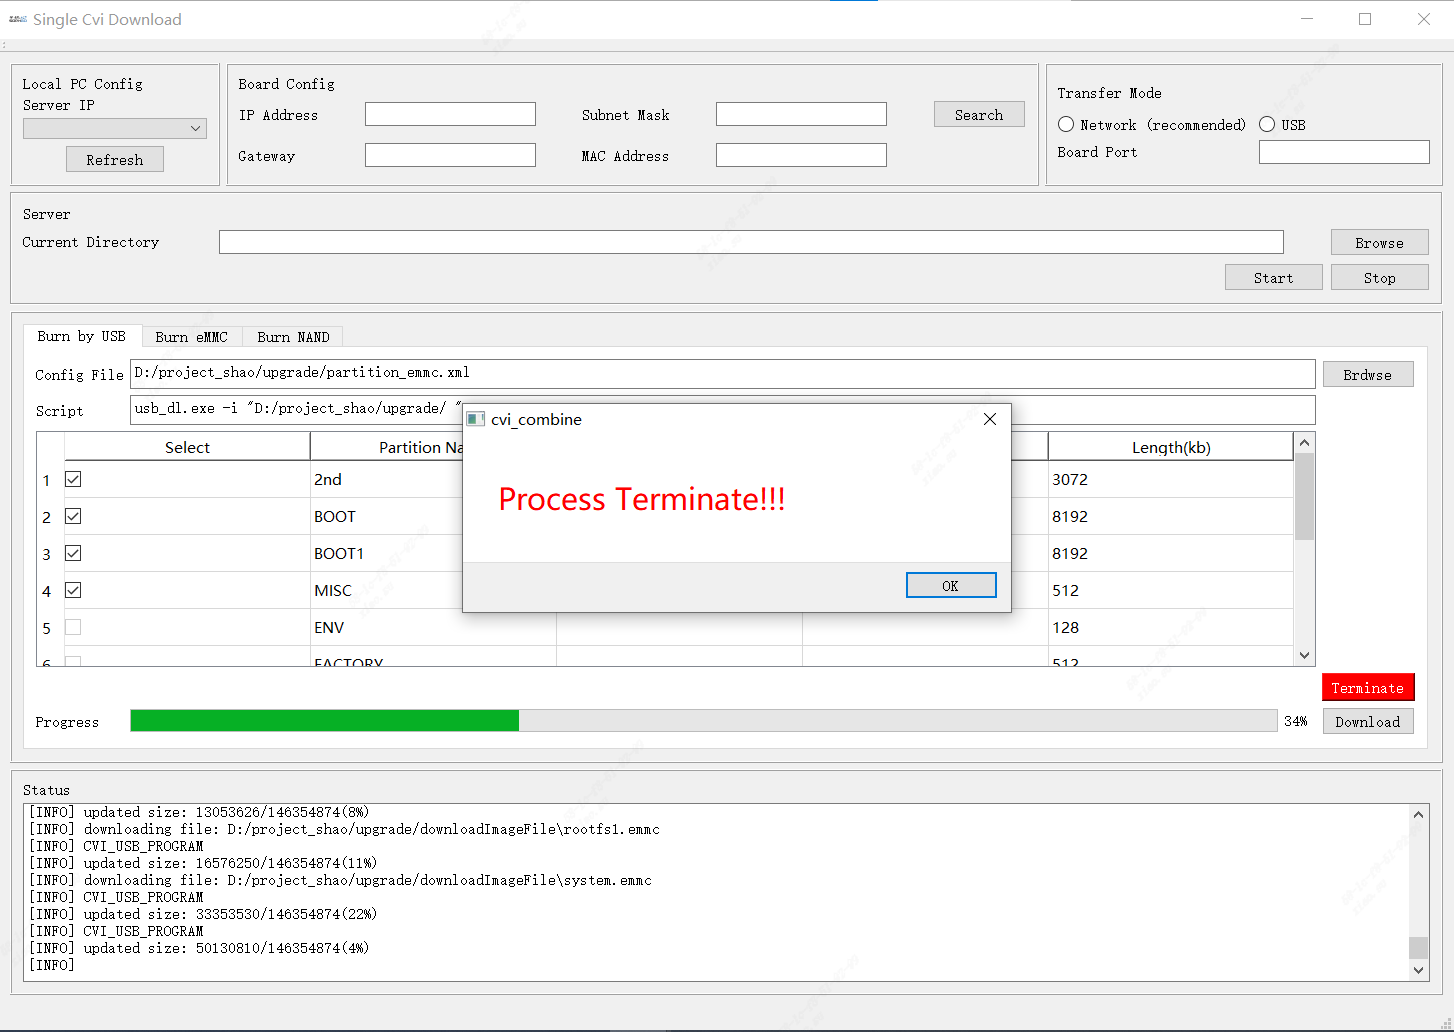
Fig. 5.7 Process interruption
5.3.2. Multiple CviDownload Operation Process
Step2.1
Select the Multiple Cvi Burn burning tool type and click the OK button.
You can jump to the corresponding page, such as Fig. 5.8.
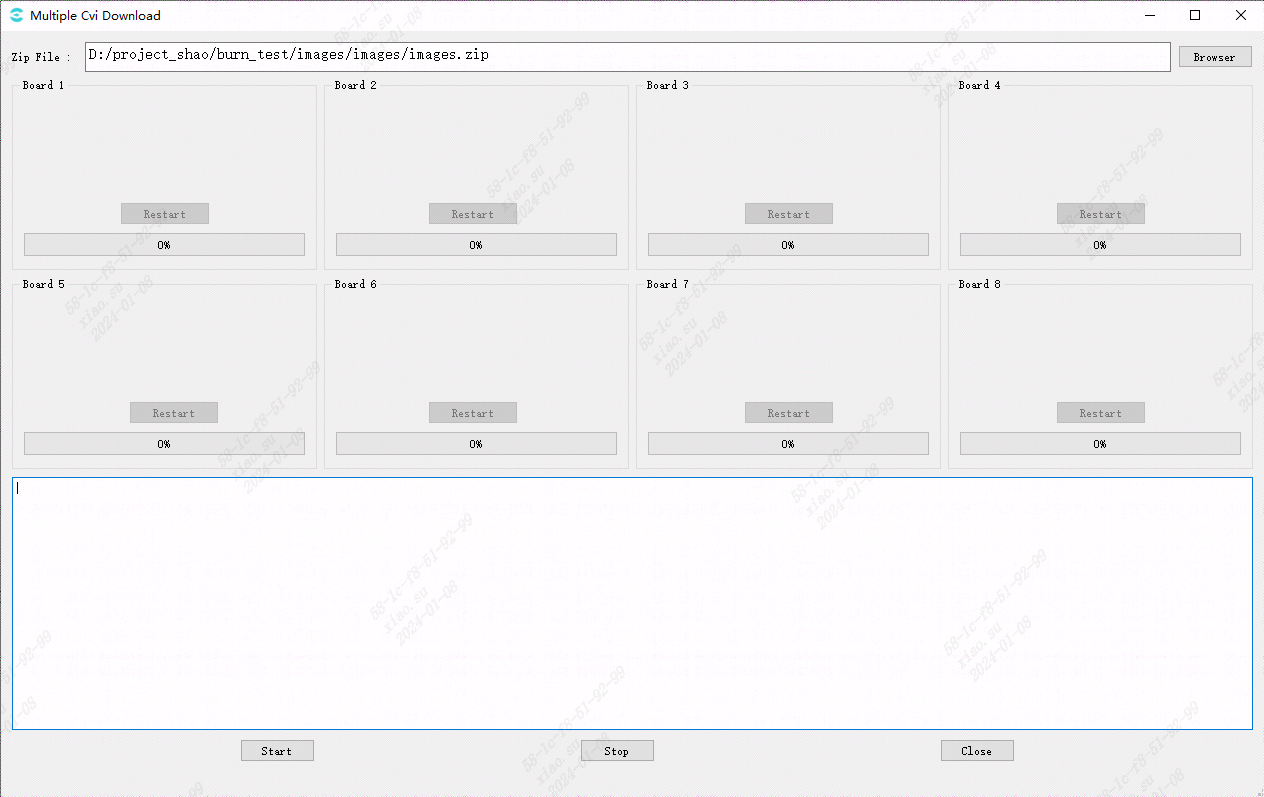
Fig. 5.8 Multiple Cvi Download interface
Step2.2
Click the browser button to select the firmware image.
There is no requirement for the image file name, but it must be a zip file.
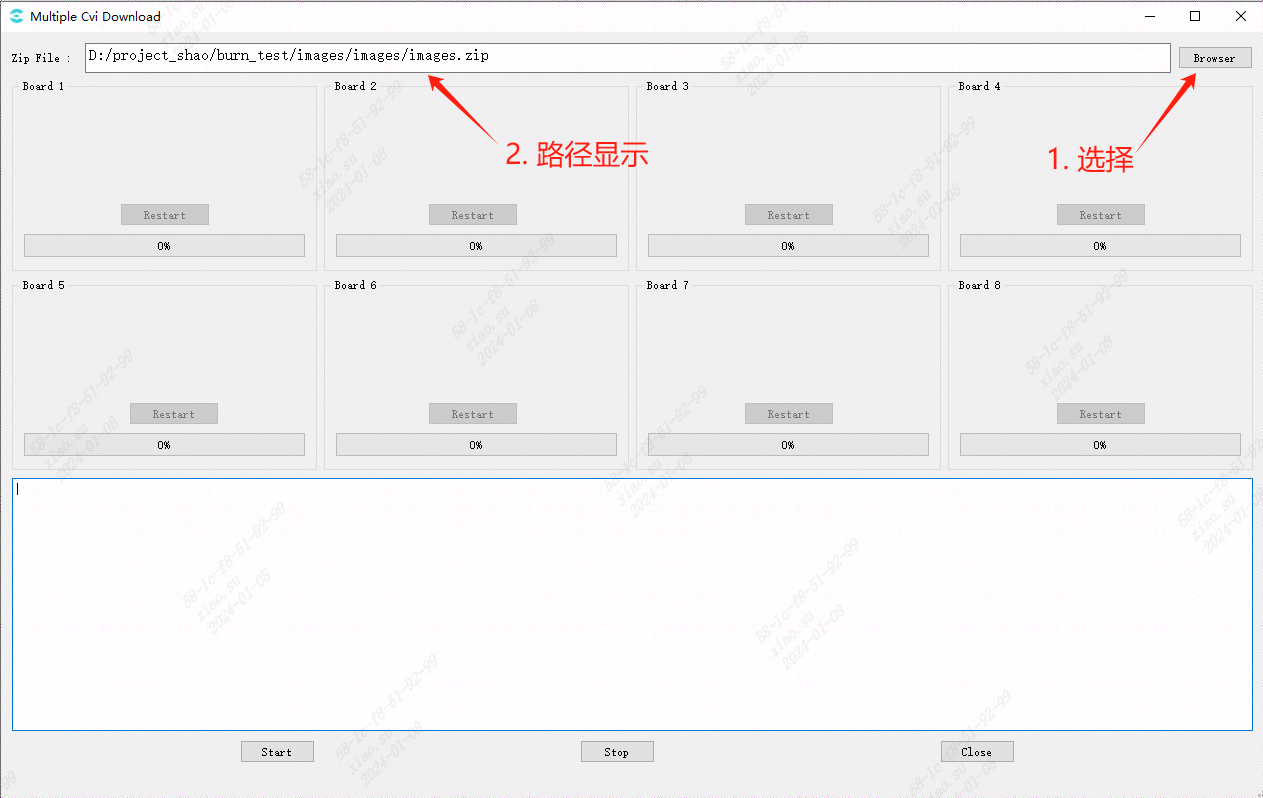
Fig. 5.9 Select zip image
Note
After selecting the image, it will check whether the CviBurnImage folder exists in the same directory.
If it exists, it will be deleted to delete the old image file!
This file is used to save all files extracted from the image, and is also the path to the burned firmware.
When placing the burned firmware file, please try to avoid folders with the same name in the path.
If you want to reselect the image file, please make sure the Start button is lit and clickable, or make sure you click the Stop button before reselecting the file.
Image file requirements:
For the content of the image file, please ensure that the root path is all the image files, not a folder, such as Fig. 5.10.
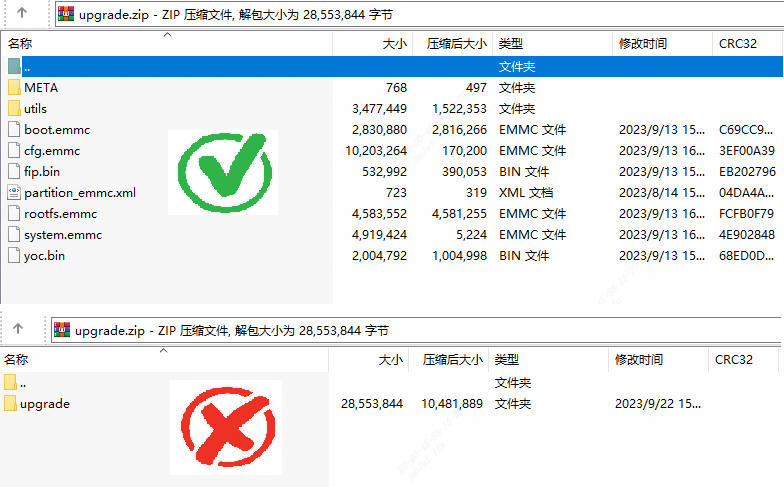
Fig. 5.10 zip file directory style
Step2.3
Click the start button to start image decompression. The software will first detect whether there is a cvi burn image folder in the same level directory. If it exists, it will not decompress the image to avoid repeatedly decompressing the same image you selected (if you want to decompress the image, please return to step 2.2 and try again Select image), otherwise a cvi burn image folder will be created and the image file will be extracted into this folder
At the same time, the software will initialize and start the burning program, and the program will enter the ready state.
The start button becomes unclickable.
The restart button above lights up and becomes clickable.
(The restart button function will be explained in detail later).
Such as Fig. 5.11
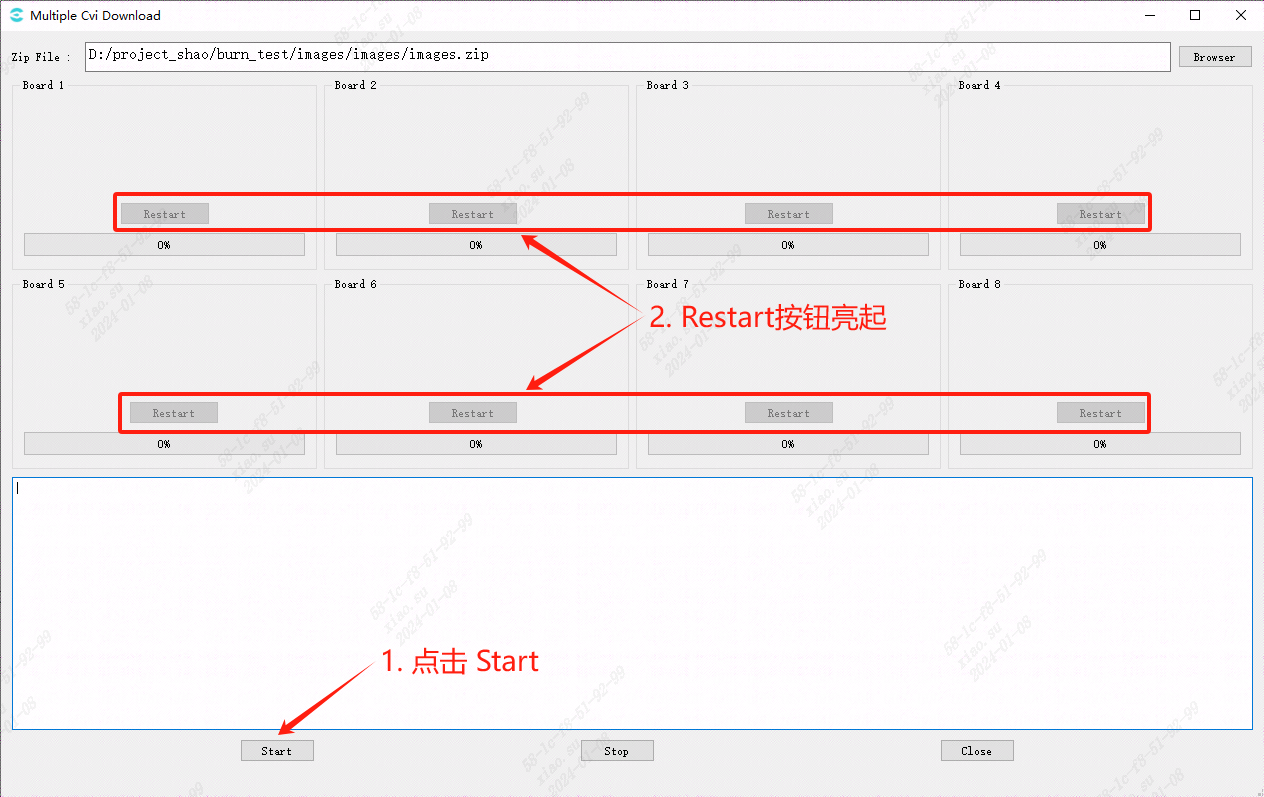
Fig. 5.11 Start the burning program and join the ready state
Step2.4
After entering the ready state, you can insert the device into the USB HUB and turn it on, and the burning program will automatically start.
What is printed in the Log is the currently inserted USB device, and the USB Port corresponding to the plugged-in board will be displayed in the box title above.
After burning starts, the progress bar will display the burning progress of the current device.

Fig. 5.12 Plug in the usb device and start burning
Attached: USB Port correspondence:
After plugging the USB interface into the computer, the software will automatically identify the inserted USB device and number it, without user settings.
After the computer establishes a connection with the board, its Port number will be displayed in the corresponding Board window.
According to the order of insertion, they are arranged on the software interface from left to right and from top to bottom.
USB Port consists of two parts, such as USB Port: 2,1,
2 represents the number of the current HUB,
1 represents the USB number on the HUB
(The number marked on the physical HUB may be different from the number identified by the computer. The HUB number marked on the computer is the main one here).
It is recommended that users mark the USB after inserting it to avoid confusion.
In this way, during mass production, the USB Port displayed by the software can correspond to the actual board one-to-one, making it easy to check the status of each board.
Note
In order to enable the USB Port to read correctly in sequence, please insert the USB HUB into the computer first and then insert the board in sequence.
Do not insert the board into the USB HUB first and then insert the HUB into the computer all at once. This operation may cause the USB Port to be unable to be read correctly
Step2.5
When the board is burned, the progress bar is 100% and the Log will print “Board x download complete”.
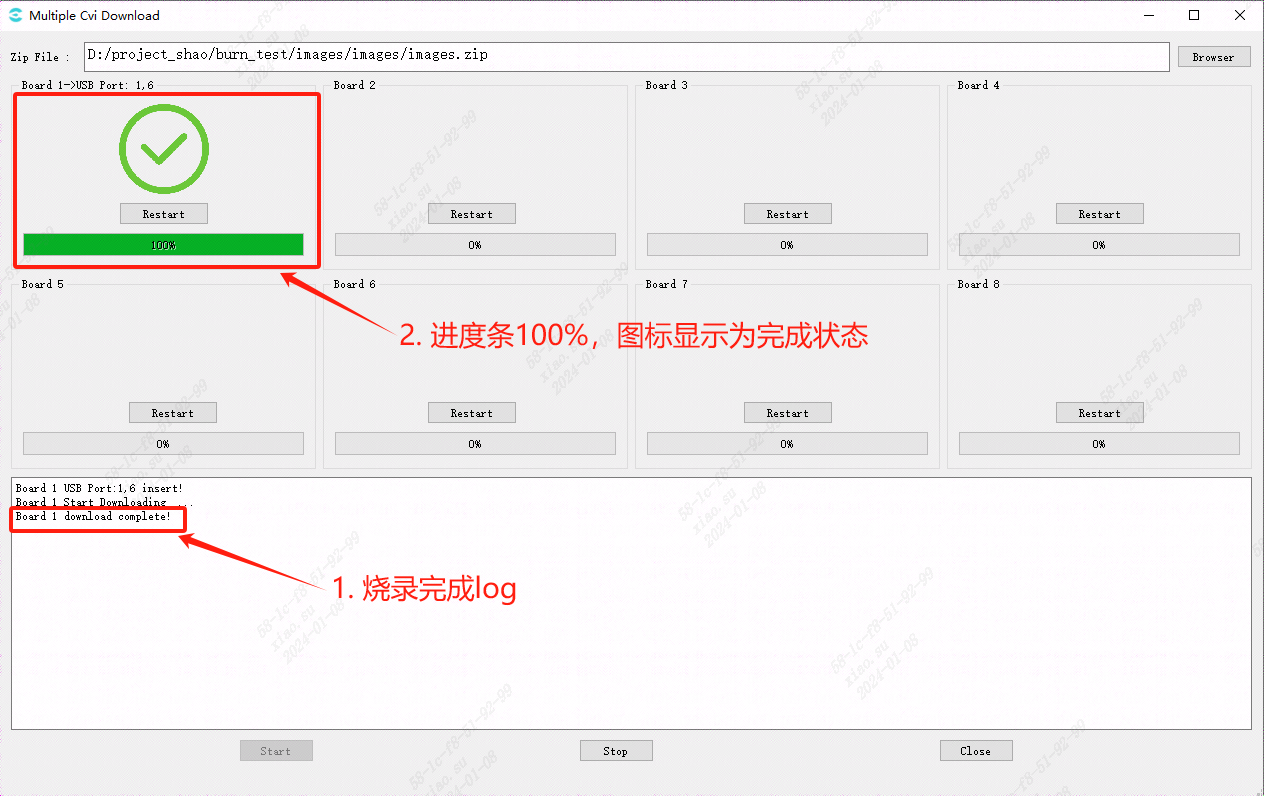
Fig. 5.13 Burning completed
Burning failed:
If the programming fails due to various reasons during the programming process, the icon in the Board box corresponding to the programming failure will display “⊗”, and the log will prompt “Board x download failed! Please restart.”
Such as Fig. 5.14. At this time, you can click the “Restart” button to restart the burning program for a single board.
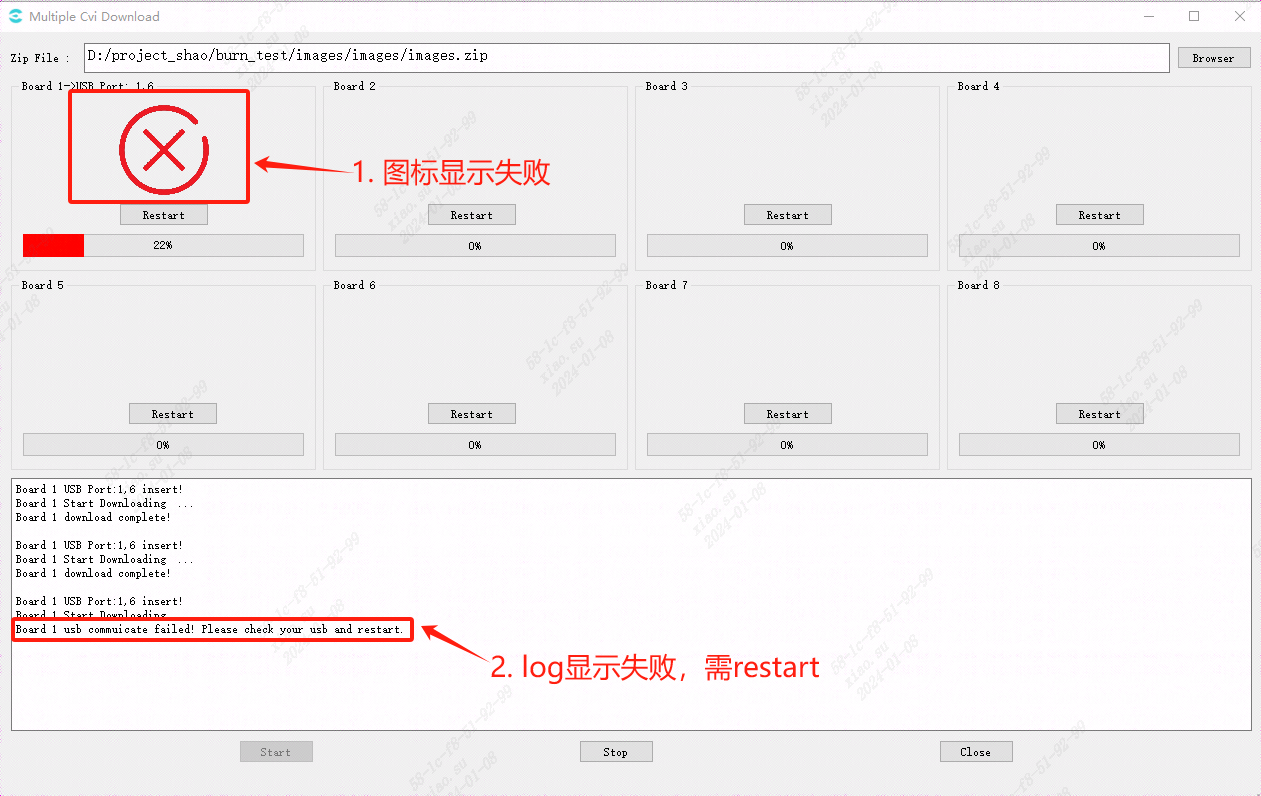
Fig. 5.14 Burning failed
Restart:
There is a restart button in the corresponding box of each board.
Click the restart button to reset the corresponding burning program.
Re-enter the ready state.
At this time, the board that has not been successfully burned needs to unplug the USB, shut down, re-insert and turn on.
The burning program will restart to burn the board.
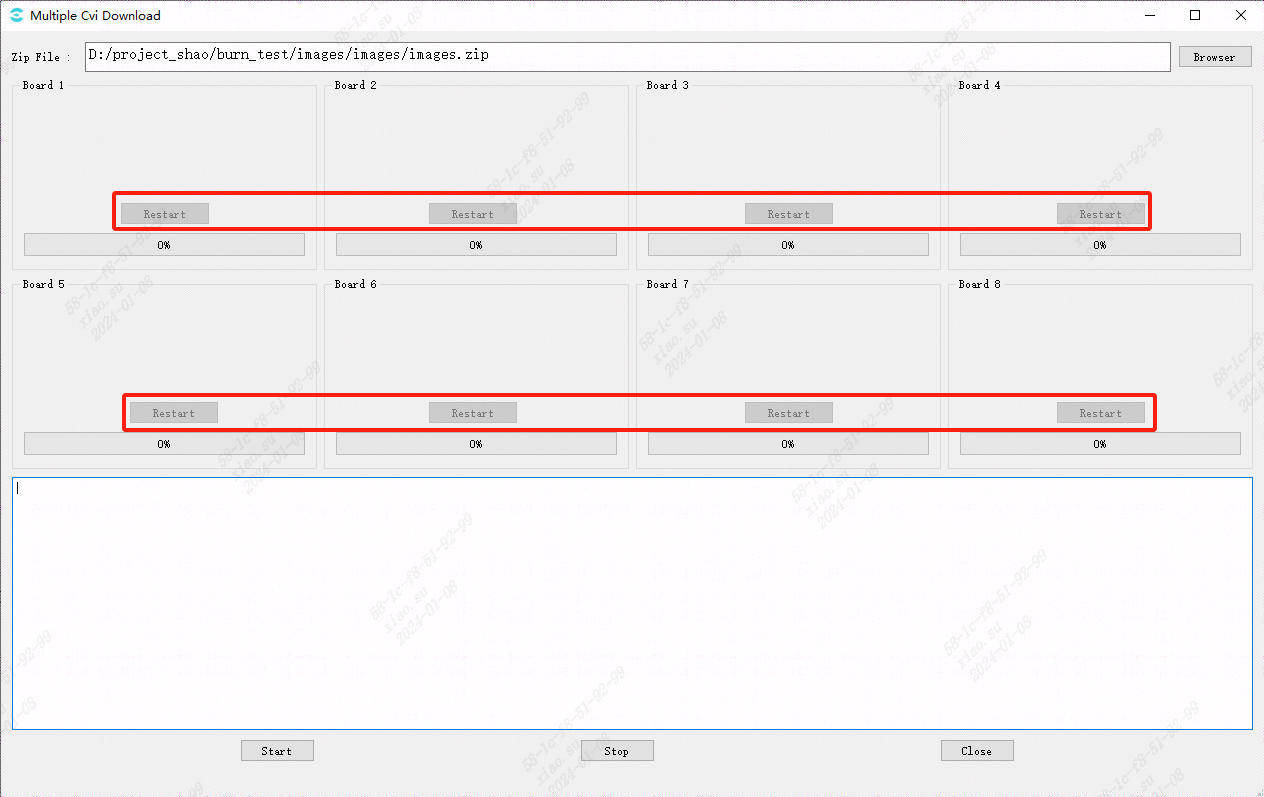
Fig. 5.15 Restart button