3. Echo Cancellation Debugging
3.1. Basic Check
There are several requirements for AEC debugging in the environment, which involve recording, playback, volume, and testing environment.
AEC parameter tuning can only be carried out after the basic requirements are met.
Step 1:Set the left and right gain value of ADC, DAC respectively:
During the adjustment process, the user may need to adjust the left and right volume of mic separately, or adjust the left and right volume of the speaker separately.
This can be set through the “sample_audio 9” command, and the DAC_R and DAC_L should be consistent as follows:
The user can use:
“sample_audio 9” enter, then input “9” and press enter, and then input “8” (volume value) and press enter to adjust the speaker volume of the left channel;
“sample_audio 9”, then input “10” and press enter, and then input “8” (volume value) and press enter to adjust the speaker volume of the right channel;
“sample_audio 9”, then input “11” and press enter, and then input “7” (volume value) and press enter to adjust the mic recording volume;
“sample_audio 9”, then input “12” and press enter, and then input “1” (volume value) and press enter to adjust the recording volume of the reference signal (ref).
Attention
Dual OS System is currently not support
./sample_audio 9
Step 2:Confirm the correctness of recording and play:
Before using two-way communication, please confirm that the microphone and speaker functions are working properly by using the “sample_audio” program provided in the SDK for verification.
First, check the IP address in the serial terminal,
and then SSH into the board to obtain a terminal “ssh root@192.168.1.3”.
Then enter the user name “root” and the password “cvitek” to log in to the board.
[Recording normal test]:
./sample_audio 4 –list -r 8000 -R 8000 -c 2 -p 320 -C 0 -V 0 -F Cvi_8k_2chn.raw -T 10
is correspondding to parameter corresponding parameter (sample_rate: 8000/ channel : 2/ preriod_size:320/ VQEon:0/preset recording seconds:10).
Then speak into mic as if reading a text.
The Cvi_8k_2chn.raw file will be produced.
[Verification]:Please take out it to a computer and play it, then check if there is any waveform of the audio recording. For example:
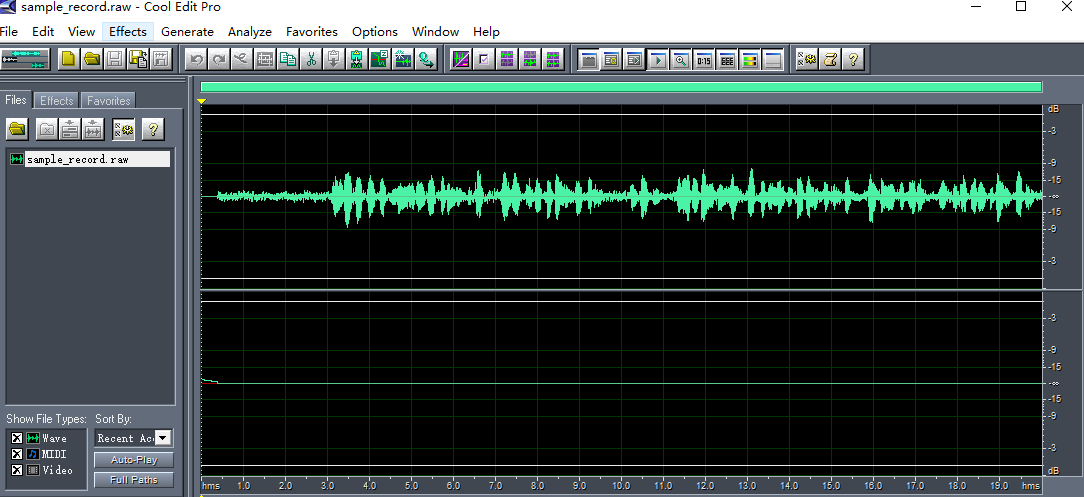
The waveform above should be moderate and not exceed the white line above, otherwise it will distort the wave. If it’s too large or too small, you can go to the ssh terminal before pressing Enter for “Presets recording seconds: 10” and execute “sample audio 9”. Then enter “11” to select the ADCL sub-function, and enter “7” for the gain value which can be set by the customer according to their own actual situation of the waveform.
[Playing Normal Test]:
./sample_audio 5 –list -r 8000 -R 8000 -c 2 -p 320 -C 0 -V 0 -F Cvi_8k_2chn.raw -T 10 speech playing parameter .
(channel:2/ sample rate:8000/period size:320/ VQE on:0)
[Verification]: When playing back, make sure that the speaker is producing sound at an appropriate volume without any obvious distortion such as popping, noise, or breaking sound.
Step 3:Confirm that the echo cancellation effect is normal:
Before using the remote intercom program on the client side, we can verify the effect of on-board echo cancellation in the following way.
[AEC Effect Test]:
Execute the commands “touch /tmp/ain_record” and “touch /tmp/dump_ao_output” (If test many times, before each test execute “rm /tmp/*.pcm” to delete files, and do not test for too long as the PCM files will consume DDR memory and cause the system to freeze).
Then execute “sample_audio 10
./sample_audio 10 –list -r 8000 -R 8000 -c 2 -p 320 -C 0 -V 1 -F play.wav -T 10”
Audio recording parameter(sample rate:8000/ chn:2/ period size:320)
Set the VQE/AEC to “on” and set the recording seconds and the file name to play.
After 2 seconds of playback (playing the text you read to yourself earlier),
the person speaks into the mic (for example 123456789abcdef),
the customer can speak for a maximum of 20 seconds.
After recording for some time, double-click enter and wait for the end.
Before inputting the “record” time and pressing “enter”, set appropriate gain values for ADCL, ADCR, and DACR in the SSH terminal. The setting method have been mentioned above: execute “sample_audio 9”: ADCL:11->set as 10; ADCR:12->set as 1; DACR:10-> set as 8. The values 10, 1, and 8 should be adjusted as needed by the user, and remembered for use in your own intercom program.
[Verification]:
Output “sample_record.raw”.
Execute “cp /tmp/*.pcm ./ “to copy the file to the current directory.
Copy the” sample_record.raw” and “ain_record.pcm” files to your computer
and use free playback software such as audacity / Cool Edit to view them.
Under normal circumstances, “sample_record.raw” is monaural
and you can only hear “123456789abcdef” without interruption,
which indicates that the effect is good.
In the actual intercom program, the sound of “sample_record.raw” is the audio to sent to the other person for listening.
If you can still hear text or “123456789abcdef” with interruptions or missing words, it means that the effect is not good.
“ain_record.pcm” file is stereo, with the left channel being the sound collected by the mic (including human speech “123456789abcdef” and text sound), and the right channel only containing the sound of the speaker, which is the text sound (the waveform of the left and right channels should be moderate and not distorted).
3.2. Echo Parameter (under the non-ideal debugging result)
SerialNumber |
Command |
Corresponding File Name |
Annotation |
|---|---|---|---|
1 |
touch /tmp/ain_record |
/tmp/ain_record.pcm |
the most raw “pcm” data from the bottom layer |
2 |
touch /tmp/dump_before_aec |
/tmp/dump_before_aec.pcm |
the pcm(none bind mode) before vqe |
3 |
touch /tmp/dump_after_aec |
/tmp/dump_after_aec.pcm |
the pcm(none bind mode) after vqe |
4 |
touch /tmp/dump_ao_output |
/tmp/dump_ao_output.pcm |
raw data of the sound played |
Data to be provided when the AEC effect is not good (please ensure that the basic requirements of AEC algorithm are met first):
Note inside the simple txt file:
-cv180x… project name
-sample rate
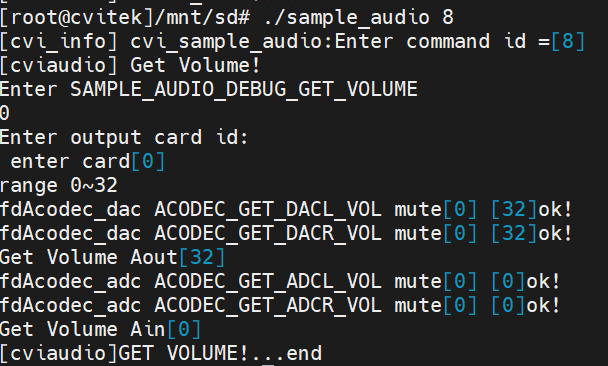
- -sample_audio 8 printed parameter:
ADC L / ADC R (recording volumn)
DAC L / DAC R (playback volumn)
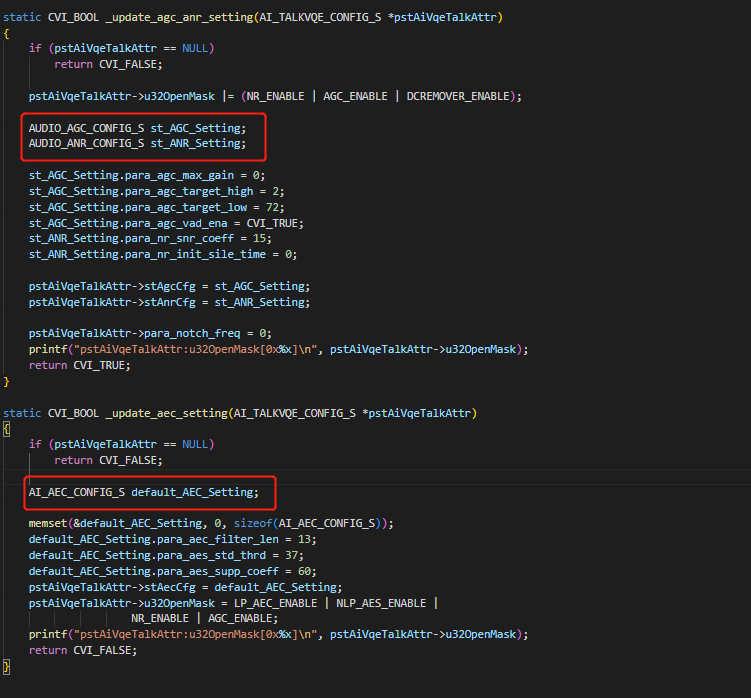
-vqeconfig.txt contains the parameters of the structure bellow in “code”:
2.dump file:
The “*.pcm” file in “/tmp” directory