5. I2C操作指南
5.1. 操作准备
I2C的操作准备如下:
使用SDK发布的kernel。
5.2. 操作过程
加载内核。默认I2C相关模块已全部编入内核,不需要再执行加载命令。
在控制台下运行I2C读写命令或者自行在内核态或者用户态编写I2C读写程序,就可以对挂载在I2C控制器上的外围设备进行读写操作。
5.3. 接口速率设置说明
如果要更改接口速率,需要修改build/boards/default/dts/cv180x/cv180x_base.dtsi或
build/boards/default/dts/cv181x/cv181x_base.dtsi中i2c node里的clock_frequency,如下所示,并重新编译内核。
i2c0: i2c@04000000 {
   compatible = "snps,designware-i2c";
   clocks = <&clk CV180X_CLK_I2C>;
   reg = <0x0 0x04000000 0x0 0x1000>;
   clock-frequency = <400000>;

   #size-cells = <0x0>;
   #address-cells = <0x1>;
   resets = <&rst RST_I2C0>;
   reset-names = "i2c0";
};
5.3.1. I2C读写命令示例:
可在linux终端上发iic相关命令detect总线设备和对总线上i2c设备进行读写。
i2cdetect -l
检测系统中的iic总线(在cv180x中可为i2c-0, i2c-1,i2c-2,i2c-3,i2c-4)
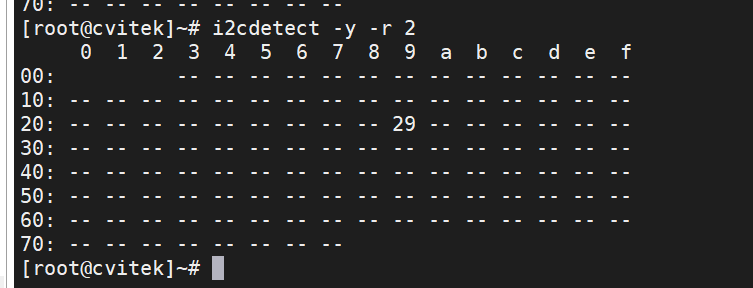
i2cdetect -y -r N 检测接到i2c-N总线上的所有设备地址,如下检测i2c-2上有哪些设备:
i2cdump -f -y N M 查看i2c-N上地址为M的设备中所有寄存器的值
i2cget -f -y 0 0x3c 0x00//读取i2c-0上地址为0x3c的设备上0x00寄存器的值
i2cset -f -y 0 0x3c 0x40 0x12//写入i2c-0上地址为0x3c的设备上0x40寄存器
5.3.2. 内核态I2C读写程序示例:
此示例说明在内核态下如何通过I2C读写程序对I2C外围设备进行读写操作。
步骤 1. 假设已知外围设备挂载在I2C控制器0上,调用i2c_get_adapter()函数以获得I2C控制器结构体 adapter:
adapter = i2c_ger_adapter(0);
步骤 2. 透过i2c_new_device()函数关连I2C控制器与I2c外围设备,以得到I2C外围设备的客户端结构体 client:
client = i2c_new_device(adapter, &info)
备注:info结构体提供i2c外围设备的设备地址
步骤 3. 调用I2C核心层提供的标准读写函数对外围设备进行读写操作:
ret = i2c_master_send(client, buf, count);
ret = i2c_master_recv(client, buf, count);
备注:client为步骤2所得之客户端结构体,buf为需要读写的寄存器地址以及数据,count为buf的长度。
代码示例如下:
//宣告一个外围设备名字叫做”dummy”,设备地址为0x3c
static struct i2c_board_info info = {
               I2C_BOARD_INFO("dummy", 0x3C),
};
static struct i2c_client *client;

static int cvi_i2c_dev_init(void) {
   //分配 i2c控制器指针
   struct i2c_adapter \*adapter;

   adapter =i2c_get_adapter(0);
   client = i2c_new_device(adapter, &info);
   i2c_put_adapter(adapter);
   return 0;
}

static int i2c_dev_write(char *buf, unsigned int count){
   int ret;

   ret = i2c_master_write(client, buf, count);
   return ret;
}

static int i2c_dev_read(char *buf, unsigned int count) {
   int ret;

   ret =i2c_master_recv(client, buf, count);
   return ret;
}
5.3.3. 用户态I2C读写程序示例:
此操作示例在用户态下通过I2C读写程序实现对I2C外围设备的读写操作。
步骤 1. 打开I2C总线对应的设备文件,获取文件描述符:
i2c_file = open("/dev/i2c-0", O_RDWR);
   if (i2c_file < 0) {
      printf("open I2C device failed %d\n", errno);
      return -ENODEV;
   }

步骤 2.
进行数据读写:
ret = ioctl(file, I2C_RDWR, &packets);
   if (ret < 0) {
      perror("Unable to send data");
      return ret;
   }

备注:需于flags指定读写操作
struct i2c_msg messages[2];
   int ret;

   /*
   * In order to read a register, we first do a "dummy write" by writing
   * 0 bytes to the register we want to read from.  This is similar to
   * the packet in set_i2c_register, except it's 1 byte rather than 2.
   */
   outbuf = reg;
   messages[0].addr = addr;
   messages[0].flags = 0;
   messages[0].len = sizeof(outbuf);
   messages[0].buf = &outbuf;

   /* The data will get returned in this structure */
   messages[1].addr = addr;
   /* | I2C_M_NOSTART */
   messages[1].flags = I2C_M_RD;
   messages[1].len = sizeof(inbuf);
   messages[1].buf = &inbuf;