Overview
This example is to realize a complete classified application mainly in virtue of resnet18 model. Model and code of this example are at http://219.142.246.77:65000/sharing/NVUS3acJ7
downloaded to the local resnet18_classify.tar.gz and decomposed as:
tar zxvf resnet18_classify.tar.gz
The catalogue of resnet18_classify includes the following files:
Original model of model/resnet18.onnx resnet18
images/ test image set
ILSVRC2012/ quantization dataset
scripts/ script file in this example
src/ catalogue of application source code
CMakeLists.txt building script
Compilation and quantization model
Initial tpu-nntc environment
Tool chain software can be used in docker environment.The docker of the latest version can be installed by referring to official tutorial.After installation, execute the following script and add the present user into docke group to obtain docker execution authority.
sudo usermod -aG docker $USER
newgrp docker
Download the Compressed package of tpu-nntc from official website and name it according to the following rules tpu-nntc_vx.y.z-<hash>-<date>.tar.gz
mkdir tpu-nntc
# decompress it to tpu-nntc.
tar zxvf tpu-nntc_vx.y.z-<hash>-<date>.tar.gz --strip-components=1 -C tpu-nntc
The docker used by tpu-nntc is sophgo/tpuc_dev:v2.1. The docker mirroring is bound with tpu-nntc. In few cases, tpu-nntc may be updated and a new mirroring is required.
cd tpu-nntc

# If the current system has no corresponding mirroring after entering docker, a mirroring will be downloaded automatically from docker hub.
# Map the upper-level directory of tpu-nntc to the /workspace directory in docker.
# 8001 - 8001 port mapping is used here. It will be used when using ufw visual tool thereafter.
# If port has been occupied, please change other unoccupied one and then make change and adjustment based on needs.
docker run -v $PWD/..:/workspace -p 8001:8001 -it sophgo/tpuc_dev:v2.1

# At this time, it has entered docker and is under /workspace catalogue.
# Initial software environment below.
cd /workspace/tpu-nntc
source scripts/envsetup.sh
Initialization mode of other dockers:
Downloading can be made in advance under an offline environment and then it can be imported into target machine for importing according to the following commands:
# Save mirror on connected machine.
docker pull sophgo/tpuc_dev:v2.1
docker save sophgo/tpuc_dev:v2.1 -o sophon_tpuc_dev.docker

# After copying sophon_tpuc_dev_docker.tar to target machine.
docker load -i sophon_tpuc_dev.docker
In addition, tpu-nntc provides the docker_setup.sh script in the scrtips directory for reference and convenient basic use. In actual use, it can be managed according to the needs. The method of use is as follows:
# Parameters behind docker_setup.sh are used for designating the specific catalogue that will be used as working catalogue. It will be mapped in /workspace.
# Here is the upper level directory of tpu-nntc.
scripts/docker_setup.sh ..

# The following information will be output. If 8001 port is occupied, other unoccupied ports will be chosen automatically
# ...
# OPEN 'http://localhost:8001' IN WEB BROWSER WHEN 'python3 -m ufw.tools.app' RUNNING IN DOCKER
Note: At this time, the catalogues of resnet18_classify and tpu-nntc are in parallel. The above also applies to other catalogues but special attention should be paid to relevant commands after adjustment.
Enter resnet18_classify catalogue after environment initialization is finished:
cd /workspace/resnet18_classify

# To facilitate clearing, it is suggested to establish an empty working catalogue
mkdir -p workdir && cd workdir
Compilation of FP32 BMODEL
The bmneto front end is required for converting onnx model. The conversion model is as below:
# At this time, in the catalogue of resnet18_classify/workdir
python3 -m bmneto --model ../model/resnet18.onnx \
                --input_names "input" \
                --shapes "[[1,3,224,224]]" \
                --target BM1684X \
                --outdir bmodel/fp32
View the information of fp32 bmodel:
tpu_model --info bmodel/fp32/compilation.bmodel
The information of output model is as below:
bmodel version: B.2.2
chip: BM1684X
create time: Thu Jul 21 06:14:45 2022

==========================================
net 0: [network]  static
------------
stage 0:
input: input, [1, 3, 224, 224], float32, scale: 1
output: output, [1, 1000], float32, scale: 1

device mem size: 49782688 (coeff: 46968736, instruct: 0, runtime: 2813952)
host mem size: 0 (coeff: 0, runtime: 0)
INT8 BMODEL generation by automatic quantization
Automatic quantization tools can process image dataset automatically and convert it into lmdb dataset. Different quantization strategies will be used for quantization for several times and bmodel will be generated automatically.
In this example, some images of ILSVRC2012 are used for quantization.
mkdir -p auto_cali_out

# Remember the parameters of cali_image_preprocess should be consistent with the pre-processing of original model application.
# Otherwise, model quantization precision is high but the application precision is low.
python3 -m ufw.cali.cali_model \
  --net_name "resnet18" \
  --model ../model/resnet18.onnx \
  --cali_image_path ../ILSVRC2012/ \
  --cali_image_preprocess '
      resize_h=224,resize_w=224;
      mean_value=123.675:116.28:103.53;
      scale=0.0171:0.0175:0.0174;
      bgr2rgb=True' \
  --input_names 'input' \
  --input_shapes '[1,3,224,224]' \
  --target BM1684X \
  --outdir auto_cali_out

cp -r auto_cali_out/resnet18_batch1 bmodel/auto-int8
View bmodel information:
tpu_model --info bmodel/auto-int8/compilation.bmodel
After entering the followings, it can be found the input and output type is int8:
bmodel version: B.2.2
chip: BM1684X
create time: Thu Jul 21 06:37:36 2022

==========================================
net 0: [resnet18]  static
------------
stage 0:
input: input, [1, 3, 224, 224], int8, scale: 48.21
output: output, [1, 1000], int8, scale: 0.214865

device mem size: 14270368 (coeff: 12009376, instruct: 0, runtime: 2260992)
host mem size: 0 (coeff: 0, runtime: 0)
# 查看量化精度情况(可选)
python3 -m ufw.tools.app --port 8001
At this time, open webpage at 8001 port of this machine (port displayed while starting docker). If http://localhost:8001 is directly opened by this machine or if the server is remote server, please replace localhost by server IP. Operate as per Step (1) and (2) in the figure. The following results can be viewed after finishing program running:
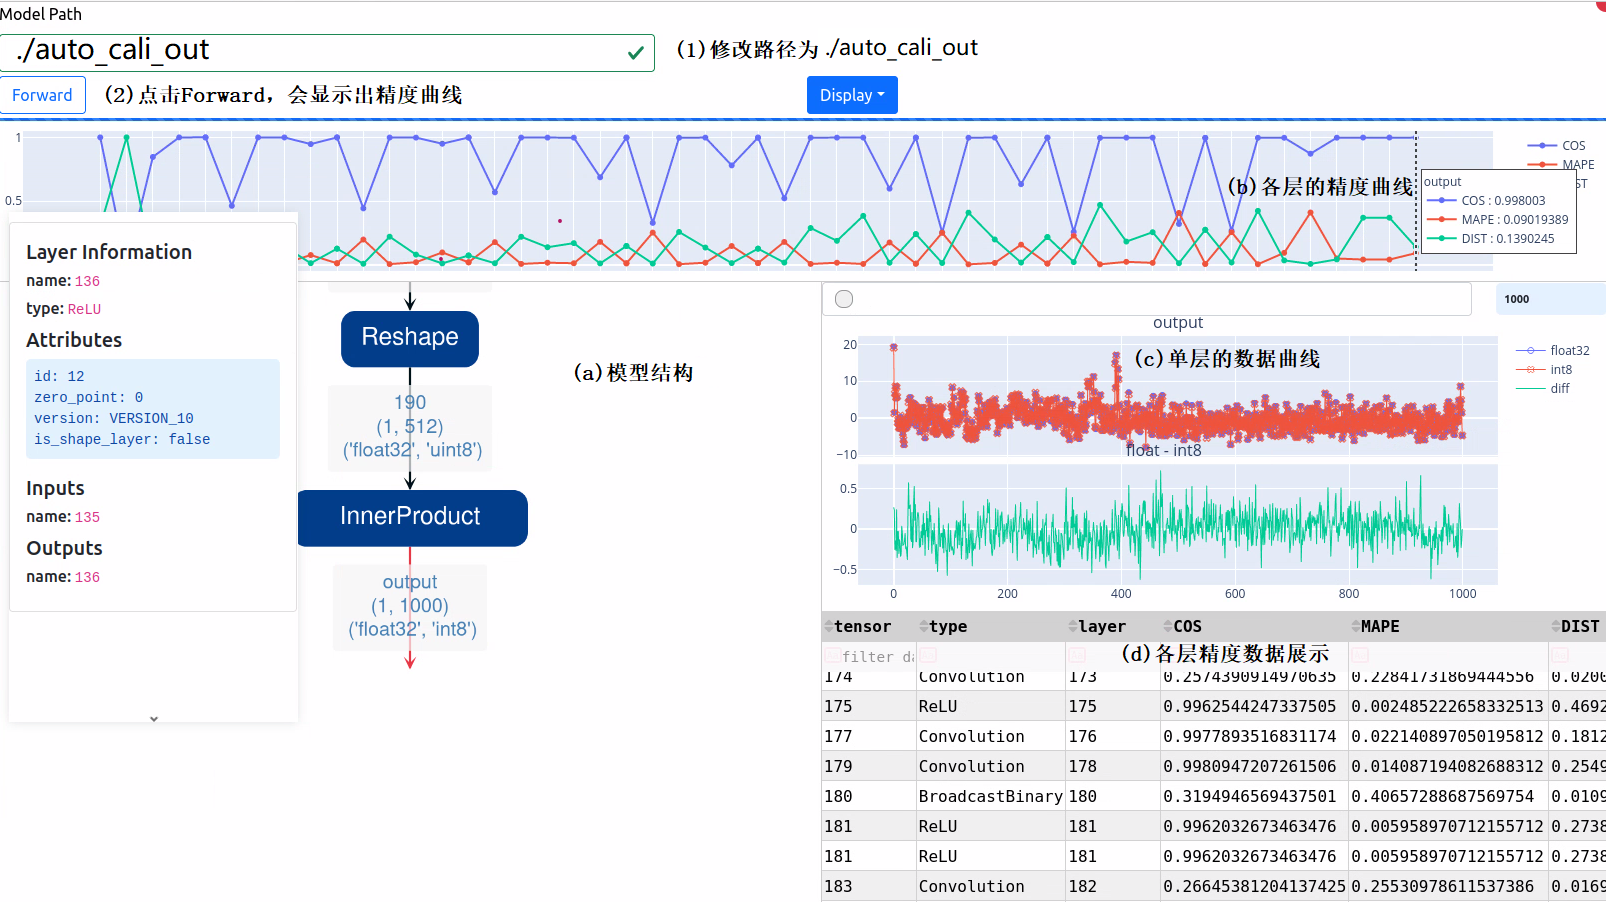
The functions of different parts are described in Figure (a), (b), (c) and (d). According to the figure, the final cosine distance has reached 0.998003, which can ensure the monotonicity of classified results and finally ensure classification accuracy.
Note: Here visual tool means reasoning one picture found in quantization dataset randomly and displaying data. The data may be different when being displayed each time but are similar to each other.
If the final precision or business verification precision cannot satisfy the requirements, increase iteration times or other parameters.
End precision display service via Ctrl+C after coming back to the development environment.
INT8 BMODEL generation by step-based quantization (optional)
There’re many steps for step-based quantization but many details are within control, such as model structure adjustment and designating quantization parameters based on layer. The process above entails certain experience and skills and is required for dealing with network with a complex structure. The basic commands and steps are introduced here. For details, please refer to our development manual.
Generate input data of LMDB
For lmdb script generation by image dataset, please refer to../scripts/convert_imageset.py.The main function is to call opencv for pre-processing and then to save it as lmdb. The script is used directly here for conversion:
python3 ../scripts/convert_imageset.py \
       --imageset_rootfolder=../ILSVRC2012 \
       --imageset_lmdbfolder=./image_lmdb \
       --resize_height=224 \
       --resize_width=224 \
       --shuffle=True \
       --mean=[123.675,116.28,103.53] \
       --scale=[0.0171,0.0175,0.0174] \
       --bgr2rgb=True \
       --gray=False
Generate image_lmdb/data.mdb file under the present catalogue after running is finished. The file saves decoded data, which are much larger than the original images.
Export FP32 UMODEL
# At this time, in the catalogue of resnet18_classify/workdir
# In comparison to compilation FP32  bmodel, it is also fitted with --mode GenUmodel parameter and --target is useless
# umodel/network_bmneto.fp32umodel will be generated in this step
python3 -m bmneto --model ../model/resnet18.onnx \
                --mode GenUmodel \
                --input_names "input" \
                --shapes "[[1,3,224,224]]" \
                --outdir umodel

# In this step, generate the model structure of umodel/network_bmneto.fp32umodel and set dataset as image_lmdb that is generated previously.
# Generate umodel/network_bmneto_test_fp32.prototxt
python3 -m ufw.tools.to_umodel \
    -u umodel/network_bmneto.fp32umodel \
    -D image_lmdb
Special note: A complete FP32 UMODEL includes two files, i.e., .prototxt and .fp32umodel. To be specific:
prototxt file is used for describing network structure and saving dataset path and some pre-processing process there or adjusting quantization parameters of each layer manually in an accurate manner.
fp32umodel is mainly used for saving network weight.
Quantify FP32 UMODEL as INT8 UMODEL
# Iteration times: 50
# save_test_proto is used for generating visual data. If it is not added, the visual results cannot be seen but the above will not influence quantization process.
calibration_use_pb quantize \
      --model umodel/network_bmneto_test_fp32.prototxt \
      --weights umodel/network_bmneto.fp32umodel \
      --target BM1684X \
      --iterations=50 \
      --save_test_proto=true
Two files, i.e., network_bmneto_deploy_int8_unique_top.prototxt and network_bmneto.int8umodel will be generated under umodel catalogue after quantization is finished. The two files will be used in final compilation as INT8 UMODEL.
Visual display can be realized thereafter.
# Check quantization precision (optional)
python3 -m ufw.tools.app --port 8001
Open http://localhost:8001 (port displayed in initialization process of docker) in browser at the same time. Operate following Step (1) and (2) and the following result can be seen after program running is finished:

It can be found that the cosine distance reaches 0.986552, which satisfies classification requirements.
End precision display service via Ctrl+C after coming back to the development environment.
Compile INT8 BMODEL
bmnetu tools are required for converting umodel into bmodel:
bmnetu --model umodel/network_bmneto_deploy_int8_unique_top.prototxt \
       --weight umodel/network_bmneto.int8umodel \
       --target BM1684X \
       --outdir "bmodel/step-int8"
View bmodel information:
tpu_model --info bmodel/step-int8/compilation.bmodel
After entering the followings, it can be found the input and output type is int8:
bmodel version: B.2.2
chip: BM1684X
create time: Thu Jul 21 10:59:22 2022

==========================================
net 0: [network_bmneto]  static
------------
stage 0:
input: input, [1, 3, 224, 224], int8, scale: 52.3023
output: output, [1, 1000], int8, scale: 0.197092

device mem size: 12771232 (coeff: 12009376, instruct: 0, runtime: 761856)
host mem size: 0 (coeff: 0, runtime: 0)
Clearing environment
Exit tpu-nntc environment after finishing bmodel generation work entirely.
exit
Program development & deployment
Install libsophon environment
Please install libsophon by referring to libsophon user manual. Besides, as opencv library is used for the pre-processing of the example, it is suggested to install libopencv-dev.
sudo apt install libopencv-dev
Inspect the correctness and performance of BMODEL
After finishing installing libsophon, test the correctness and performance of compiled bmodel using bmrt_test.
Estimate the max fps of model based on the performance results output by bmrt_test in order to select a proper model.
# bmodel compiled above will be tested below.
# --context_dir parameter is connected with folder and must contain compilation.bmodel、input_ref_data.dat、output_ref.data.dat.The latter two files are generated in course of compilation and used for comparing data in course of running.
cd resnet18_classify/workdir
bmrt_test --context_dir bmodel/fp32
bmrt_test --context_dir bmodel/auto-int8
bmrt_test --context_dir bmodel/step-int8
By taking the last command output as an example:
01 [BMRT][load_bmodel:1019] INFO:Loading bmodel from [bmodel/step-int8//compilation.bmodel]. Thanks for your patience...
02 [BMRT][load_bmodel:983] INFO:pre net num: 0, load net num: 1
03 [BMRT][show_net_info:1358] INFO: ########################
04 [BMRT][show_net_info:1359] INFO: NetName: network_bmneto, Index=0
05 [BMRT][show_net_info:1361] INFO: ---- stage 0 ----
06 [BMRT][show_net_info:1364] INFO:   Input 0) 'input' shape=[ 1 3 224 224 ] dtype=INT8 scale=52.3023
07 [BMRT][show_net_info:1373] INFO:   Output 0) 'output' shape=[ 1 1000 ] dtype=INT8 scale=0.197092
08 [BMRT][show_net_info:1381] INFO: ########################
09 [BMRT][bmrt_test:769] INFO:==> running network #0, name: network_bmneto, loop: 0
10 [BMRT][bmrt_test:834] INFO:reading input #0, bytesize=150528
11 [BMRT][bmrt_test:987] INFO:reading output #0, bytesize=1000
12 [BMRT][bmrt_test:1018] INFO:net[network_bmneto] stage[0], launch total time is 420 us (npu 327 us, cpu 93 us)
13 [BMRT][bmrt_test:1022] INFO:+++ The network[network_bmneto] stage[0] output_data +++
14 [BMRT][bmrt_test:1038] INFO:==>comparing #0 output ...
15 [BMRT][bmrt_test:1043] INFO:+++ The network[network_bmneto] stage[0] cmp success +++
16 [BMRT][bmrt_test:1063] INFO:load input time(s): 0.000099
17 [BMRT][bmrt_test:1064] INFO:calculate  time(s): 0.000422
18 [BMRT][bmrt_test:1065] INFO:get output time(s): 0.000022
19 [BMRT][bmrt_test:1066] INFO:compare    time(s): 0.000022
The following information can be viewed from the output above:
Line 02-08 is the input and output information of bmodel network.
Line 12 is the running time in TPU. To be specific, TPU time is 327us while CPU time is 93us. Here CPU time mainly refers to the call and waiting time at HOST end.
Line 15 means successful comparison of data running.
Line 16 means the time of loading data from NPU to DDR.
Line 17 is equivalent to the total time of 12 lines.
Line 18 is the time of taking back output data.
Application development
Initialize equipment and load bmodel
bm_handle_t handle;
// open device
status = bm_dev_request(&handle, 0);
if (BM_SUCCESS != status) {
  return false;
}
// create bmruntime handle and load_bmodel
void *p_bmrt = bmrt_create(handle);
string bmodel_path = "compilation.bmodel";
if(argc > 2) bmodel_path = argv[2];
bmrt_load_bmodel(p_bmrt, bmodel_path.c_str());
Pre-processing
Pre-processing mainly includes data preparation from OpenCV or other data processing libraries. Put the final data in tensor.
The quantization model shall be multiplied by input_scale on the basis of fp32 model input before being converted into int8 as the input of quantization model.
std::string image_name = argv[1];
cv::Mat image = cv::imread(image_name.c_str());
if(image.empty()){
  std::cout<<"Failed to read image: "<<image_name<<std::endl;
  return -1;
}

auto cv_type = input_dtype == BM_FLOAT32? CV_32FC3: CV_8UC3;
cv::Mat resized;
cv::resize(image, resized, cv::Size(ws, hs), 0, 0, cv::INTER_NEAREST);
resized.convertTo(resized, cv_type,
        0.0078125 * input_scale,
        -127.5 * 0.0078125 * input_scale);

// Change input memory storage format form Opencv to BMTPU
std::vector<float> input_data(ws*hs*c);
std::vector<cv::Mat> input_channels;
if(cv_type == CV_32FC3) cv_type = CV_32FC1;
if(cv_type == CV_8UC3) cv_type = CV_8UC1;
// map input_data into input_channels
WrapInputLayer(input_channels, input_data.data(), c, hs, ws, cv_type);
cv::split(resized, input_channels);

bm_tensor_t input_tensor;
bmrt_tensor(&input_tensor, p_bmrt, input_dtype, input_shape);
bm_memcpy_s2d(handle, input_tensor.device_mem, input_data.data());

bm_tensor_t output_tensor;
Model reasoning
Model reasoning function is asynchronous. bm_thread_sync should be called for synchronous waiting after calling is finished.
double start_time = what_time_is_it_now();
bool ret = bmrt_launch_tensor(p_bmrt, net_name.c_str(), &input_tensor, input_num,
                              &output_tensor, output_num);
if (!ret) {
  printf("launch failed!");
  exit(-1);
}
// sync, wait for finishing inference or get an undefined output
status = bm_thread_sync(handle);
if (BM_SUCCESS != status) {
  printf("thread sync failed!");
  exit(-1);
}
Post-processing
For classification, post-processing is mainly aimed to obtain correct category by taking top value.
Pay attention to the output processing of quantization model. The data taken out are quantized output, which must be multiplied with the corresponding output_scale value in order to obtain the output corresponding to fp32.
size_t size = bmrt_tensor_bytesize(&output_tensor);
std::vector<char> raw_output(size);

// Get output data from device
bm_memcpy_d2s_partial(handle, raw_output.data(), output_tensor.device_mem, size);

// Free output and input device memory
bm_free_device(handle, output_tensor.device_mem);
bm_free_device(handle, input_tensor.device_mem);


// real post-process the output data
// here is to get the top one
auto output_count = bmrt_shape_count(&output_tensor.shape);
auto output_dtype = network_info->output_dtypes[0];
float output_scale = network_info->output_scales[0];

int max_index = 0;
float max_score = -1;
for(int i=0; i<output_count; i++){
  float score = 0;
  if(output_dtype == BM_FLOAT32) {
    score = ((float*)raw_output.data())[i];
  } else if(output_dtype == BM_INT8) {
    // multiply the output_scale only for quantized model
    // for classification, the scale may be useless
    score = raw_output[i] * output_scale;
  } else {
    assert(0);
  }
  if(score>max_score) {
    max_score = score;
    max_index = i;
  }
}

cout <<"IMAGE "<< image_name
     <<" TOP SCORE IS " << max_score
     << " AT " << max_index << endl;

double start_end = what_time_is_it_now();
printf("TOTAL TIME %f s\n", start_end - start_time);
Release equipment
// Destroy bmruntime context
bmrt_destroy(p_bmrt);
Program compilation script
Below shows the specific contents of applied Cmake building script. find_package is recommended to provide environment information:
cmake_minimum_required(VERSION 3.10)
project(resnet18-classify)

# opencv for preprocess
find_package(OpenCV REQUIRED)
include_directories(${OpenCV_INCLUDE_DIRS})

# use libbmrt libbmlib
find_package(libsophon REQUIRED)
include_directories(${LIBSOPHON_INCLUDE_DIRS})
message(STATUS ${LIBSOPHON_LIBS})

aux_source_directory(src SRC_FILES)
add_executable(classify ${SRC_FILES})
target_link_libraries(classify ${OpenCV_LIBS} ${the_libbmlib.so} ${the_libbmrt.so})

install(TARGETS classify DESTINATION bin)
install(FILES
  ${CMAKE_CURRENT_SOURCE_DIR}/workdir/bmodel/auto-int8/compilation.bmodel
  DESTINATION bmodel)
Start compilation and running after finishing building script writing:
# 此时在resnet18-classify目录下
mkdir build && cd build
cmake ../ -DCMAKE_INSTALL_PREFIX=`pwd`/install && make && make install
classify program will be generated at this time. The running command is as below:
./classify ../images/cat.jpg ../workdir/bmodel/fp32/compilation.bmodel
./classify ../images/cat.jpg ../workdir/bmodel/auto-int8/compilation.bmodel
./classify ../images/cat.jpg ../workdir/bmodel/step-int8/compilation.bmodel
Packaging deployment
After confirming different bmodels satisfy the business demands, package them compiled classify program and bmodel and send them to business system.
If the original model is changed later, compile bmodel again to replace the original bmodel.
In addition, bmodel is not related to platform. The same application of different platforms can share the same bmodel.