Qantization-Tools is a tool for network model quantization developed independently by Sophon.
It could analyze 32bit float network models having been well trained by different frames and generate 8bit fixed-point network model.
The 8bit fixed-point network model can be used in SOPHON series AI computing platforms.
In SOPHON computing platform, various layers of input, output and coefficient of network are represented by 8bit and mixing precision calculation is also supported
so as to reduce power consumption and memory occupation as well as data transmission delay significantly on the basis of ensuring network precision, and improve computing speed.
Fig. 1 the structural diagram of Quantization-Tools
Parse-Tools:
Analyze well-trained network models under various deep learning frames, generate network model file with uniform format—umodel.
Supported deep learning frame includes: Caffe, TensorFlow, MxNet, PyTorch, Darknet, ONNX and PaddlePaddle.
Calibration-Tools:
Analysis on umodel file with float32 format is made based on the Entropy Loss Minimum Algorithm (MAX and other algorithms are also optional).
Fix network coefficient into 8bit and save network model as umodel file with int8 format.
U-FrameWork:
Customized deep deep learning reasoning frame has integrated the computing function of various kinds of open source deep learning frames and could provide the following functions:
Provide basic computing for fixed-point as the basic computing platform.
Verify the precision of network model with fp32 and int8 format as a verification platform.
Compile int8umodel into bmodel that can run on SOPHON computing platform as an interface via bmnetu.
Quantization program provides a number of example programs, which include Imdb production, transferring of network and quantization process of different frames and visual debugging tools. Refer to Quantitative demo.
Quantization-Tools of this version include one-key quantization tools.
Several steps required for quantization have been integrated in the process.
Descriptions based on different steps could help gain more direct understandings on the quantization process.
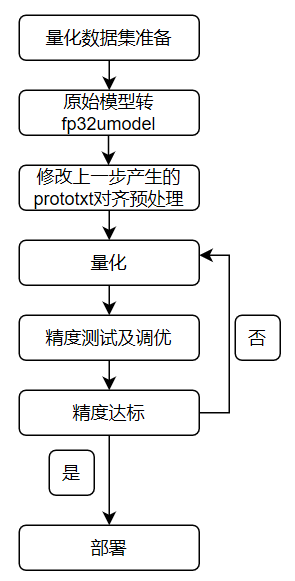
See the figure below for the use of network quantization by Quantization-Tools:
The specific quantization steps are described as below:
Prepare quantization dataset
As Post-Training quantization tools, Quantization-tools could quantify well trained float32 network.
In the process, a certain number of real data are required for reasoning in virtue of float32 network.
The scope of input and output data in each layer will be recorded in the reasoning process as quantization reference.
If one-key quantization interface is used, for the common CV reasoning tasks, lmdb will be generated in course of one-key quantization
when setting path for setting quantization picture and pre-processing, and it can be used directly in course of step quantization;
If simple pre-processing device cannot satisfy the requirements or network output of non-CV type may be different shapes,
refer to and modify python code in create_lmdb example and produce lmdb by yourself.
Conversion of float32 network
Convert network based on different frames into float32 Umodel prior to quantization. In this process, data prepared in Step 1 can be used as reasoning input.
Tool that will be used in this step is ufw.tools.*_to_umodel. Alternatively, judge the model of the specific open source frame in course of one-key quantization
based on the designated model and parameter file suffix so as to call these interfaces automatically for the purpose of conversion.
Alignment pre-processing
Step quantization entails pre-processing that is carried out when user confirms network training. Modify the prototxt file generated in last step based on the above.
Align network training pre-processing or it is suggested to produce lmdb containing data after pre-processing directly while producing lmdb.
Quantization network
Convert float32 Umodel into int8 Umodel via a certain times of reasoning statistics and calculation of quantization parameters.
calibration_use_pb binary tool or its interface in the form of python is used in this step.
Precision test and optimization
This step involves several rounds together with quantization network. Adjust quantization parameters by verifying if the quantized network could satisfy the precision or speed requirements and then carry out quantization again in order to reach the expected goal.
ufw test_fp32/ufw test_int8 and visual tools are used in this step. In most cases, user needs to develop its own development precision test program for the purpose of precision verification.
Network deployment
It is deployed after quantization is finished and similar to float32 network deployment. Use bmnetu tool to convert int8 Umodel into int8 Bmodel that can be deployed on SOPHON’s relevant equipment finally.
As for CV reasoning network that generally takes image as input, auto_cali one-key quantization tool is recommended.
This tool could integrate step quantization with simpler operation. It can reduce the probability of errors caused by manual input in course of step quantization and has the following functions:
Finish conversion from original frame (TensorFlow/PyTorch/Caffe/Darknet/MxNet/ PaddlePaddle/ONNX) to bmodel of BM168X chip by one key
Carry out quantization strategy search automatically based on the preset optimization parameter combination and int8 model precision results in order to find optimal quantization strategy that satisfies precision requirements.
Enter the directory of saving model and quantization data set after starting docker environment via tpu-nntc release package.
If lmdb is taken as quantization dataset, convert the original pictures into lmdb dataset via ufwio. See the descriptions of Prepare lmdb dataset for details.
–cali_image_path parameter can also be used by auto-cali to designate picture dataset; –cali_image_preprocess parameter can also be used for pre-processing dataset.
During the process above, auto-cali will save the processed images as lmdb dataset automatically for calling in the future.
The ufw.cali.cali_model module can realize one-button quantification conversion from the original frame to the bmodel of 1684x chip
$ python3 -m ufw.cali.cali_model \
--net_name resnet18 \
--model test_models/pytorch/resnet18.pt \
--cali_lmdb test_models/imagenet_preprocessed_by_pytorch_100/ \ #Use the pretreated lmdb file, if using configuration parameter of picture data: cali_image_path and cali_image_preprocess parameter, see the cases below
--input_shapes '[1,3,224,224]'\
--test_iterations 10\
--postprocess_and_calc_score_class topx_accuracy_for_classify \
--cali_iterations=100
Introduction to optional parameters
Parameter Name
Parameter Type
Mandatory
Description
net_name
string
Y
Model/network name, this name will be used as filename of generated umodel
model
string
Y
Model file path, pb file of tensorflow, pt file of pytorch, json file of mxnet, prototxt file in caffe and U-FrameWork
weights
string
N(mandatary when described file exists)
Path of model weights file, caffemodel file in caffe, fp32umodel file in U-FrameWork and params file in mxnet
input_names
string
N
Network input tensor name, format: ‘input_tensor1_name, input_tensor2_name’, the middle is divided by a comma
input_shapes
string
Y
Network input tensor shape, format: ‘[input_shape];[input_shape]’, the middle is divided by a comma, such as ‘[4, 3, 224, 224];[4, 1]’, it should correspond to the input name (if any)
input_descs
string
Y
Description of data type and value range of network input tensor, format: “[serial number, data type, lower bound, upper bound]”, e.g., “[0, uint8, 0, 256]”, default “[x, float, 0, 1]”
input_structure
string
Y
Hierarchical structure of network input tensor, it may be required by some frames, such as pytorch; format: “0,1,(2,3)”
output_names
string
N
Network output tensor name, format: “output_tensor1_name, output_tensor2_name”, the middle is divided by a comma
cali_lmdb
string
Y
Path of quantitative calibration picture set lmdb is null string by default; if it is not set, the cali_image_path should read the calibration picture from the file directory
cali_image_path
string
Y
Path of quantitative calibration picture set, it is null string by default; if it is not set, the cali_lmdb should read the calibration data from lmdb
Parameter Name
Parameter Type
Mandatory
Description
cali_iterations
string
N
Quantity of quantitative calibration pictures; it is 0 by default, which means the actual quantity of pictures acquired from lmdb or picture directory; the picture quantity can be set to be lower than the actual quantity. In general, it is suggested to use 200 pictures for calibration
cali_image_preprocess
string
N
Preprocessing of user-defined picture; each preprocessing op is divided by a comma, the parameters in op are divided by a comma, such as –cali_image_preprocess “resize_side=256; crop_h=224, crop_w=224; mean_value=103.94:116.78:123.68, scale=1.0, bgr2rgb=True”
fp32_layer_list
string
N
Some layers are calculated via fp32; the designated format is: “Layer 1 name, Layer 2 name, …… Layer n name”, be divided by a comma
layer_param_list
string
N
Set the layer_param of layers, the layers are divided by “;”, the layer name and layer parameter are divided by “:”, the parameters of layers are divided by “,”, while the parameter name and value are divided by “=”; such as, Layer 1 name: Parameter 1=1, parameter 2=xx; Layer 2 name: Parameter 1=3, parameter 2=yy
convert_bmodel_cmd_opt
string
N
Specify the command parameter to output bmodel, provide it to bmnetu for use, it is null by default; the options supported can be viewed through the command bmnetu –help; for example, if it is configured as “-dyn 1 -opt 2 -enable_profile”, these three parameters will be sent to bmnetu command immediately
Introduction to auto quantization parameters
Enable the following parameters to test the quantization effects with different quantization options and optimization can improve the quantitation accuracy. The quantization effects are judged based on the cosine distance between the output of float-point network and output of fixed-point network
(this standard is not absolutely accurate due to the diversified forms of network; the quantization optimization is subject to the actual environment test results after actual deployment).
The quantization and accuracy test process will be conducted repeatedly, as Auto-cali auto quantization may have some attempts; multiple iteration reasoning can be overlaid each time, so the period can be long; the user can have step-by-step quantization by experience.
Parameter Name
Parameter Type
Mandatory
Description
postprocess_and_calc_score_class
string
N
Specify the files in directory of auto_cali/usr as the category of network posttreatment and accuracy calculation, it is None by default: Support topx_accuracy_for_classify of classified models; currently, it supports [detect_accuracy, topx_accuracy_for_classify, feature_similarity, None],
i.e.: Support detect_accuracy of object detection model, support feature_similarity for cos similarity calculation of extracted characteristics; if it is set as None, no post-treatment and accuracy calculation is performed
try_cali_accuracy_op
string
N
Specify the quantization parameters of calibration tool; automatically searched quantization parameters are not used, it is empty string by default, to ensure easy debugging; the options supported can be viewed through calibration_use_pb –help;
it can be designated as default, now, the basic default parameter of calibration_use_pb is used for testing by default, to ensure easy debugging. Such as, –try_cali_accuracy_opt=”-per_channel=True;-th_method=SYMKL”
test_iterations
string
N
The iterated function tested in test set, it is 0 by default, which means the actual quantity acquired from lmdb or picture directory, the picture quantity can be set to be lower than actual quantity; this parameter must be set if the test data are sent via network
feature_compare_layer_list
string
N
This parameter can be used for comparing the layer of cosine distance if network output is not available for comparison of cosine distance; it can also be set as use_the_conv_at_the_end, which means the cos is calculated through the last conv of output branch
If quantization accuracy fails to satisfy the demands, the quantization strategy can be searched automatically or matched manually by referring to the Quantization skills
Auto-cali one-key quantization is a quantization interface that combines multiple sets; the user can perform customization and attempts in each step, in order to have further optimization on basis of one-key quantization or the one-key quantization fails to meet the requirements; please refer to Step-by-step quantization
It is recommended to use auto_cali one-key quantization tool for the CV reasoning network that uses common pictures as input. Auto_cali is integration of step-by-step quantization, each step will be described in this section, and improves the understanding to the end to end procedure of quantization.
For quantization of non-cv networks in which the inputs may be special and of networks below accuracy requirement from auto_cali, step by step calibration is recommanded to fine-tune the quantization:
The steps of step-by-step quantization are introduced as follows, taking YOLOv5s model as example, the detailed operation steps can refer to Step quantization YOLOv5s.
Format requirements of Quantization-tools for input data: [N,C,H,W] (which means, store data according to W, then store data according to H, the rest can be analogized in the same manner)
The storage order of Quantization-tools for dimensions C of input data is consistent with the original frame. For example, the storage order of dimension C of caffe frame is BGR, while the storage order of dimension C of tensorflow is RGB.
Use the U-FrameWork interface to capture the network reasoning input during network reasoning or script compilation, and save it as lmdb; the method is as follows:
In U-FrameWork, the input data of network is saved in the form of lmdb and used as data source of data layer. The quantization input pictures need to be decoded and converted in simple cases.
It is recommended to carry out subtraction of mean value and variance dividing in the process of lmdb preparation; the data after preprocessing should be stored in lmdb. The complex treatment which fails to be expressed accurately in preprocessing,
or the middle results in cascade network are inputted as the next level network for training, the user can develop the preprocessing script independently, to generate the lmdb directly.
The functions related to lmdb have become independent ufwio packets which are independent from SDK of Sophgo and can run in any Python3.7 and higher environment.
Composition of lmdb API
lmdb = ufwio.LMDB_Dataset(path, queuesize=100, mapsize=20e6) # create a LMDBDataset object
put(data, labels=None, keys=None) # store picture and label information
data:tensordata,onlynumpy.arrayformatorthepythonlistwhichcontainsmultiplenumpy.arrayareaccepted.Thedatatypecanbeint8/uint8/int16/uint16/int32/uint32/float32.Thedatawillbestoredintheoriginalshape.lables:Thelablesofpictureshouldbetypedint;thisvaluecanbeskippedifthere's no label.keys:Keyvalueoflmdbcanbethefilenameoforiginalpicture,butthestoredlmdbdatawillbesortedbythekeyvalue;itisrecommendedtousetheuniqueandincrementalkeyvalue.Ifthisvalueisskipped,LMDB_Datasetwillmaintaintheincrementalkeyvalueautomatically.
It is recommended to delete the target lmdb, recreate and add it before calling this function, for this function will not detect whether the given path has files, and it may lead to disorder due to repeated key if new contents are added for the lmdb files already exist.
The data can be covered or polluted by using the repeated key; the writing performance can be degraded by using the non-incremental key.
Data layer should be used for analyzing this lmdb.
The use method of generated lmdb is described in the Use of lmdb dataset, The data can be prepared for the reasoning in quantization period in coordination with the described preprocessing.
The network after the third-party frame training must be converted into fp32umodel before it is quantized. One *.fp32umodel file and one *.prototxt file will be generated in this stage.
Generally, the filename of prototxt file is net_name_bmnetX_test_fp32.prototxt; in which, X is the initial of original frame name;
for example, when network of Tensorflow is converted to umodel, the prototxt filename will be net_name_bmnett_test_fp32.prototxt, while the network converted by PyTorch will be net_name_bmnetp_test_fp32.prototxt.
The fp32umodel file generated in this stage is the quantitative input; the preprocessing modification via Use of lmdb dataset refers to the modification of prototxt file that is generated in this stage.
Note: Considering the accuracy on BM1684 chip, the inputted Calibration-tools and fp32umodel should ensure independence of Batchnorm layer and Scale layer.
Sometimes, the customer may use the third-party tool to have equivalent transformation of network diagrams; make sure the Batchnorm layer and Scale layer are not integrated into Convolution in advance.
The converted and generated tools of fp32umodel are the series of python scripts named ufw.tools.*_to_umodel and stored in ufw, * means the abbreviation of different frames. View help through the following commands:
python3-mufw.tools.cf_to_umodel--help# Caffe model transformation fp32umodel toolpython3-mufw.tools.pt_to_umodel--help# PyTorch model transformation fp32umodel toolpython3-mufw.tools.tf_to_umodel--help# TensorFlow model transformation fp32umodel toolpython3-mufw.tools.dn_to_umodel--help# Darknet model transformation fp32umodel toolpython3-mufw.tools.mx_to_umodel--help# MxNet model transformation fp32umodel toolpython3-mufw.tools.on_to_umodel--help# ONNX model transformation fp32umodel toolpython3-mufw.tools.pp_to_umodel--help# PaddlePaddle model transformation fp32umodel tool
The detailed introduction of parameters may vary along with the frames; for details, please refer to the explanation of parameters in each frame.
The commands generated by models in the following cases are saved as simple python scripts; the users can modify small number of parameters based on these scripts,
to finish the model transformation, or the users can add parameters in command line directly by using python3 -m ufw.tools.xx_to_umodel, in order to have transformation.
fp32umodel generated by network model in Caffe frame
Parameter modification
The cases are stored in https://github.com/sophon-ai-algo/ of github item, please enter the correct branch for downloading.
The scripts of this case are stored in examples/calibration/caffemodel_to_fp32umodel_demo/resnet50_to_umodel.py of items above;
for user network, the -m -w -s parameter can be modified on basis of this:
The name of outputted folder, compilation by default
-n
string
N
Network name
-D
string
N
Position of lmdb dataset; setting of this parameter can be skipped if it does not exist; it can be added according to the actual path when editing prototxt file manually
--cmp
string
N
Specify whether test the intermediate file of model transformation
--dyn
string
N
Specify whether convert the model through dynamic network
If -d parameter is not specified, the compilation folder will be generated in the current folder to store the outputted *.fp32umodel and *_bmnetc_test_fp32.prototxt.
fp32umodel generated by network model in Tensorflow frame
Parameter modification
The cases are stored in https://github.com/sophon-ai-algo/ of item github, please enter the correct branch for downloading.
In this case, the parameters such as -m, -i and -s can be modified by referring to examples/calibration/tf_to_fp32umodel_demo/resnet50_v2_to_umodel.py.
Enter the tensor name, multiple inputs are divided by a comma, for example: “input_ids,input_mask”
-o
string
N
Output tensor name
-s
string
Y
Input tensor dimension, (N,H,W,C), multiple input networks are divided by a comma and should be consistent with the sequence of input; for example: “[1,384],[1,384]”
-d
string
N
The name of outputted folder is compilation by default
-n
string
N
Network name
-D
string
N
Setting of lmdb dataset can be skipped if it does not exist; it can be added according to the actual path when editing prototxt file manually
--cmp
string
N
Specify whether test the intermediate file of model transformation
--dyn
string
N
Specify whether convert the model through dynamic network
--descs
string
N
Input the description information such as data type based on the original model, such as “[0,uint8,0,256]”,multiple inputs are divided by “,”, such as “[0,int32,0,256],[1,int32,0,2]”
If -d parameter is not specified, the compilation folder will be generated in the current folder to store the outputted *.fp32umodel and *_bmnett_test_fp32.prototxt.
fp32umodel generated by network model in Pytorch frame
Parameter modification
The cases are stored in https://github.com/sophon-ai-algo/of item github, please enter the correct branch for downloading.
The parameters such as -m and -s can be modified on basis of examples/calibration/pt_to_fp32umodel_demo/yolov5s_to_umodel.py.
Input tensor dimension, (N,H,W,C), multiple input networks are divided by a comma and should be consistent with the sequence of input, for example: “[1,384],[1,384]”
-d
string
N
The name of outputted folder is compilation by default
-n
string
N
Network name
-D
string
N
Setting of lmdb dataset can be skipped if it does not exist; it can be added according to the actual path when editing prototxt file manually
--cmp
string
N
Specify whether test the intermediate file of model transformation
--dyn
string
N
Specify whether convert the model through dynamic network
--descs
string
N
Input the description information such as data type based on the original model, such as “[0,uint8,0,256]”, multiple inputs are divided by “,”, such as: “[0,int32,0,256],[1,int32,0,2]”
If -d parameter is not specified, the compilation folder will be generated in the current folder to store the outputted *.fp32umodel and *_bmnetp_test_fp32.prototxt.
fp32umodel generated by network model in Mxnet frame
Parameter modification
The cases are stored in https://github.com/sophon-ai-algo/ of item github, please enter the correct branch for downloading.
The parameters such as -m, -w and -s can be modified on basis of examples/calibration/mx_to_fp32umodel_demo/mobilenet0.25_to_umodel.py
Input tensor dimension, (N,H,W,C), multiple input networks are divided by a comma and should be consistent with the sequence of input; for example: “[1,384],[1,384]”
-d
string
N
The name of outputted folder is compilation by default
-D
string
N
Setting of lmdb dataset can be skipped if it does not exist; it can be added according to the actual path when editing prototxt file manually
--cmp
string
N
Specify whether test the intermediate file of model transformation
--dyn
string
N
Specify whether convert the model through dynamic network
--descs
string
N
Input the description information such as data type based on the original model, such as “[0,uint8,0,256]”, multiple inputs are divided by “,”, such as: “[0,int32,0,256],[1,int32,0,2]”
If -d parameter is not specified, the compilation folder will be generated in the current folder to store the outputted *.fp32umodel and *_bmnetm_test_fp32.prototxt.
fp32umodel generated by network model in Darknet frame
Parameter modification
The cases are stored in https://github.com/sophon-ai-algo/ of item github,
please enter the correct branch for downloading. The parameters such as -m, -w and -s can be modified on basis of examples/calibration/dn_to_fp32umodel_demo/yolov3_to_umodel.py
Input tensor dimension, (N,H,W,C), multiple input networks are divided by a comma and should be consistent with the sequence of input; for example: “[1,384],[1,384]”
-d
string
N
The name of outputted folder is compilation by default
-D
string
N
Setting of lmdb dataset can be skipped if it does not exist; it can be added according to the actual path when editing prototxt file manually
--cmp
string
N
Specify whether test the intermediate file of model transformation
Run command:
While releasing this example program, the original network is not released along with SDK in order to reduce the volume of release package.
Please download the original network in order to run the case:
If -d parameter is not specified, the compilation folder will be generated in the current folder to store the outputted *.fp32umodel and *_bmnetd_test_fp32.prototxt.
The cases are stored in https://github.com/sophon-ai-algo/ of item github, please enter the correct branch for downloading.
The parameters such as -m, -i and -s can be modified on basis of examples/calibration/on_to_fp32umodel_demo/postnet_to_umodel.py
Input tensor dimension, (N,H,W,C), multiple input networks are divided by a comma and should be consistent with the sequence of input; for example: “[1,384],[1,384]”
-d
string
N
The name of outputted folder is compilation by default
-n
string
N
Network name
-D
string
N
Setting of lmdb dataset can be skipped if it does not exist; it can be added according to the actual path when editing prototxt file manually
--cmp
string
N
Specify whether test the intermediate file of model transformation
--dyn
string
N
Specify whether convert the model through dynamic network
--descs
string
N
Input the description information such as data type based on the original model, such as “[0,uint8,0,256]”, multiple inputs are divided by “,”, such as: “[0,int32,0,256],[1,int32,0,2]”
If -d parameter is not specified, the compilation folder will be generated in the current folder to store the outputted *.fp32umodel and *_bmneto_test_fp32.prototxt.
fp32umodel generated by PaddlePaddle network model
Parameter modification
The cases are stored in https://github.com/sophon-ai-algo/ of item github, please enter the correct branch for downloading.
The parameters such as -m, -i and -s can be modified on basis of examples/calibration/pp_to_fp32umodel_demo/ppocr_rec_to_umodel.py
Input tensor dimension, (N,H,W,C), multiple input networks are divided by a comma and should be consistent with the sequence of input; for example: “[1,384],[1,384]”
-d
string
N
The name of outputted folder is compilation by default
-n
string
N
Network name
-D
string
N
Setting of lmdb dataset can be skipped if it does not exist; it can be added according to the actual path when editing prototxt file manually
--cmp
string
N
Specify whether test the intermediate file of model transformation
If -d parameter is not specified, the compilation folder will be generated in the current folder to store the outputted *.fp32umodel and *_bmpaddle_test_fp32.prototxt.
Notes of parameter setting in this stage:
If -D (-dataset ) parameter is specified, ensure correct path under -D parameter and the specified dataset should be compatible with this network; otherwise, running error may occur.
If -D parameter is specified, modify prototxt by using lmdb dataset according to the chapter of Use of lmdb dataset.
Use data layer as input
Set data preprocessing correctly
Set lmdb path correctly
Do not use -D parameter if failing to provide legal data source (this parameter is optional; if parameter is not specified,
the random data will be used for testing the correctness of network conversion; the data source can be modified manually in the converted network).
The parameter–cmp can be specified when converting the model; this parameter can be used to see if the intermediate format of model conversation
is consistent with the model calculation result in the original frame, which increases the verification of model conversion correctness.
The network quantization process includes two steps below:
Optimize the inputted float-point network drawing; this step is included in quantization step and can be implemented independently. Please refer to Optimizing network.
Perform quantization of float-point network to acquire int8 network drawing and coefficient file. Please refer to Quantization network.
Please introduce the use method of dataset firstly, for the lmdb dataset generated by Prepare lmdb dataset are required in quantization, and correct use of dataset is crucial.
As for post-training quantization method, the trained models are provided with reasoning for certain times, in order to record the scope of input/output data in each layer and then determine the quantization parameters.
While performing reasoning, make sure the inputted data are valid data during actual practice/verification, to ensure that statistics is correct. The preprocessing should be consistent with the practice.
Therefore, U-FrameWork provides a simple preprocessing interface, to configure the preprocessing algorithm by modifying the *_test_fp32.prototxt file that is generated when generating fp32umodel;
the generated lmdb data will be calculated according to the configuration before inputting network, to have real network reasoning;
the complete preprocessing can be regarded as the combination of cv conversion when preparing lmdb and preprocessing algorithm defined in prototxt.
Generally, the following three contents can be modified prior to definition preprocessing:
Use Data layer as network input.
Use the parameter data_param of Data layer to specify the position of generated lmdb dataset.
Modify the transform_param parameter of Data layer to correspond to the picture preprocessing of network.
The typical structure of data layer is shown in cases below:
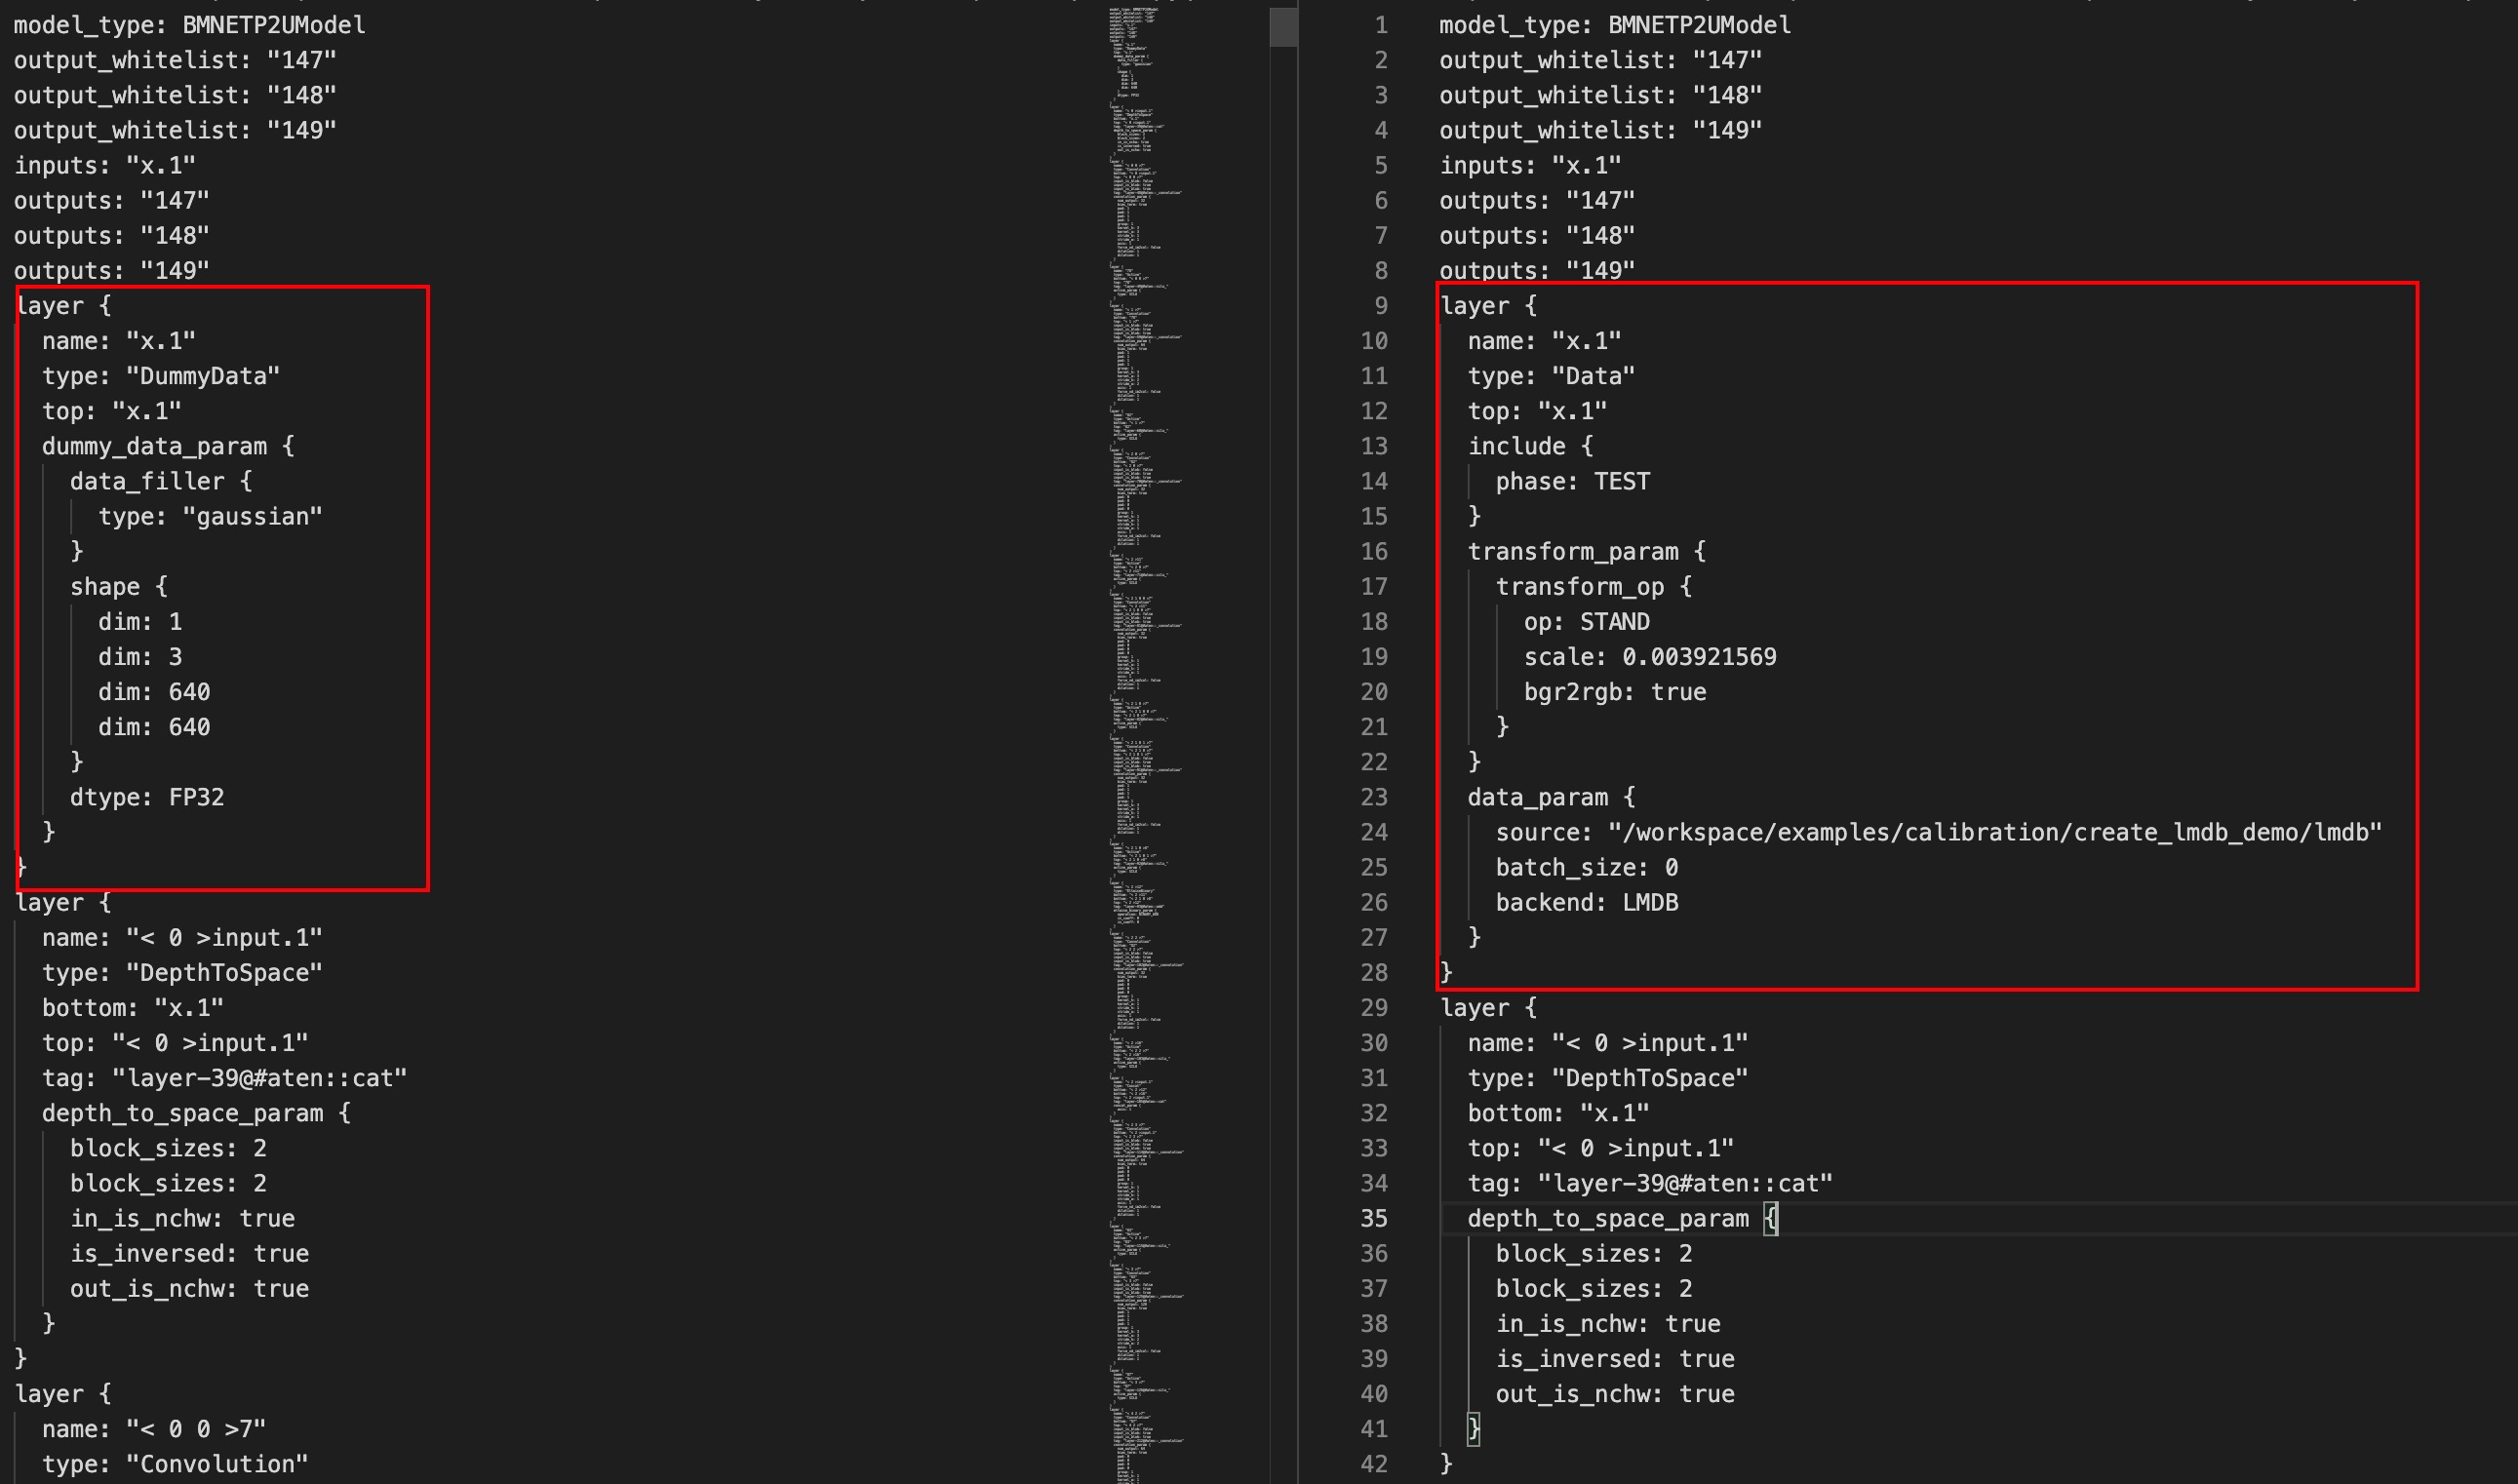
Special note: As new auxiliary information is stored in lmdb of ufwio since Version 2.7.0 compared with the previous versions, so the format is different from the lmdb of previous versions, the interface in python form is used when preparing lmdb; the example procedure create_lmdb provides the routines which can be modified based on it. It is recommended to include the preprocessing in python codes, generate the pretreated data for quantization, to avoid preprocessing prior to definition in prototxt.The data which are consistent with network input shape should be generated when preparing lmdb; for common CV model data, the 4-dimension lmdb is generated by example procedure by default; when this lmdb is used for converting the input of -D parameter of Command fp32umodel, the batch size parameter at data layer of prototxt above will be set as 0 automatically; if no -D parameter is specified in the conversion process of fp32umodel, the batch size should be set as 0 when modifying the designated data source of prototxt manually.The lmdb generated by SDK binary convert_imageset tool of previous version is compatible with the previous prototxt; the lmdb generated is 3-dimensional; different dimensions may occur if the lmdb generated by new tool is used for the previous and converted fp32umodel, and if so, the batch size of data layer should be modified as 0. The prototxt of previous version is still compatible with lmdb; no manual modification is required, even if fp32umodel is converted by the newly converted lmdb as dataset.
1model_type:BMNETT2UModel2output_whitelist:"vgg_16/fc8/squeezed"3inputs:"input"4outputs:"vgg_16/fc8/squeezed"5layer{6name:"input(data_will_be_transposed)"7type:"Data"8top:"input(data_will_be_transposed)"10include{11phase:TEST12}13transform_param{14transform_op{15op:RESIZE16resize_side:25617}18transform_op{19op:CROP20crop_h:22421crop_w:22422}23transform_op{24op:STAND25mean_value:103.9400024414062526mean_value:116.7799987792968827mean_value:123.6800003051757828scale:1.029bgr2rgb:True30}31}32data_param{33source:"/my_lmdb"// Set the source of the data layer34batch_size:035backend:LMDB37}38}Modifycorrectlmdblocationofsource
Make sure to modify the *_test_fp32.prototxt file and add the data preprocessing parameter in datalayer (or Annotated- Data layer) prior to network quantization,
to make sure the data sent to network are consistent with the preprocessing in training of original framework.
The Calibration-tools quantization tool is improved based on the form of Caffe data preprocessing. The TransformationParameter of Caffe means
the execution sequence of parameters is relatively fixed and fails to flexibly express the flexible and variable preprocessing modes based on Phthon frame, such as Tensorflow and Pytorch;
so, it applies to the default data preprocessing of Caffe model only. This tool is improved into the representation method of user-defined TransformOp array;
the preprocessing can be understood as different transform_op by defining the transform_op structure and be listed in transform_param by sequence;
the programs will execute the calculations by sequences; the definition of each op can refer to TransformOp definition.
Length of short side of image zoom; the short weight/height of picture is zoomed to this value, while another side is zoomed
according to the scale of this side; input this parameter, then resize_h and resize_w will be ignored.
resize_h
Target height of picture
resize_w
Target width of picture
CROP Parameter
Introduction
crop_fraction
The ratio of picture clipping; the inputted picture is clipped based on this center point as the reference point;
if this parameter is inputted, then crop_h and crop_w will be ignored.
crop_h
Target height of picture clipping
crop_w
Target width of picture clipping
STAND Parameter
Introduction
mean_value
Mean value of picture; one or more values can be inputted; it should correspond to channel quantity in many cases.
mean_file
The mean value that is inputted in file form
scale
Picture multiplication factor; the input data will multiply with this factor; multiple factors can be inputted and
should correspond to the channel quantity.
div
Picture division factor; the inputted data will divide by this factor; multiple factors can be inputted and should correspond
to channel quantity; this parameter will be calculated along with scale; generally, it can be converted into scale.
bgr2rgb
When data in lmdb are formatted bgr, but the data formatted rgb need to be inputted by net, the bgr2rgb should be set as ture
The necessary parameters and common optional parameters required for quantization network of binary quantization tools are provided here;
meanwhile, sdk also provides quantization interfaces in python form; please refer to the quantization of file input parameters in help:
python3 -m ufw.cali --help
-target: Target quantization chip, which can be BM1684 or BM1684X
-model: Quantization input network
-weights: Weight file of quantization network
-dump_dist: The data of each layer will be stored in file during quantization; it can be loaded and skipped directly in the next quantization, to accelerate the process of inference and statistics
-load_dist: Load the data distribution of layer saved in the previous quantization to repeat inference and increase the inference speed; only the distribution saved by network that has no structure change can be used
-th_method: The threshold calculation algorithm can be divided into KL(default),SYMKL,JSD,ADMM,ACIQ,MAX,PERCENTILE9999
-th_binnum: Number of optional data bin when using KL quantization algorithm, exponential value of 2 between 512 and 4096
-save_test_proto: Save test network, this network includes data layer, applies to comparison of quantization effects of visual tools
-iterations: Quantization inference times; the data distribution with more inference iterations is more accurate, but longer period is required
-graph_transform: Whether graph optimization is required, default is true
-accuracy_opt: Whether accuracy optimization item is enabled; float-point inference will be used by deptwise convolution once it is enabled; it is disabled by default
-bitwidth: Data width after quantization; the default is int8:TO_INT8
-conv_group: Whether implement grouping of convolution channel; implement grouping of channel with major data difference according to the sort of scope, in order to reduce the quantization error
-fold_concat_scale: Merge concat and scale factor, transfer the threshold difference between different inputs of concat to the scale factor
-fpfwd_blocks: The float-point forwarding block starting from certain layer to the next calculation layer
-fpfwd_inputs: The float-point forwarding of layers from input to certain layer
-fpfwd_outputs: The float-point forwarding from certain layer to the layers between network outputs
-merge_depwise_scale: Merge the convolution of depthwise with subsequent scale, open accuracy_opt will start this operation by default
-merge_scale_to_conv: Merge the scale convolution into the convolution
-notmerge_conv_layer: Exclude the layer and avoid merging when merging the scale after convolution
-pad_value: Pad value of layer with pad
-per_channel: Try quantization of each channel of convolution
-random_input_compare: Contrast is inputted randomly by default when optimizing network; some network may collapse due to random input; turn on this switch, use the source data of data layer in network as the input comparison, and make sure the input setting of network is correct
-winograd: Whether use Winograd algorithm, whether specify it again when transferring bmodel
-fuse_preprocess: Whether implement pretreatment merging. For STAND defined by fp32_prototxt, these pretreatments will be converted in convolution weights if the first layer of network is convolution; the uint8 data range decoded by picture will be directly used by generated bmodel input.
-asym_threshold: Only for BM1684X, wether quantize the network in asymetric threshold
-fp16_opt: Only for BM1684X, wether to use FP16 forwarding if Convolution/Eltwise/EltwiseBinary/ReLU/BatchMatmul layers are set forward with float, separate different kind of layers with ',', or input '*'for all 5type of layers
Note: For different quantization target chips, some parameters can be skipped or be included by default.
For BM1684X chip, the accuracy_opt, per_channel, merge_scale_to_conv and graph_transform is opened by default
(independent network optimization steps are not provided; select command graph_transform to implement quantization directly).
The fuse_preprocess is supported in distributed quantization due to modification of prototxt.
For more parameter options related to network quantization, please refer to the chapter of Quantization skills below.
-iteration=200: This parameter describes the number of pictures which need information statistics during fixed quantization; the default value is 200
-winograd: Optional parameter, Winograd function is enabled for 3x3 convolution; the default value is False
-graph_transform: Optional parameter, enable optimization function of network drawing; this parameter is equivalent to the execution of graph_transform command above prior to quantization; the default value is True
-save_test_proto: Optional parameter, the prototxt file used for storage and testing; the default value is False
The output of Quantization-tools includes 5 parts:
*.int8umodel: The network factor file that is formatted int8 and generated by quantization
*_test_fp32_unique_top.prototxt:
*_test_int8_unique_top.prototxt:
It is network structure file formatted fp32, int8 respectively; this file includes datalayer and its difference form the original prototxt file is:
The output blog of each layer is unique and there’s no in-place; these two files will be generated when -save_test_proto is True.
*_deploy_fp32_unique_top.prototxt:
*_deploy_int8_unique_top.prototxt: It is network structure file formatted fp32 and int8 respectively; this file does not datalayer
The storage position of files above is the same with the files which are specified through parameter -weights=PATH_TO/*.fp32umodel
If optimization parameters, such as accuracy_opt, are opened in the quantization network parameter, picture optimization will be performed firstly when quantization starts;
in this process, network inference will be performed to prove that the optimized network is equivalent to the original network, so it will occupy certain time;
if repeated quantization is required, network optimization can be performed independently by using the parameter graph_transform, the optimized result will be regarded as quantization input,
and the graph_transform parameter in quantization process will not be opened. In the default configuration, the input float-point network will be optimized,
including: merge batchnorm with scale, merge preprocessing into network, and delete the unnecessary functions, such as operator, in the inference process.
For more options for optimizing float-point network drawing, please refer to the chapter of Quantization skills below. The command of independent network optimization is as follows:
The input parameters for network drawing optimization of Quantization-tools include 3 parts:
graph_transform: Fixed parameters
-model= PATH_TO/*.prototxt: The file that describes network structure; the datalayer of this prototxt specifies the prepared dataset, as shown in Modify lmdb dataset generated by data_param.
-weights=PATH_TO/*.fp32umodel: The file that saves network coefficient
The output of network drawing optimization via Quantization-tools includes 2 parts:
PATH_TO/*.prototxt_optimized
PATH_TO/*.fp32umodel_optimized
Sometimes, the suffix of newly generated network model is “optimized”, in order to make a distinction with the original network model.
The two files above are saved in the same path of files that are specified through parameter “-weights=PATH_TO/*.fp32umodel”.
Each network needs to be quantized in the cascade network quantization, and lmdb and quantization optimization should be prepared for each network respectively.
Accuracy test is an optional step for verifying the network accuracy after int8 quantization. This step can be arranged before the network deployment described in Deployment,
and be repeated along with Quantization network, in order to reach the expected accuracy. Based on the deployed test environment test, the accuracy test can also be used for evaluating the quantization effects according to the actual accuracy results.
The accuracy test may vary along with network type. Generally, the accuracy test means complete preprocessing, posttreatment and development of accuracy calculation program.
Calibration-tools provides application interfaces of U-FrameWork, in order to carry out float32 or int8 inference to umodel, and further calculate the network inference accuracy.
For traditional classification network and detection network, Calibration-tools provides two cases to demonstrate the accuracy test.
$ cd <release dir>
$ ufw test_fp32 \ # Fixed parameters
-model=PATH_TO/\*_test_fp32_unique_top.prototxt \ # Outputted file of quantization network in chapter
-weights= PATH_TO/\*.fp32umodel \ # fp32 umodel
-iterations=200# Number of pictures under test
Accuracy of int8 network after test conversion
$ cd <release dir>
$ ufw test_int8 \ # Fixed parameters
-model=PATH_TO/\*test_int8_unique_top.prototxt \ # Outputted file of quantization network in chapter
-weights= PATH_TO/\*.int8umodel \ # Outputted file of quantization network in chapter, quantized int8umodel
-iterations=200# Number of pictures under test
The tool provides interface functions for the call of external programs, so that accuracy test program can collect the network reasoning results and get the final accuracy.
The tool provides python interfaces for the call of user. For details of complete python interface, please refer to Appendix U-FrameWork python interface.
By using the Use auto-cali compilation model and have optimization as the example procedure, the chapter describes the way to view network quantization errors through calibration visual analysis tools.
This tool runs the fp32 and int8 network, and compares the output of each layer, and displays the data quantization loss at each layer directly through the graphic interface.
Note: Make sure to add “-save_test_proto=True” in the configuration parameter of quantization tool when using the visual analysis tool,
to make sure there’s int8 network model to compare with float-point calculation. By default, this int8 test model will not be saved.
This tool uses MAPE (Mean Abusolute Percentage Error) and COS (Cosine Similarity) as the error evaluation standard. Its calculation is defined as:
The evaluation parameter value at batchnorm layer can be invalid as some layers of int8 network are merged for calculation; for example, relu is merged with batchnorm.
This quantization tool is provided in the form of Web App. As the quantization tool is running in Docker, the port mapping option may be added in the Docker start script when using this quantization tool,
as shown in Start Mapping of Docker Port, the port mapping option -p should be added when starting docker, the port 8000 in Docker is mapped as host port 8000. According to the configuration when starting Docker,
the “–port” parameter should be matched with internal port mapping of Docker when using ufw.tools.app.
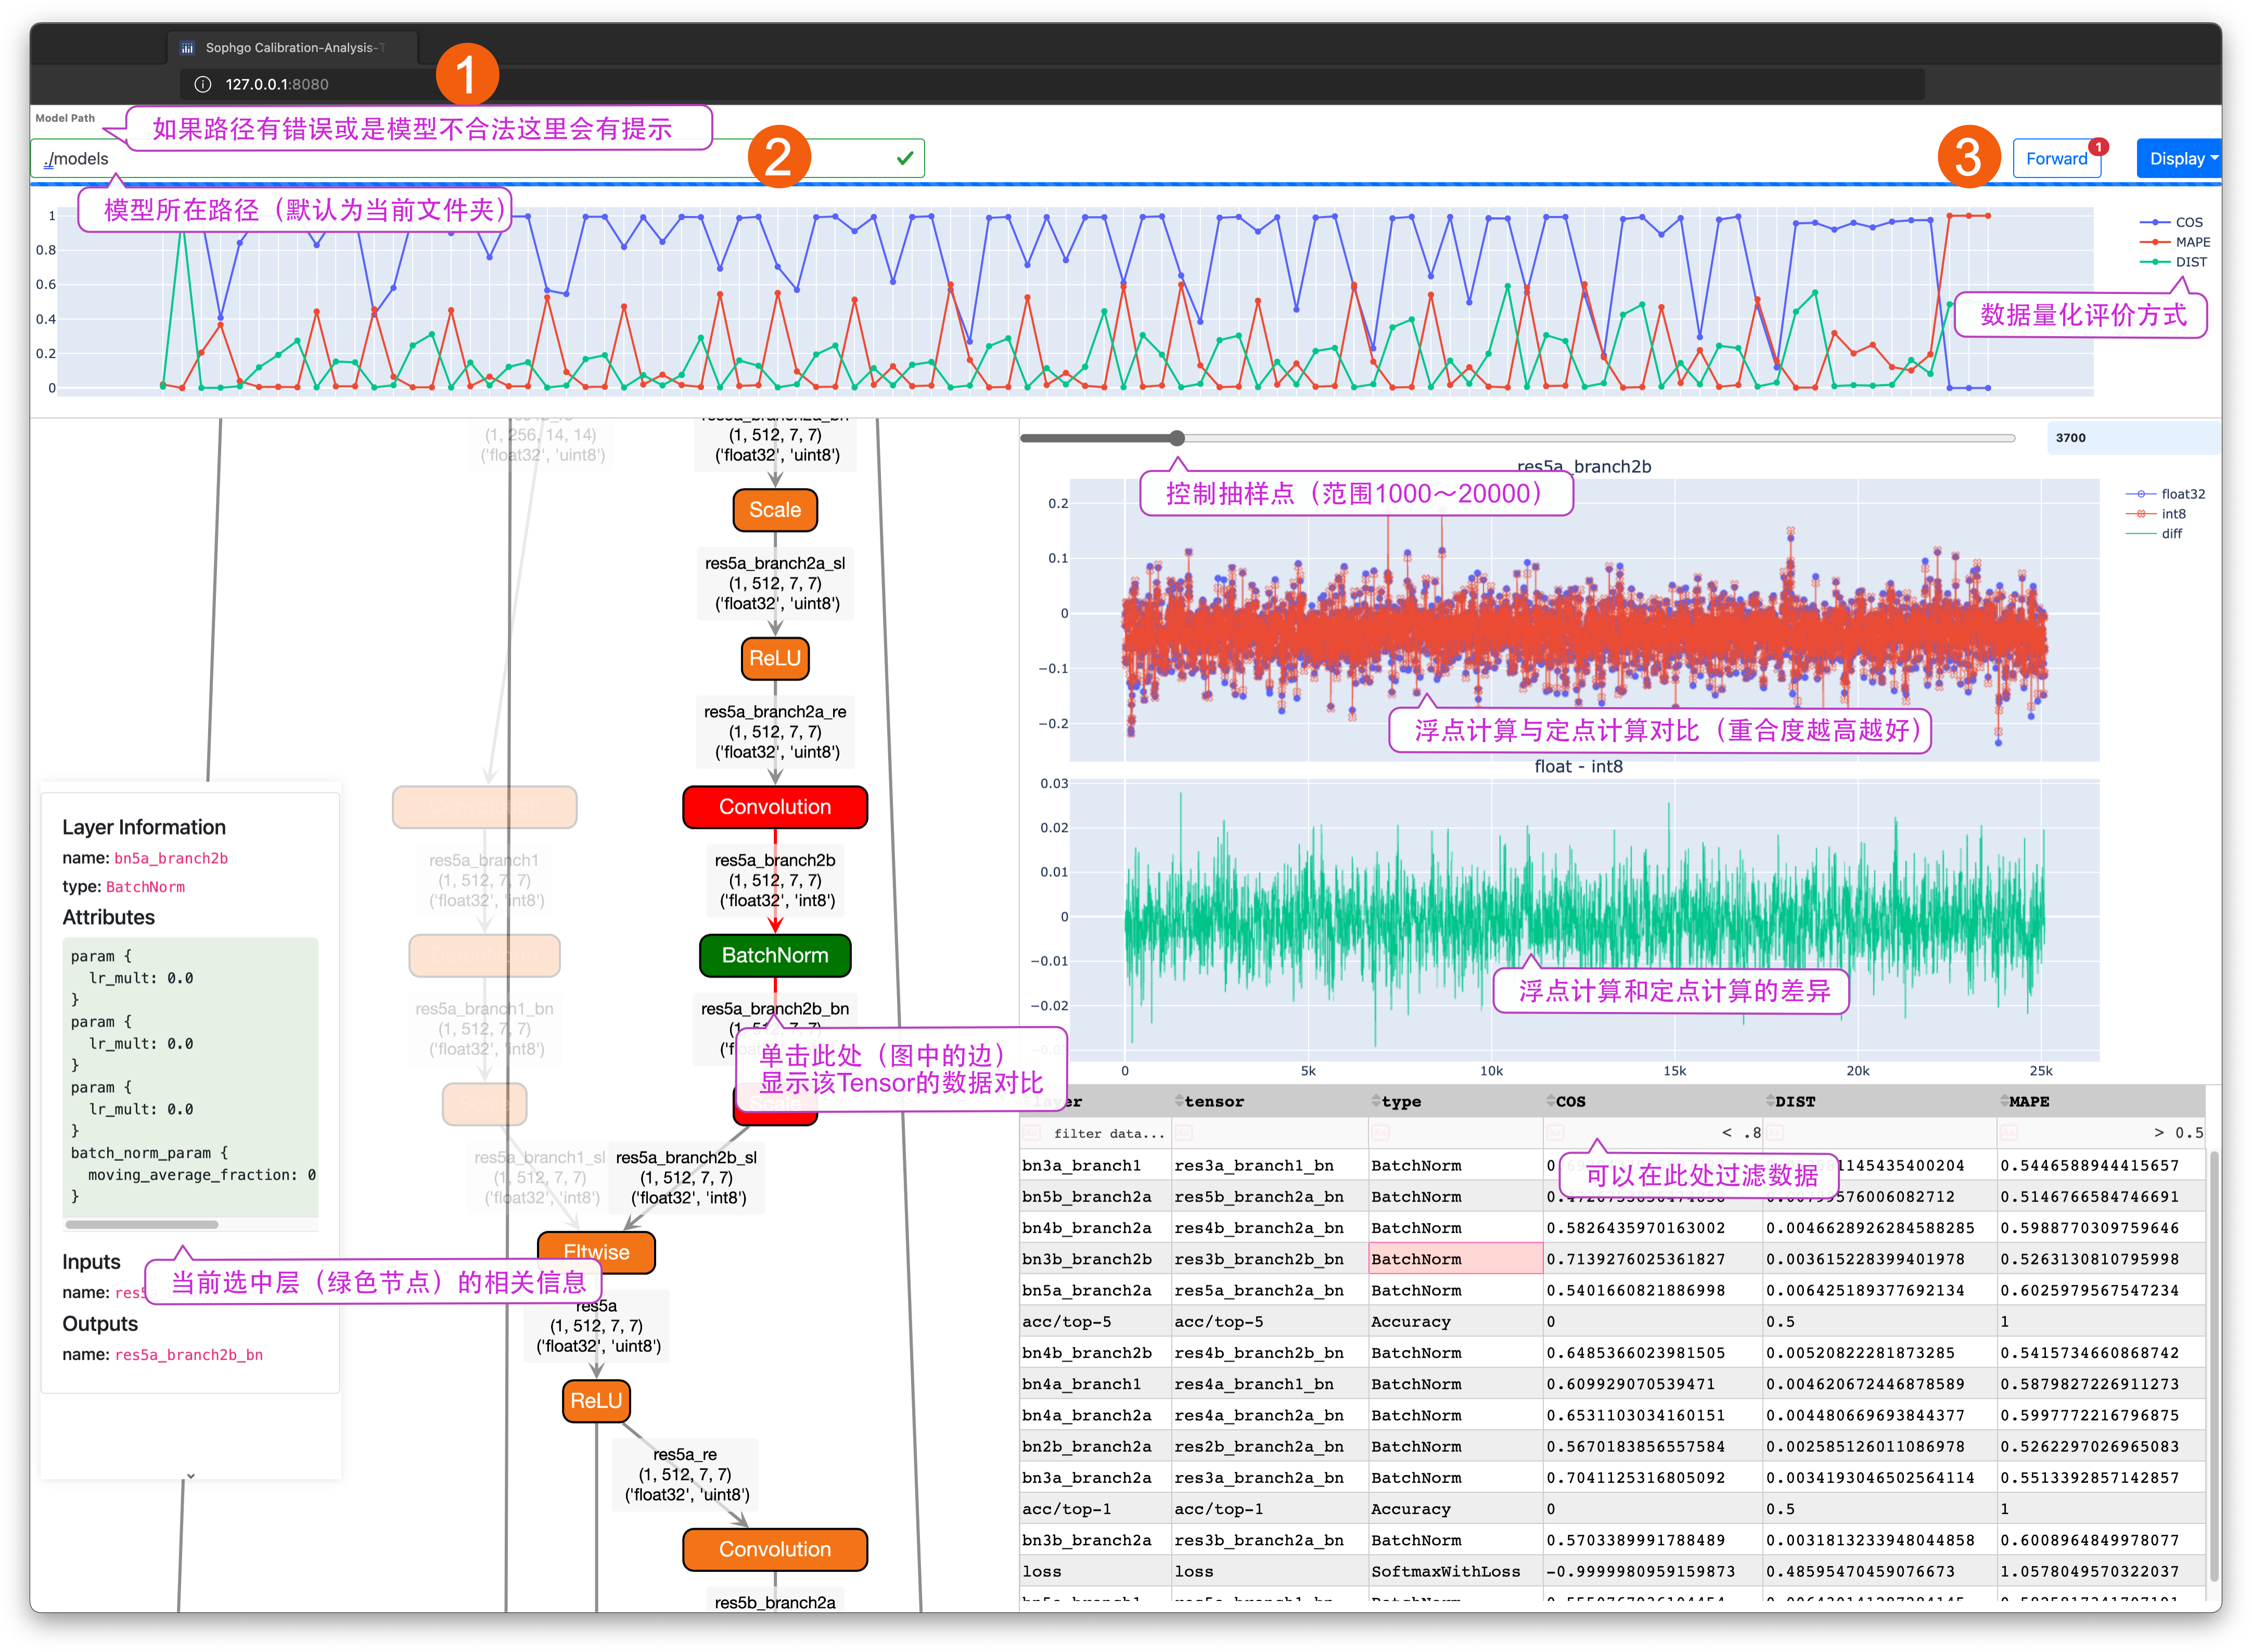
Input localhost:8080 (correspond to position 1 in diagram) in browser according to the port number (taking 8080 as example) when establishing docker, to enter the interface of visual analysis tool.
Input ./models/ in model path (correspond to position 2 in diagram), then click enter to view the network structure diagram in the Graph display area. Click Forward button (correspond to 3 in diagram),
to execute forward reasoning of network and the information on Graph will be updated, including shape of Tensor; the network in float-point and fixed-point mode corresponds to calculation mode of Tensor.
For details of instructions, please refer to marks of Visual Analysis Tool.
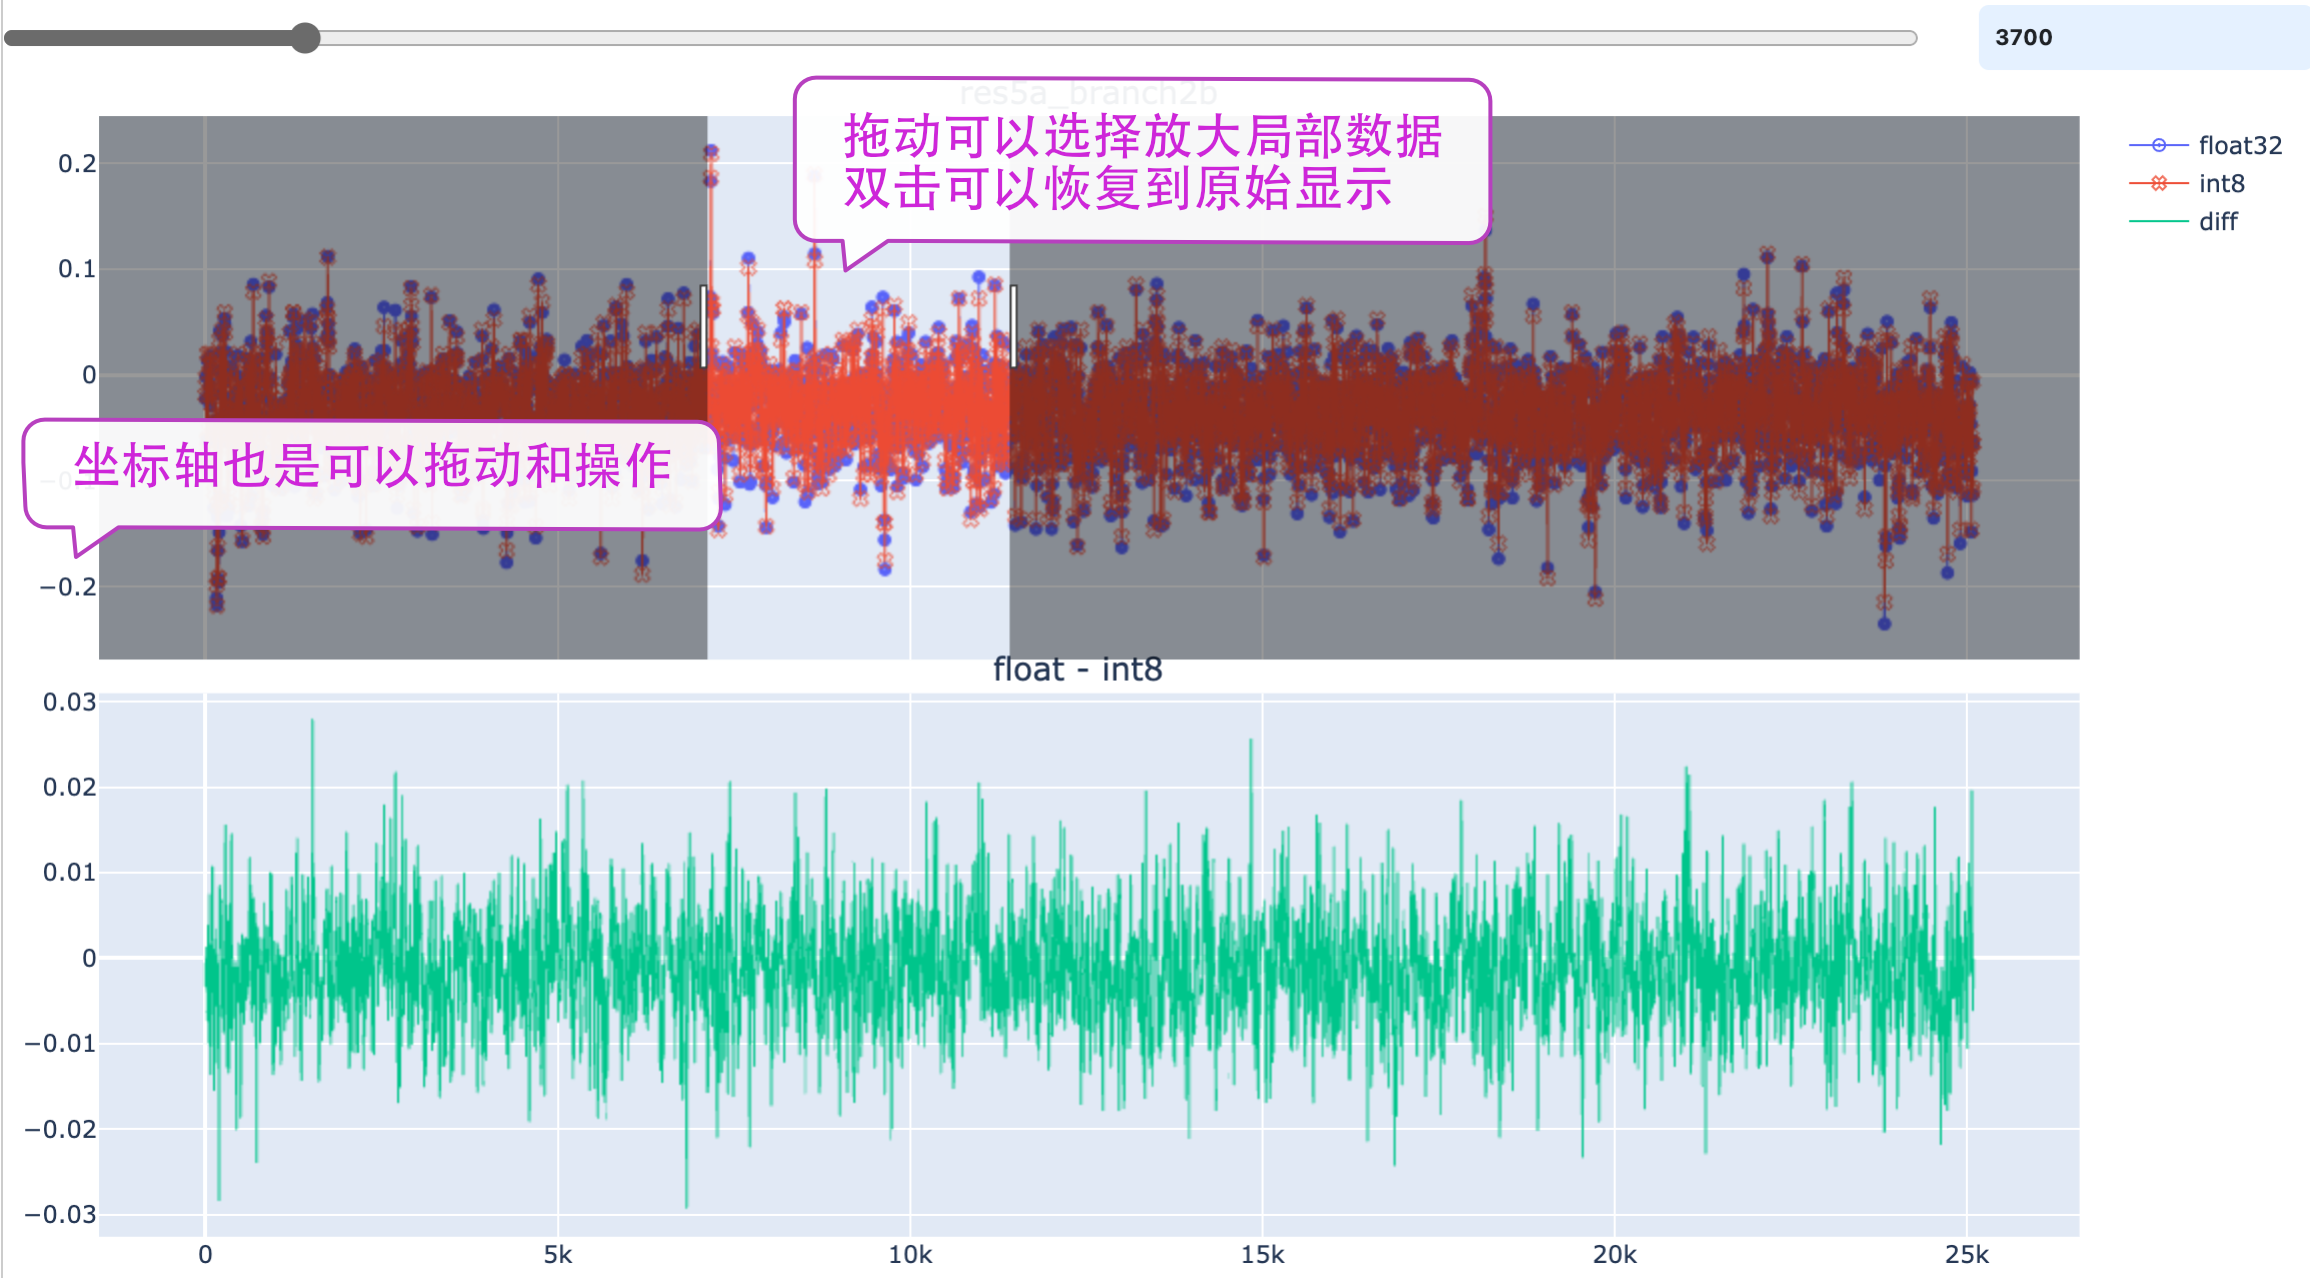
Use the slider to control the sampling quantity in the Data Contrast Diagram. The increase of sampling point can bring rich and authentic display,
but affect the response speed of app. Refer to the prompts in diagram for the relevant operations.
The Display menu can control the display mode of elements in app; for example, control the Layout effects of Graph and hide the suspended window.
Grab the top of suspended window to drag it to other position. The data filter supports the operate modes such as >, <, =, !=.
Deployment means generation of SOPHON series AI platform instruction sets through int8umodel. The following two files are related during network deployment:
**.int8umodel,**_deploy_int8_unique_top.prototxt
The two files above will be sent to bmnetu, to generate the bmodel which can run on the SOPHON series AI operation platform;
for details of steps, please refer to relevant parts of bmnetu in reference file NNToolChain.pdf and relevant examples in sophonsdk.
As a model compiler for UFW (Unified Framework) of BM168X, BMNETU can compile the umodel (Unified Model) and prototxt of certain network into the files required by BMRuntime.
The calculation results of NPU model and CPU calculation results at each layer can be compared during compilation, to ensure the correctness.
The use method of this compiler is introduced as follows:
Requirement
python 3.x
linux
Usage
Method 1: Command form
Command name: bmnetu - BMNet compiler command for UFW model
Parameter dyn=False means static compilation, while dyn=True means dynamic compilation. Meaning of static compilation: When model is compiled, only the set shapes of compilation can be run in runtime.
Meaning of dynamic compilation: When model is compiled, any shapes can be run in runtime, only if the value in shapes is ≤ the value in set shapes of compilation.
Generally, the performance of neural network on chip after dynamic compilation is lower than that of static compilation. Therefore, dynamic compilation is recommended if the shapes in actual network have variations at large range;
static compilation is recommended if shapes are fixed or only several shapes are required. Please refer to bmodel instructions for the support methods of several shapes in static compilation.
Optional. Check result during compilation.
Default: True
use_wino
bool
Optional. Use winograd convolution. If not given,
the flag value will be determined by model files.
Note that it’s a global flag for all conv layers, and
it can be overridden by the layer-level flag
use_winograd (which is False by default).
examples:
The examples of umodel commands for compiling int8 are as follows
The python interface of bmnetu is as follows; pip3 install –user bmnetu-x.x.x-py2.py3-none-any.whl is required.
The python interface of umodel of compiled int8 is as follows:
importbmnetu## compile int8 modelbmnetu.compile(model="/path/to/prototxt",## Necessaryweight="/path/to/caffemodel",## Necessarytarget="BM1684",## Necessaryoutdir="xxx",## optional, default 'compilation'shapes=[[x,x,x,x],[x,x,x]],## optional, if not set, default use shape in prototxtnet_name="name",## optional, if not set, default use the network name in prototxtopt=2,## optional, if not set, default equal to 2dyn=False,## optional, if not set, default equal to Falsecmp=True## optional, if not set, default equal to True)
The examples of using bmnetu python are as follows:
If bmnetu succeeds, the following information will be viewed in the outputted log.
####################################### Store bmodel of BMCompiler.######################################
When bmnetu succeeds, one compilation.bmodel file will be generated in the specified folder; this file is successfully converted bmodel and can be renamed by user.
When cmp=True mode is used by user in bmnetu, one input_ref_data.dat and output_ref_data.dat will be generated respectively in the specified folder and
they are the network input reference data and network output reference data which are respectively generated by UFW,
They can be used by bmrt_test to verify whether the generated bmodel has correct results when chip is running.
bmnetu will fail if there’s no information above. If it fails, the user can modify the opt optimization item and other optimization levels may succeed,
to avoid delay of user deployment. The user can report the failure problems to our support staffs.
By taking YOLOv5s as example, this chapter will introduce the auto-cali one-key quantization tool and realize quantization and optimization of YOLOv5s model through step-by-step quantization.
For detailed introduction to auto-cali one-key quantization tool, please refer to auto-cali quantization
The picture dataset and lmdb dataset can be used by auto-cali. In this chapter, we will make explanation by using picture dataset as examples;
the specific preparation steps of lmdb dataset can refer to the following examples:
Once quantization is done, the generated compilation.bmodel can be seen in the directory of ./yolov5s_bmnetp_test_fp32/.
We can view the quantization accuracy preliminarily through the visual tools.
python3 -m ufw.tools.app --port 8001
Open localhost:8001 in the browser, click forward and wait for completion of program and the following results can be seen:
It has good accuracy from the view of cosine similarity, but the result is for reference only.
The specific accuracy is subject to the test procedure and relevant test indexes.
The accuracy test is performed as follows; firstly, install the Python packet used for testing and download the label file
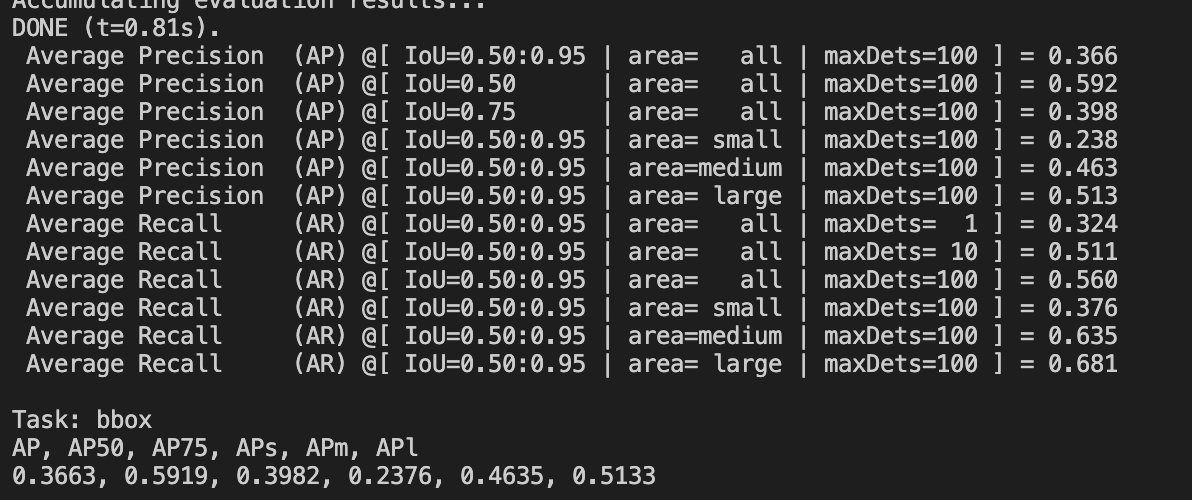
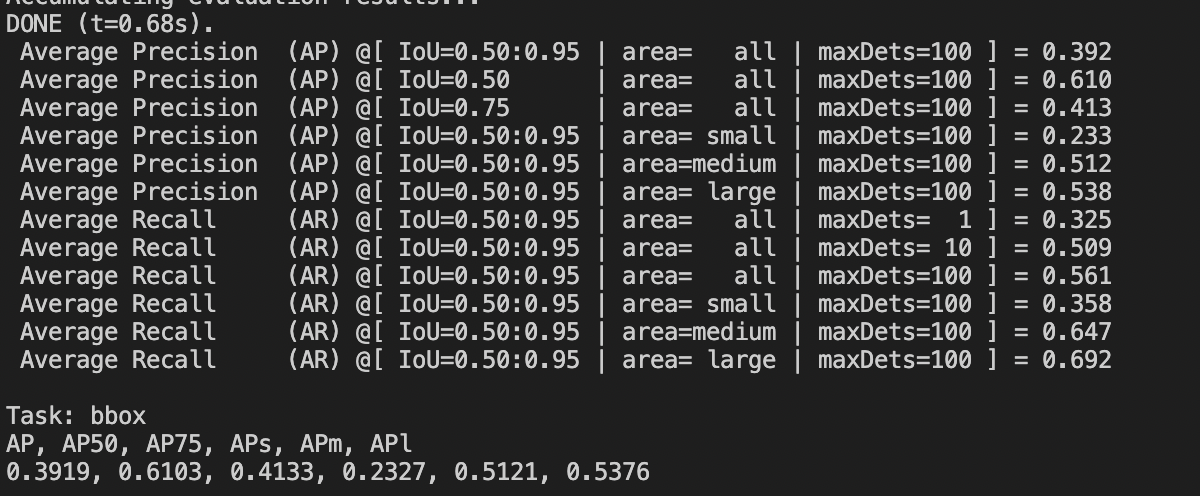
Run the command of accuracy test. Note: The mAP result of coco128 used in this accuracy test dataset is not completely equivalent to the mAP accuracy in the paper of YOLOv5s.
The following results will be acquired when operation is ended (it may have deviation with actual results; the actual results prevail):
The accuracy is poor, for the key information, such as output score and coordinate of the final 3-layer convolution structure of YOLOv5s network have strict requirements for accuracy.
The final 3-layer convolution and subsequent layers will be quantized through fp32.
try_cali_accuracy_opt in the following command means the fpfwd_outputs parameter can be transferred to calibration_use_pb tool;
the specific parameter instructions can be viewed through calibration_use_pb –help.
python3 -m ufw.cali.cali_model \
--net_name 'yolov5s'\
--model ./yolov5s_jit.pt \
--cali_image_path ../../create_lmdb_demo/coco128/images/train2017/ \
--cali_image_preprocess 'resize_h=640,resize_w=640;scale=0.003921569,bgr2rgb=True'\
--input_shapes '[1,3,640,640]'\
--postprocess_and_calc_score_clas=feature_similarity \
--try_cali_accuracy_opt='-fpfwd_outputs=< 24 >14,< 24 >51,< 24 >82'# or run the following script directly and the result is equivalent to
bash ./auto_cali.sh
The prototxt generated in the previous step will be modified; YOLOv5s model should be pretreated and the data should be inputted to lmdb file.
Note: The path of lmdb file should be absolute path. The specific modification contents are as follows:
prototxt is modified in the previous step; in this step, we will use the modified prototxt and fp32umodel to generate int8umodel through quantization.
According to the experience of Use auto-cali one-key quantization tool for quantization, we will use fp32 reasoning in the final 3-layer convolution and subsequent layers.
Once the quantization program is finished, we can acquire yolov5s_jit_bmnetp_deploy_int8_unique_top.prototxt and yolov5s_jit_bmnetp.int8umodel in the compilation file.
Add the following parameters through calibration_use_pb command line:
-dump_dist: Specify the path of one output file. Save the max. value in each layer of network and distribution information of feature in the file.
-load_dist: Specify the path of file generated by one -dump_dist parameter. Read the max. value in each layer of network and feature distribution information generated by parameter -dump_dist.
When some network requires quantization optimization and repeated quantization, this parameter can have statistics of one distribution information and be used repeatedly, in order to accelerate the optimization.
Note: Saving and loading of feature distribution is not supported by ADMM.
The threshold adjustment has major influences on the network quantization effects. Two methods are provided here for adjusting the quantization thresholds.
Add the following parameters through command line of calibration_use_pb:
-th_method: Optional parameter, specify the method of quantization threshold at each layer; optional parameters: KL, SYMKL, JSD, ADMM, ACIQ and MAX; the default value is KL.
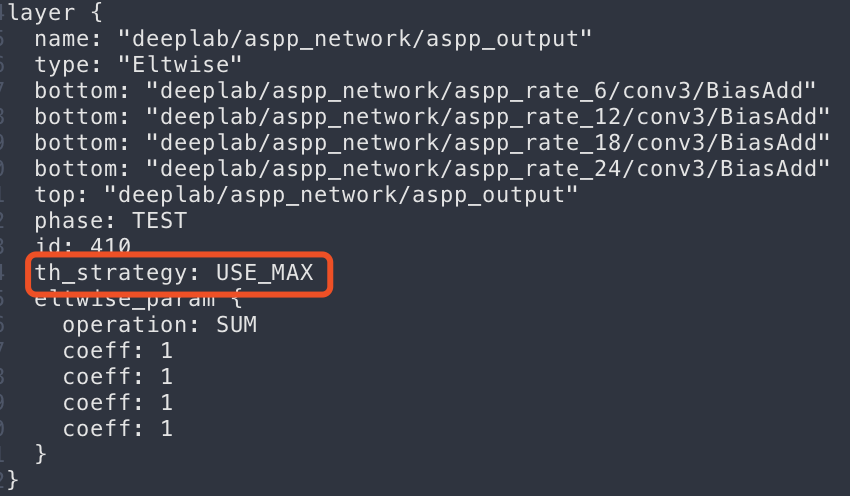
Some parameters are added in layer_parameter and can be used in the prototxt file according to the following method, in order to make fine adjustment to the threshold of certain specific layer.
Fig. 8 The max value is used as threshold in Prototxt file
th_strategy: Set the calculation strategy of quantization threshold in current layer.
Optional parameter: USE_DEFAULT, USE_KL, USE_MAX, the default value is USE_DEFAULT.
USE_DEFAULT: The threshold in current layer is calculated through the rules defined in calibration-tools quantization program.
USE_KL: The threshold in current layer is calculated through calculation of KL distribution; the KL here is relative to MAX; the specific calculation strategy of threshold can be KL, SYMKL or JSD.
USE_MAX: The max value in statistics is used as the max value of current layer.
th_scale: The calculated threshold multiplies with scale factor th_scale and the default value is 1.0.
threshold: Set the quantization threshold of current layer; no default value.
The chip 1684 integrates float-point calculation unit, to utilize float point effectively for calculation.
Based on this characteristic of chip, the mixed execution is provided to run the network;
some layers can be calculated through fixed point, while some layers can be calculated through float point.
Some layers can be calculated through float point, in order to improve the overall quantization accuracy of network effectively.
preprocessing and postprocessingPreprocessing of complex network
Due to high flexibility of Tensorflow and Pytorch based on python frame, the network models transferred from these frames may include the operators related to preprocessingpreprocessing and postprocessing.
These operators may greatly affect the quantization accuracy of network. A way is provided here to mark the preprocessingpreprocessing and postprocessing related layers in the network,
and allow these layers to run as float points. The following parameters are used in the calibration_use_pb command line:
-fpfwd_inputs: Network layer name is separated by a comma. In network, these layers and the layers before them are marked as network preprocessing.
Network preprocessing is not counted as a part of the formal network, it is not quantified in the calibration process, and float-point calculation is kept in the reasoning process.
-fpfwd_outputs: Network layer name is separated by a comma. In the network, these layers and the layers after them are marked as network posttreatment.
The posttreatment of the network is not counted as a part of the formal network, it is not quantified in the calibration process, and float-point calculation is kept in the reasoning process.
Specify through command line parameters:
Use the following parameters in the calibration_use_pb command line:
-fpfwd_blocks: the network layer name is separated by a comma. In the network, each layer and the layer after them until the next layer for data calculation are not quantified in the calibration process,
and float points are used for calculation in the reasoning process.
calibration-tools program will automatically determine how many layers behind this layer need to be calculated by float point according to the specified layer name, and calculate this block of the network as a whole by float point, so as to achieve the purpose of improving the quantization accuracy.
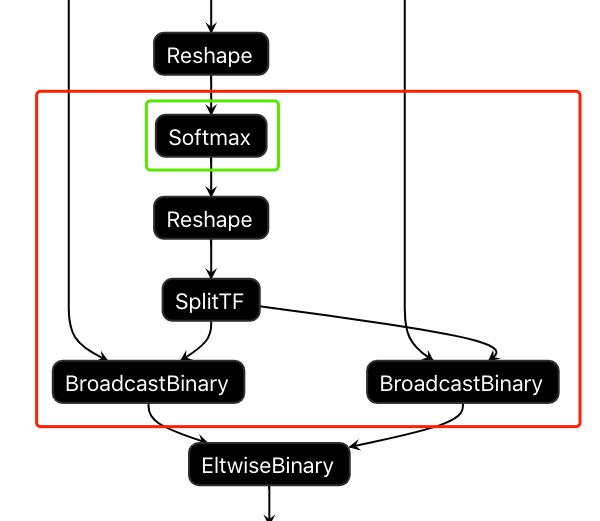
As shown in the diagram below, use -fpfwd_blocks on the command line to specify the layer name of the Softmax layer, and the calibration-tools program will identify all the layers in the red box in the figure as float-point calculation.
The calibration-tools program will automatically convert the input data into float-point format at the input of this block and into int8 data format at the output.
Fig. 9 Execute precision-sensitive layer block with float point through command line setting
Specify by configuring prototxt:
forward_with_float: Calculate the current layer by float point. The optional parameters are True and False, and the default value is False.
The reference of specific use method is shown in set forward_with_float in prototxt file as shown in diagram below;
the *_test_fp32.prototxt file refers to the inputted prototxt file via calibration_use_pb command; see generate fp32umodel.
In the calibration_use_pb command line, the following parameters can be used to improve the accuracy.
The effect may vary along with network characteristics, and the actual measurement shall prevail:
-accuracy_opt: Use float-point reasoning to improve the accuracy of the depthwise convolution in the network. The default value is False, off.
-conv_group: The output channel of conv is grouped according to the output amplitude and split into different groups for quantization. The default value is False, off.
-per_channel: Turn on the per_channel function of convolution calculation, it is False by default, off.
Simple network optimization will be carried out in the quantization process, in order to improve the accuracy and speed.
In the process of converting the front-end network to fp32U-model using Parse-tools, batchnorm and bias will be automatically converted into scale layer, and if there are adjacent scales are merged into one.
When the command is called, network optimization is performed without using graph-transform parameter in advance.
Network optimization will also be performed when quantization is performed directly. For example, open the accuracy_opt parameter and it will trigger network optimization.
This parameter is for BM1684X only
In neuron networking inferencing, the distrbution of the active or output of each layer various greatly, for common Convolution+batchnorm combination, the output may be normal distributed, but for many kind of active layer output,
the distribution may be asymmetric, quantize these layers with asymmetric threshold may make better use of the 8 bits, and the zero point of inputs may be transformed to the bias of the layer, to network with many active layers, customer
can try this parameter to compare if accuracy is increased:
in step by step calibration, enable this paramter with: “-asym_threshold=True”
in auto_cali calibration, add this option in: –try_cali_accuracy_opt=”-asym_threshold=True”
This parameter is for BM1684X only
More data types are supported in BM1684X, and for compute extensive layers such as convolution and batchmatmul, the calculation-power differ much between float32 and float16 with little accuracy difference, so replace the triditional float32
forwarding with float16 may imporove performance in mixed inference.
Convolution/Eltwise/EltwiseBinary/ReLU/BatchMatmul layers support fp16 forwarding, and some of these kind of layers can be enabled with fp16_opt paramter, for example, -fp16_opt=”Eltwise,ReLU” enables Eltwise and ReLU layers that has been
set forward with float32 been forward with float16, -fp16_opt=’*’ enables all five layer types forward with float16.
auto_cali can automatically try some quantization optimization strategies to improve the network quantization effect.
The example of automatic search quantization is as follows:
Automatic search quantization strategy of MobileNet SSD under Caffe framework
Manual configuration quantization strategy of MobileNet SSD under Caffe framework
Automatic search quantization strategy of MobileNet SSD under Caffe framework
If quantization effects in auto-cali quantization fail to meet the requirements, configure the parameters postprocess_and_calc_score_class
to turn on the accuracy test function and search out the best quantization strategy in threshold calculation, mixed execution, network diagram optimization and other methods.
$ python3 -m ufw.cali.cali_model \
--net_name 'MobileNetSSD'\
--model ./test_models/caffe/MobileNetSSD_deploy.prototxt \
--weight ./test_models/caffe/MobileNetSSD_deploy.caffemodel \
--cali_image_path ./test_models/detect_pic/ \ # use original picture, if lmdb data is used to configure parameters: calib_lmdb_path
--cali_image_preprocess='resize_h=512,resize_w=512;mean_value=127.5:127.5:127.5, scale=0.007843'\
--input_shapes '[1,3,512,512]'\
--test_iterations 10\
--postprocess_and_calc_score_class detect_accuracy # This parameter supports 4 optional items [detect_accuracy、topx_accuracy_for_classify、feature_similarity、None]
Manual configuration quantization strategy of MobileNet SSD under Caffe framework
When the self-searching quantification strategy is slightly more time-consuming, the corresponding quantification optimization strategy can be manually called in auto_cali by using the allocation parameter
try_cali_accuracy_opt according to the content of the subsequent chapter. The optional quantification strategies all come from the calibration_use_pb module, please refer to calibration_use_pb –help.
$ python3 -m ufw.cali.cali_model \
--net_name 'MobileNetSSD'\
--model ./test_models/caffe/MobileNetSSD_deploy.prototxt \
--weight ./test_models/caffe/MobileNetSSD_deploy.caffemodel \
--cali_image_path ./test_models/detect_pic/ \ # Use the original picture, if lmdb data is used to configure parameters: calib_lmdb_path
--cali_image_preprocess='resize_h=512,resize_w=512;mean_value=127.5:127.5:127.5, scale=0.007843'\
--input_shapes '[1,3,512,512]'\
--postprocess_and_calc_score_class detect_accuracy \
--try_cali_accuracy_opt='-per_channel=True,-th_method=ADMM'# Directly specify to use -per_channel=True, -th_method=ADMM quantization parameter for quantization. For more strategies, please refer to the calibration_use_pb module and calibration_use_pb --help
The above information shows that the path of lmdb dataset is not set correctly, please follow the chapter Prepare lmdb dataset to set the path of lmdb dataset.
The visualization tool shown in Use auto-cali compilation model and have optimization shows that the data set is found unavailable when running the network,
which may be caused by different starting paths of jupyter-notebook or different paths mapped by lmdb when starting Docker.
The absolute paths can be used to specify the location of lmdb.
The following information indicates that the network converted has layers which are not supported by Quantization-tools.
Please contact the energy calculation technician to solve them.
See appendix of this chapter for the layers supported by Quantization-tools Supported layer.
The information above shows that the max. output value of a certain layer is 0, which may be the problem of the whole network input.
Please check if the network input is correctly configured. It is also possible that the calculation of some layers is special,
for example, there is no data calculation or constant output with zero value, etc., which can be treated according to different situations.
The quantitative examples are stored in the https://github.com/sophon-ai-algo/中的examples/calibration of github.
Please enter the right branch to download. Examples included are as follows:
In this case, resnet18 network under caffe framework is converted into int8umodel, and the accuracy of the original float32 network and the accuracy of converted int8 network are tested.
Convert to int8umodel
$ cd <release dir>/examples/calibration/classify_demo
$ source classify_demo.sh
$ convert_to_int8_demo
This case converts jpg pictures into lmdb data sets, and the pictures in the specified directory can be converted into lmdb by using the example code.
Users can modify this example code to add their own preprocessing operations.
In this case, the face detection network squeezenet, under caffe framework is converted into int8umodel,
and the detection results of the original float32 network and int8 network are tested.
Set up environment
$ cd <release dir>/examples/calibration/face_demo
$ source face_demo.sh
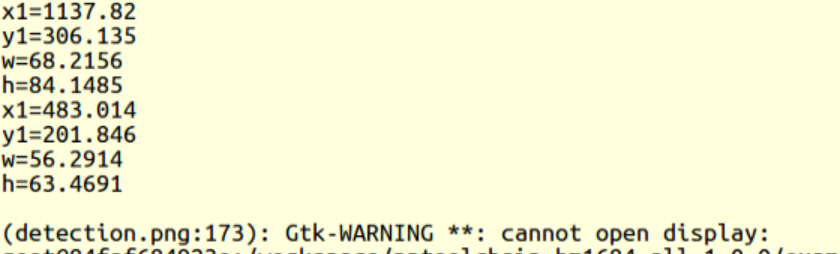
Meanwhile, examples/calibration/face_demo generates the image detection.png after detection, such as
Detection effects of squeezenet fp32umodel: (If detection.png is not found when running in docker, please refresh the directory)
Fig. 15 Detection effects of squeezenet fp32umodel
convert to int8umodel
$ convert_squeezenet_to_int8
Fig. 16 Output of squeezenet int8umodel conversion success
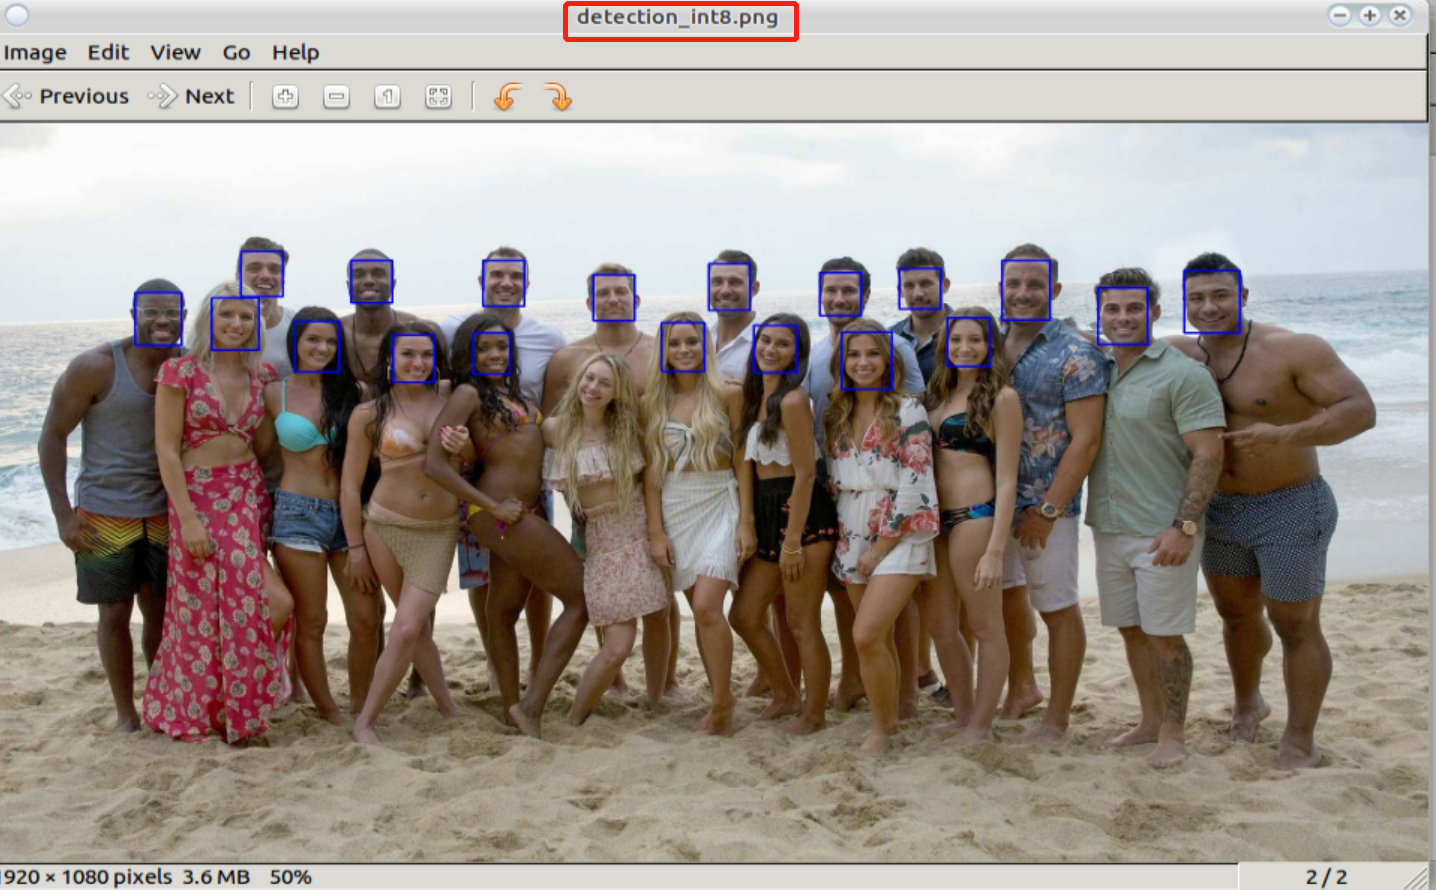
The case takes ssd_vgg300 as an example to describe the use of python interface, so it is convenient to use fp32umodel or int8umodel to build framework programs for precision testing or application programs.
Detect pictures with float32 network
$ cd <release dir>/examples/calibration/object_detection_python_demo
$ python3 ssd_vgg300_fp32_test.py
Fig. 19 ssd vgg300 fp32umodel output of successful running
Meanwhile, the detection picture person_fp32_detected.jpg will be generated in examples/calibration/object_detection_python_demo, as shown in Detection effects of ssd vgg300 fp32umodel.
Fig. 20 Detection effects of ssd vgg300 fp32umodel
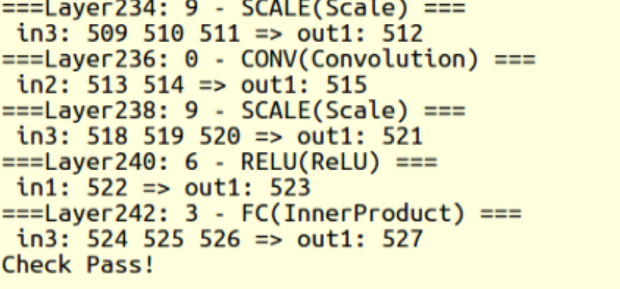
Fig. 21 Successful output of ssd vgg300 conversion to int8umodel
Meanwhile, the detection picture person_int8_detected.jpg will be generated in examples/calibration/object_detection_python_demo, as shown in Detection effects of ssd vgg300 int8umodel.
Fig. 22 Detection effects of ssd vgg300 int8umodel
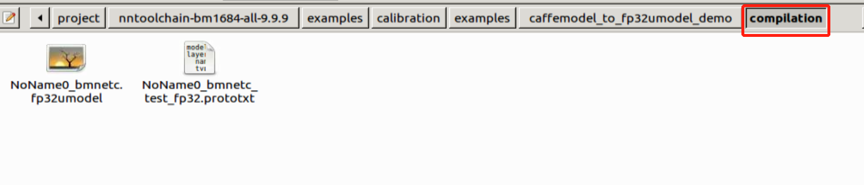
Taking resnet50 as an example, this case program describes how to convert the model file (*.caffemodel, *prototxt) under the caffe framework into fp32umodel.
Run command
$ cd <release dir>/examples/calibration/caffemodel_to_fp32umodel_demo
$ python3 resnet50_to_umodel.py
Fig. 25 Successful results of Tensorflow model conversion to fp32umodel
Under the current folder, generate the dummy_lmdb random quantization data directory and generate the compilation folder, to store the newly generated *.fp32umodel and *.prototxt:
Note: In this example, random quantization data are firstly generated as the parameter of the conversion data source. This data is only an example and cannot be used for subsequent quantization of this network.
Fig. 26 Successful output of Tensorflow model conversion to fp32umodel
The case program takes yolov5s as an example to describe how to convert the model file (*.pt) under pytorch framework into fp32umodel.
Run command
$ cd <release dir>/examples/calibration/pt_to_fp32umodel_demo
$ python3 yolov5s_to_umodel.py
Under the current folder, the newly generated compilation folder stores the newly generated *.fp32umodel and *.prototxt.
For more details of conversion process, please refer to fp32umodel generated by network model in Pytorch frame.
The case program takes mobilenet0.25 as an example to describe how to convert the model files (*.json, *.params) under mxnet framework into fp32umodel.
Run command
$ cd <release dir>/examples/calibration/mx_to_fp32umodel_demo
$ python3 mobilenet0.25_to_umodel.py
Under the current folder, the newly generated compilation folder stores the newly generated *.fp32umodel and *.prototxt.
For more details of conversion process, please refer to fp32umodel generated by network model in Mxnet frame.
Taking yolov3 as an example, this case program describes how to convert the model files (*.cfg, *.weights) under darknet framework into fp32umodel.
Run command
$ cd <release dir>/examples/calibration/dn_to_fp32umodel_demo
$ get_model.sh # download model
$ python3 yolov3_to_umodel.py
Under the current folder, the newly generated compilation folder stores the newly generated *.fp32umodel and *.prototxt.
For more details of conversion process, please refer to fp32umodel generated by network model in Darknet frame.
The case program takes postnet as an example to describe how to convert onnx model file (*.onnx) into fp32umodel.
Run command
$ cd <release dir>/examples/calibration/on_to_fp32umodel_demo
$ python3 postnet_to_umodel.py
Under the current folder, the newly generated compilation folder stores the newly generated *.fp32umodel and *.prototxt.
For more details of conversion process, please refer to fp32umodel generated by ONNX network model.
Taking PaddleOCR character recognition network as an example, this case program describes how to convert PaddlePaddle files (*.pdiparams) into fp32umodel.
Run command
$ cd <release dir>/examples/calibration/pp_to_fp32umodel_demo
$ python3 ppocr_rec_to_umodel.py
Under the current folder, the newly generated compilation folder stores the newly generated *.fp32umodel and *.prototxt.
For more details of conversion process, please refer to fp32umodel generated by PaddlePaddle network model.
Auto-cali is a one-click automatic quantification tool which can complete the whole quantification,
automatic debugging and precision testing process, and it is the top priority for users. It has the following advantages:
1) One-click conversion from the original frame model to BM168X chip bmodel.
2) It is convenient for users to verify the accuracy of int8 model in large quantities, forming a closed-loop process of quality optimization and promotion.
3) Automatically search for the quantization strategy to find the best quantization strategy that meets the accuracy requirements.
4) It is convenient for users to integrate the quantification process of BM168X into their own training process.
The following example uses pictures for calibration and testing.
$ python3 -m ufw.cali.cali_model \
--model='./test_models/pytorch/yolov5s.torchscript.pt'\ # quantize pytorch model
--cali_image_preprocess='resize_h=1280,resize_w=1280;scale=0.0039215'\ # Use this configuration for calibration and picture pretreatment
--cali_image_path='./test_models/yolov5_image/'\
--input_shapes='[1,3,1280,1280]'\
--test_iterations 10\
--net_name yolov5s \
--postprocess_and_calc_score_class feature_similarity # Perform feature_similarity of cos similarity calculation to extracted features
The following example uses lmdb file to calibrate and test, and configures the posttreatment and precision calculation of different types of models through the parameter of postprocess_and_calc_score_class.
$ python3 -m ufw.cali.cali_model \
--model='./test_models/pytorch/resnet18.pt'\
--cali_lmdb='test_models/imagenet_preprocessed_by_pytorch_100/'\
--input_shapes='[1,3,224,224]'\
--test_iterations 10\
--net_name resnet18 \
--cali_iterations=20\
--postprocess_and_calc_score_class topx_accuracy_for_classify # Current topx_accuracy_for_classify which supports classification model, detect_accuracy of target detection model, if set as None, no posttreatment and accuracy calculation will be performed
The following example quantifies the paddlepaddle model with multiple inputs:
$ python3 -m dfn --url https://disk.sophgo.vip/sharing/OzFNMbTvT # if dfn not installed, execute pip3 install dfn installation
$ tar xzvf models.tar.gz
$ python3 -m ufw.cali.cali_model \
--net_name 'ppmodel_demo'\
--model ./models/model.pdmodel \
--cali_image_path ./yolov5_image \
--cali_image_preprocess='image_shape|resize_h=640,resize_w=640;scale=0.0039215;\ mean_value=0.485:0.456:0.406,div=0.229:0.224:0.225,bgr2rgb=True|image_scale_factor'\
--input_shapes '[1,2];[1,3,640,640];[1,2]'\
--output_name 'matrix_nms_0.tmp_0,matrix_nms_0.tmp_2'\
--input_descs '[0,fp32,640,640];[2,fp32,1,1]'\
--input_name 'im_shape,image,scale_factor'\
--postprocess_and_calc_score_class feature_similarity \
--feature_compare_layer_list 'use_the_conv_at_the_end'\ # Perform cos comparison to the last conv output of each output branch
--test_iterations 5\
--cali_iterations 10\
--fp32_layer_list 'conv2d_210.tmp_0'\ # set the layer named model/mish/mul in the converted ppmodel_demo_bmpaddle_test_fp32.prototxt to fp32 calculation
--layer_param_list 'conv2d_203.tmp_0:per_channel_flag=True'\ # enable per_channel of this layer
--convert_bmodel_cmd_opt '--v=4 --enable_profile=True'\ # Use this command as part of bmentu command; refer to bmnetu --help for more parameters