5. Wi-Fi Basic Operation
5.1. STA Mode Basic Operation
5.1.1. Loading Driver
Step 1. load the driver
check if the three files in the red box below are available under /mnt/system/ko/3rd

Note that since the wifi driver is not placed in the Linux source directory tree, it cannot be built-in, and can only be compiled into ko.
insmod /mnt/system/ko/3rd/8189fs.ko
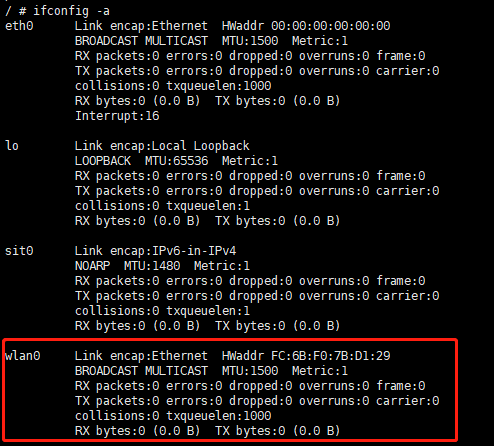
Step 2. check whether the driver is loaded successfully
excute the shell command:
ifconfig -aIf the loading is successful, you can see the wlan0 interface after executing the shell command.
5.1.2. Start Wi-Fi and Connect AP
Step 1. Start wlan0
execute the shell command:
ifconfig wlan0 up
Step 2. Start wpa_supplication
excute the shell command:
echo "ctrl_interface=/var/run/wpa_supplicant" >/tmp/wpa_supplicant.conf

wpa_supplicant -iwlan0 -Dnl80211 -c/tmp/wpa_supplicant.conf &
-iwlan0 means to use wlan0 interface
-Dnl80211 means to use cfg80211 interface
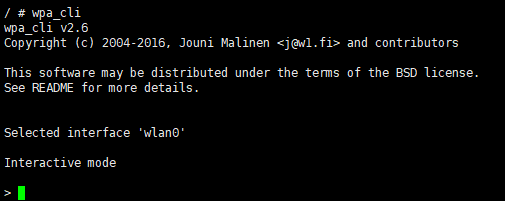
Step 3. Start wpa_cli
excute the shell command:
wpa_cli -i wlan0A “>” prompt will appear when the execution is successful.
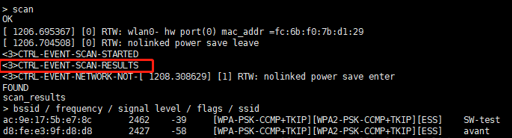
Step 4. Scan nearby AP
After the “>” prompt symbol, execute the following command:
scanAfter“CTRL-EVENT-SCAN-RESULTS”appears, execute
scan_resultsand then the scanning results can be obtained.
Step 5. Connect AP
Connect the AP configured as WPA-PSK/WPA2-PSK authentication and encryption type.
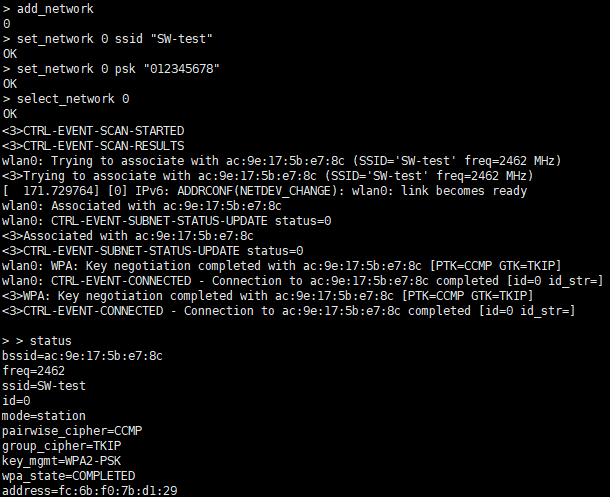
After the “>” prompt symbol, execute the following command to obtain the network ID (0 in this example):
add_networkConfigure the SSID of the network (the SSID in this example is “SW-test”, obtained from step 4)
set_network 0 ssid “SW-test”
Configure the network encryption method and password (assuming that the SW-test password is 012345678)
set_network 0 psk “012345678”
Start the network
select_network 0
5. Observe whether you have received CTRL-EVENT-CONNECTED. If so, it means the connection is established. BTW, “status” command can be used to query the connection status.
6. Enter “quit” to exit wpa_cli. To get the dynamic IP address, execute the shell command as follows
udhcpc -b -i wlan0 -R &
Execute the ping command to check whether the network is operating normally
ex.
ping 8.8.8.8
Connect the AP configured as open system
The steps and configuration are the same for WPA-PSK/WPA2-PSK authentication and encryption type. Only when configuring the network encryption mode, you need to input the following command:
set_network 0 key_mgmt NONE
5.1.3. Turn off Wi Fi and Unload Driver
Step 1. Execute the shell command as follows:
ifconfig wlan0 downStep 2. Execute the shell command as follows:
rmmod 8189fs.ko
5.2. SoftAP Mode Basic Operation
5.2.1. Loading Driver
The same as STA mode. Please refer to 5.1.1 loading driver .
5.2.2. hostapd Configuration, udhcpd Configuration and Starting SoftAP
To start SoftAP, you need to start hostapd first. Similar to wpa_supplicant, hostpad can be used to configure various authentication protocols and connection processes of AP.
Step 1. Start the hostpad.
Execute shell command
ifconfig wlan0 192.168.1.1 up
hostapd /etc/network/hostapd.conf -B -i wlan0
Step 2. Start udhcpd to assign dynamic IP to the Wi-Fi device by executing shell command
udhcpd /etc/network/udhcpd.conf
Remark:
Users can modify hostapd.conf to configure the ssid, channel, encryption and authentication mode of SoftAP. The document is located in /ramdisk/rootfs/overlay/{processor_name}/etc/network in the SDK package or /etc/network on the platform. For example, users can configure the AP name and login password by modifying ssid and wpa_passphrase.
interface=wlan0
ctrl_interface=/var/run/hostapd
ssid=CV180X_EVB
channel=6
wpa=3
wpa_passphrase=012345678
The significance of other parameters can be referred to http://manpages.ubuntu.com/manpages/bionic/man5/udhcpd.conf.5.html
Users can modify udhcpd.conf to configure the IP range provided by SoftAP. The document is located in /ramdisk/rootfs/overlay/{processor_name}/etc/network in the SDK package or /etc/network on the platform.
# The start and end of the IP lease block
start    192.168.1.10   #default: 192.168.0.20
end      192.168.1.254   #default: 192.168.0.254