5.3. Using TPU-MLIR for Model Quantization
The overall architecture of TPU-MLIR is shown in the following figure:
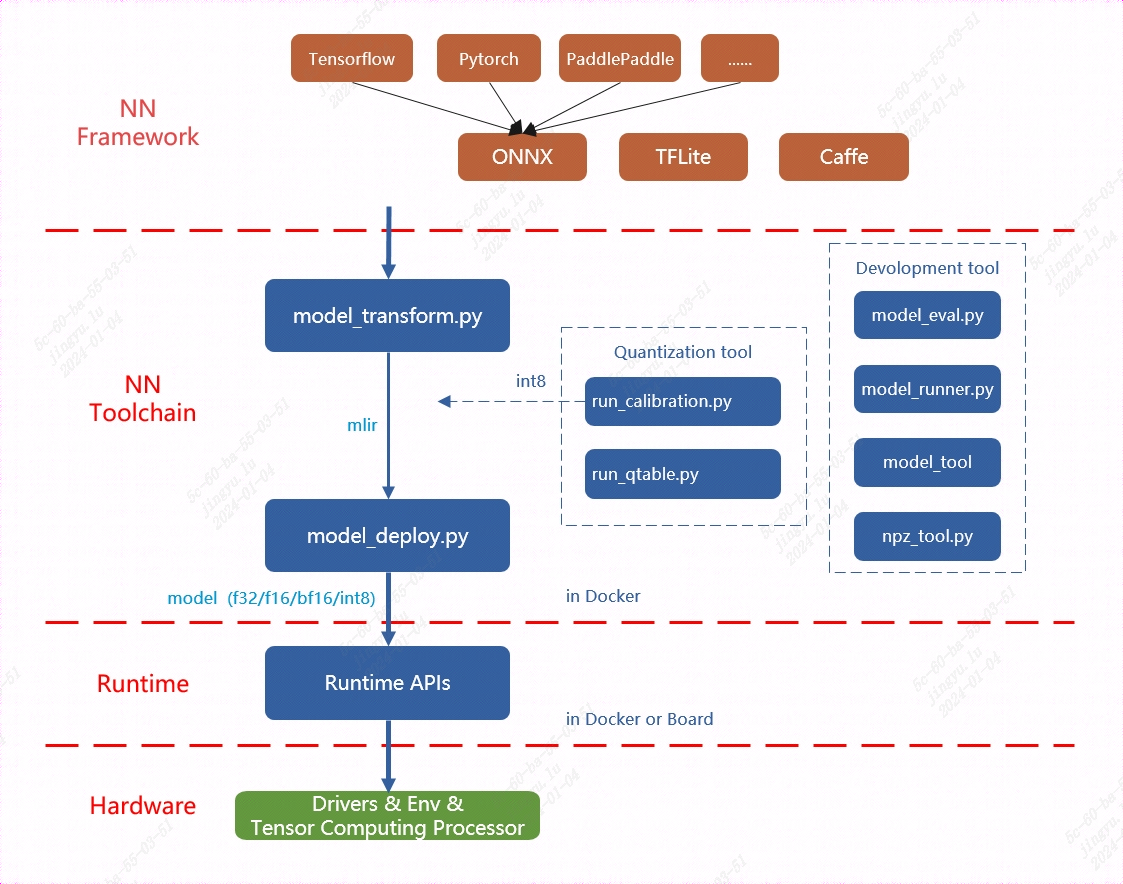
Fig. 5.3 The overall architecture of TPU-MLIR
Currently, the directly supported frameworks include Pytorch, ONNX, TFLite, and Caffe. Models from other frameworks need to be converted to the onnx model before performing subsequent operations. For how to convert network models from other deep learning architectures to onnx, please refer to the onnx official website: https://github.com/onnx/tutorials.
Model conversion needs to be executed in a specified docker. It mainly consists of two steps. The first step is to convert the original model to an mlir file through model_transform.py, and the second step is to convert the mlir file to a bmodel through model_deploy.py.
If user want to convert to an INT8 model, user need to call run_calibration.py to generate a calibration table, which is then passed to model_deploy.py.
In addition, if the INT8 model does not meet the accuracy requirements, user can call run_qtable.py to generate a quantization table to determine which layers use floating-point calculations, and then pass it to model_deploy.py to generate a mixed-precision model.
Note
In summary, generating an int8 quantized model typically requires the following steps:
Convert the model to an mlir format model file;
Use the above mlir format model file to generate a calibration table;
Finally, generate an int8 bmodel;
Note
Currently, MLIR supports the Pytorch, ONNX, TFLite, and Caffe frameworks, and more network layers and models are continuously being supported. For specific steps, please refer to the following usage guide:
Function |
Usage Guide |
Compile PyTorch model |
Torch |
Compile ONNX model |
ONNX |
Compile TFLite model |
TFLite |
Compile Caffe model |
Caffe |
This article introduces how to convert and deploy an ONNX model to the BM1684X intelligent vision deep learning processor platform using the TPU-MLIR. For the configuration of the development environment, please refer to the TPU-MLIR Quick Start Manual
Note
This chapter takes the yolov5s.onnx model as an example to introduce how to compile and migrate an onnx model to run on the BM1684X platform. For other models, please refer to the Model Usage Guide in the above table.
The model comes from the official website of yolov5: https://github.com/ultralytics/yolov5/releases/download/v6.0/yolov5s.onnx
This section requires the following files (where xxxx corresponds to the actual version information): tpu-mlir_xxxx.tar.gz (tpu-mlir release package)
5.3.1. Load tpu-mlir
The following operations need to be performed in a Docker container. For the use of Docker, please refer to the TPU-MLIR Quick Start Manual
1$ tar zxf tpu-mlir_xxxx.tar.gz
2$ source tpu-mlir_xxxx/envsetup.sh
envsetup.sh will add the following environment variables:
Variable Name |
Value |
Description |
|---|---|---|
TPUC_ROOT |
tpu-mlir_xxx |
Location of the extracted SDK package |
MODEL_ZOO_PATH |
${TPUC_ROOT}/../model-zoo |
Location of the model-zoo folder, at the same level as the SDK |
REGRESSION_PATH |
${TPUC_ROOT}/regression |
Location of the regression folder |
The modifications made by envsetup.sh to the environment variables are as follows:
 1 export PATH=${TPUC_ROOT}/bin:$PATH
 2 export PATH=${TPUC_ROOT}/python/tools:$PATH
 3 export PATH=${TPUC_ROOT}/python/utils:$PATH
 4 export PATH=${TPUC_ROOT}/python/test:$PATH
 5 export PATH=${TPUC_ROOT}/python/samples:$PATH
 6 export PATH=${TPUC_ROOT}/customlayer/python:$PATH
 7 export LD_LIBRARY_PATH=$TPUC_ROOT/lib:$LD_LIBRARY_PATH
 8 export PYTHONPATH=${TPUC_ROOT}/python:$PYTHONPATH
 9 export PYTHONPATH=${TPUC_ROOT}/customlayer/python:$PYTHONPATH
10 export MODEL_ZOO_PATH=${TPUC_ROOT}/../model-zoo
11 export REGRESSION_PATH=${TPUC_ROOT}/regression
5.3.2. Prepare the working directory
Create a directory named model_yolov5s, note that it is at the same level as tpu-mlir; and put the model file and image file into the model_yolov5s directory.
The operations are as follows:
1$ mkdir yolov5s_onnx && cd yolov5s_onnx
2$ wget https://github.com/ultralytics/yolov5/releases/download/v6.0/yolov5s.onnx
3$ cp -rf $TPUC_ROOT/regression/dataset/COCO2017.
4$ cp -rf $TPUC_ROOT/regression/image.
5$ mkdir workspace && cd workspace
Here, $TPUC_ROOT is an environment variable corresponding to the tpu-mlir_xxxx directory.
5.3.3. ONNX to MLIR
If the model accepts image input, understanding the preprocessing steps of the model is essential before initiating the conversion process. If the model uses preprocessed npz files as input, no preprocessing is required.
The preprocessing process is expressed by the following formula (\(x\) represents the input):
The official website yolov5 image is rgb, each value will be multiplied by 1/255, converted to mean and scale corresponding to
0.0,0.0,0.0 and 0.0039216,0.0039216,0.0039216.
The model conversion command is as follows:
$ model_transform.py \
    --model_name yolov5s \
    --model_def../yolov5s.onnx \
    --input_shapes [[1,3,640,640]] \
    --mean 0.0,0.0,0.0 \
    --scale 0.0039216,0.0039216,0.0039216 \
    --keep_aspect_ratio \
    --pixel_format rgb \
    --output_names 350,498,646 \
    --test_input../image/dog.jpg \
    --test_result yolov5s_top_outputs.npz \
    --mlir yolov5s.mlir
The main parameters of model_transform.py are explained below (for a complete introduction, please refer to the User Interface chapter of the TPU-MLIR Development Reference Manual):
Parameter name |
Required? |
Description |
|---|---|---|
model_name |
Yes |
Specify the model name |
model_def |
Yes |
Specify the model definition file, such as .onnx or .tflite or .prototxt file |
input_shapes |
No |
Specify the shape of the input, for example [[1,3,640,640]]; two-dimensional array, can support multiple input situations |
input_types |
No |
Specify the type of input, for example int32; multiple inputs are separated by,; if not specified, it defaults to float32 |
resize_dims |
No |
The dimensions of the original image after resizing; if not specified, it will be resized to the input size of the model |
keep_aspect_ratio |
No |
Whether to maintain the aspect ratio when Resize, the default is false; if set, it will be padded with 0 for the insufficient part |
mean |
No |
The mean value of each channel of the image, the default is 0.0,0.0,0.0 |
scale |
No |
The ratio of each channel of the picture, the default is 1.0,1.0,1.0 |
pixel_format |
No |
Image type, can be one of rgb, bgr, gray, rgbd, default is bgr |
channel_format |
No |
Channel type, for image input can be nhwc or nchw, non-image input is none, default is nchw |
output_names |
No |
Specify the name of the output; if not specified, the output name from the model will be used. Once specified, the designated name will serve as the output. |
test_input |
No |
Specify the input file for verification, which can be an image or npy or npz; if not specified, no correctness verification will be performed |
test_result |
No |
Specify the output file after verification |
excepts |
No |
Specify the names of the network layers that need to be excluded from verification, separated by commas |
mlir |
Yes |
Specify the name and path of the output mlir file |
After converting to an mlir file, a ${model_name}_in_f32.npz file will be generated, which is the input file of the model.
5.3.4. MLIR to F16 Model
Note
BM1684 platform does not support F16, BF16 models. For complete support details, please refer to the product manuals of each device.
To convert the mlir file to an f16 bmodel, follow these steps:
$ model_deploy.py \
    --mlir yolov5s.mlir \
    --quantize F16 \
    --processor bm1684x \
    --test_input yolov5s_in_f32.npz \
    --test_reference yolov5s_top_outputs.npz \
    --model yolov5s_1684x_f16.bmodel
The main parameters of model_deploy.py are explained below (for a complete introduction, please refer to the User Interface chapter of the TPU-MLIR Development Reference Manual):
Parameter name |
Required? |
Description |
|---|---|---|
mlir |
Yes |
Specify the mlir file |
quantize |
Yes |
Specify the default quantization type, support F32/F16/BF16/INT8 |
processor |
Yes |
Specify the platform the model will use, support bm1684x/bm1684/cv183x/cv182x/cv181x/cv180x |
calibration_table |
No |
Specify the path of the calibration table, which is required when there is INT8 quantization |
tolerance |
No |
Represents the error tolerance of the similarity between the results of MLIR quantization and the results of MLIR fp32 inference |
test_input |
No |
Specify the input file for verification, which can be an image or npy or npz; if not specified, no correctness verification will be performed |
test_reference |
No |
Reference data used to verify the correctness of the model (using npz format). It is the calculation result of each operator |
compare_all |
No |
Whether to compare all intermediate results when verifying correctness, the default is not to compare intermediate results |
excepts |
No |
Specify the names of the network layers that need to be excluded from verification, separated by commas |
model |
Yes |
Specify the name and path of the output model file |
After compilation, a file named yolov5s_1684x_f16.bmodel will be generated.
5.3.5. MLIR to INT8 Model
5.3.5.1. Generating the Calibration Table
Before converting to an INT8 model, user need to run calibration to obtain the calibration table. The number of input data should be prepared according to the situation, ranging from about 100 to 1000.
Then, use the calibration table to generate a symmetric or asymmetric bmodel. If the symmetric model meets the requirements, it is generally not recommended to use the asymmetric model, as the performance of the asymmetric model will be slightly worse than that of the symmetric model.
Here, the calibration process utilizes 100 existing images from COCO2017 as an example.:
$ run_calibration.py yolov5s.mlir \
    --dataset../COCO2017 \
    --input_num 100 \
    -o yolov5s_cali_table
After the run is complete, a file named yolov5s_cali_table will be generated, which is used as the input file for subsequent compilation of the INT8 model.
5.3.5.2. Compiling to INT8 Symmetric Quantized Model
To convert to an INT8 symmetric quantized model, execute the following command:
$ model_deploy.py \
    --mlir yolov5s.mlir \
    --quantize INT8 \
    --calibration_table yolov5s_cali_table \
    --processor bm1684x \
    --test_input yolov5s_in_f32.npz \
    --test_reference yolov5s_top_outputs.npz \
    --tolerance 0.85,0.45 \
    --model yolov5s_1684x_int8_sym.bmodel
After the compilation is complete, a file named yolov5s_1684x_int8_sym.bmodel will be generated.
5.3.6. Effect Comparison
In this release package, there is a Python-written YOLOv5 example with the source code path $TPUC_ROOT/python/samples/detect_yolov5.py, which is used for object detection on images. Reviewing this code can assist in understanding the utilization of the model: preprocessing to obtain the model input, conducting inference to derive the output, and subsequently executing post-processing.
Use the following code to verify the execution results of the onnx/f16/int8 models.
The execution method of the onnx model is as follows, obtaining dog_onnx.jpg:
$ detect_yolov5.py \
    --input../image/dog.jpg \
    --model../yolov5s.onnx \
    --output dog_onnx.jpg
The execution method of the f16 bmodel is as follows, obtaining dog_f16.jpg:
$ detect_yolov5.py \
    --input../image/dog.jpg \
    --model yolov5s_1684x_f16.bmodel \
    --output dog_f16.jpg
The execution method of the int8 symmetric bmodel is as follows, obtaining dog_int8_sym.jpg:
$ detect_yolov5.py \
    --input ../image/dog.jpg \
    --model yolov5s_1684x_int8_sym.bmodel \
    --output dog_int8_sym.jpg
The comparison results are as follows:
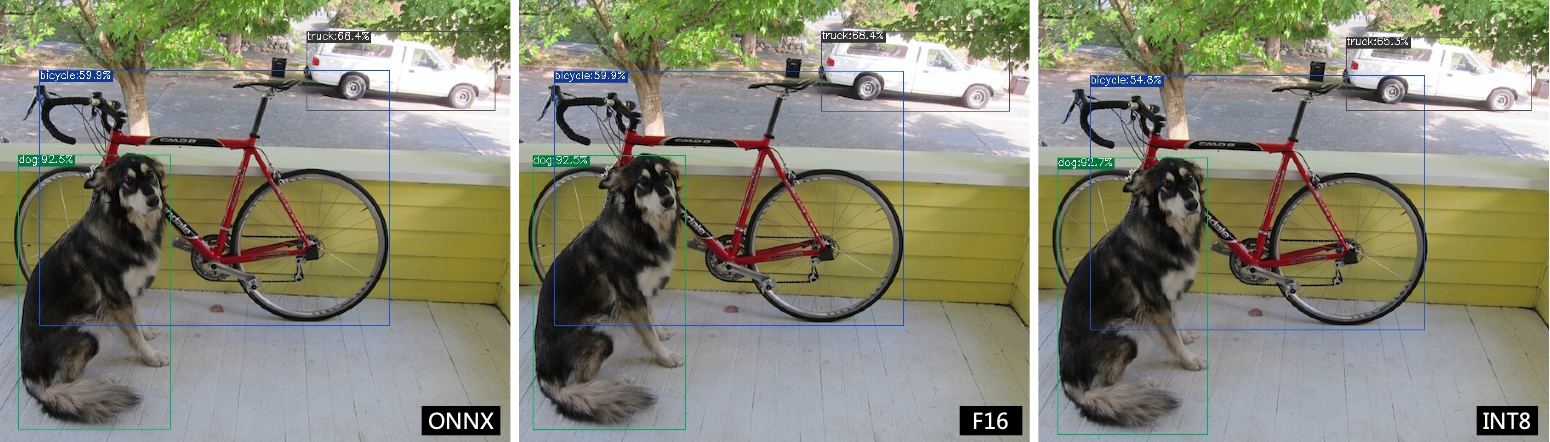
Fig. 5.4 TPU-MLIR compilation effect comparison for YOLOv5s
Due to different operating environments, the final effect and accuracy may differ slightly from yolov5s_result.
5.3.7. Model performance testing
The following operations need to be performed outside Docker,
5.3.7.1. Install the libsophon environment
Please refer to the LIBSOPHON User Manual to install the libsophon environment.
5.3.7.2. Check the performance of the BModel
After installing libsophon, user can use bmrt_test to test the correctness and performance of the compiled bmodel. Based on the performance results output by bmrt_test, user can estimate the maximum fps of the model and choose the appropriate model.
# Test the bmodel compiled above
# --bmodel parameter followed by the bmodel file,

$ cd $TPUC_ROOT/../model_yolov5s/workspace
$ bmrt_test --bmodel yolov5s_1684x_f16.bmodel
$ bmrt_test --bmodel yolov5s_1684x_int8_sym.bmodel
Take the output of the last command as an example (the log is truncated here):
 1[BMRT][load_bmodel:983] INFO:pre net num: 0, load net num: 1
 2[BMRT][show_net_info:1358] INFO: ########################
 3[BMRT][show_net_info:1359] INFO: NetName: yolov5s, Index=0
 4[BMRT][show_net_info:1361] INFO: ---- stage 0 ----
 5[BMRT][show_net_info:1369] INFO:   Input 0) 'images' shape=[ 1 3 640 640 ] dtype=FLOAT32
 6[BMRT][show_net_info:1378] INFO:   Output 0) '350_Transpose_f32' shape=[ 1 3 80 80 85 ]...
 7[BMRT][show_net_info:1378] INFO:   Output 1) '498_Transpose_f32' shape=[ 1 3 40 40 85 ]...
 8[BMRT][show_net_info:1378] INFO:   Output 2) '646_Transpose_f32' shape=[ 1 3 20 20 85 ]...
 9[BMRT][show_net_info:1381] INFO: ########################
10[BMRT][bmrt_test:770] INFO:==> running network #0, name: yolov5s, loop: 0
11[BMRT][bmrt_test:834] INFO:reading input #0, bytesize=4915200
12[BMRT][print_array:702] INFO:  --> input_data: < 0 0 0 0 0 0 0 0 0 0 0 0 0 0 0 0...
13[BMRT][bmrt_test:982] INFO:reading output #0, bytesize=6528000
14[BMRT][print_array:702] INFO:  --> output ref_data: < 0 0 0 0 0 0 0 0 0 0 0 0 0 0...
15[BMRT][bmrt_test:982] INFO:reading output #1, bytesize=1632000
16[BMRT][print_array:702] INFO:  --> output ref_data: < 0 0 0 0 0 0 0 0 0 0 0 0 0 0...
17[BMRT][bmrt_test:982] INFO:reading output #2, bytesize=408000
18[BMRT][print_array:702] INFO:  --> output ref_data: < 0 0 0 0 0 0 0 0 0 0 0 0 0 0...
19[BMRT][bmrt_test:1014] INFO:net[yolov5s] stage[0], launch total time is 4122 us (npu 4009 us, cpu 113 us)
20[BMRT][bmrt_test:1017] INFO:+++ The network[yolov5s] stage[0] output_data +++
21[BMRT][print_array:702] INFO:output data #0 shape: [1 3 80 80 85 ] < 0.301003   ...
22[BMRT][print_array:702] INFO:output data #1 shape: [1 3 40 40 85 ] < 0 0.228689 ...
23[BMRT][print_array:702] INFO:output data #2 shape: [1 3 20 20 85 ] < 1.00135    ...
24[BMRT][bmrt_test:1058] INFO:load input time(s): 0.008914
25[BMRT][bmrt_test:1059] INFO:calculate  time(s): 0.004132
26[BMRT][bmrt_test:1060] INFO:get output time(s): 0.012603
27[BMRT][bmrt_test:1061] INFO:compare    time(s): 0.006514
The following information can be obtained from the above output:
Lines 05-08 are the network input and output information of the bmodel
Line 19 is the running time on the intelligent vision deep learning processor, which takes 4009us for the intelligent vision deep learning processor and 113us for the central processing unit. The central processing unit time here mainly refers to the waiting time for the HOST side to call
Line 24 is the time to load data to the DDR of the NPU
Line 25 is equivalent to the total time of line 12
Line 26 is the output data retrieval time